A sticky sidebar WordPress widget item is a content part that remains visible to the visitors all the time. Create a sticky floating sidebar widget and display your important content part for which you want to get more clicks. Your visitors are more likely to click on most visible and attentive part of your website.
When you want to put more attention to some part of your website. For the reason to get it visible all the time or get more user clicks, you make it sticky to let users discover more useful part of your website.
In this post, I will give you the best description which allows you to easily add a sticky sidebar on activation of the plugin. You need to just click the checkbox after activation to make any widget a sticky bar.
Let’s start with the Q2W3 Fixed Widget plugin installation for a floating widget sidebar.
Install and activate sticky sidebar WordPress plugin
The plugin is free to use all the features after you install it. I am also using it to my sidebar for every blog post to boost my Email list for Email Marketing. Check the left sidebar containing the subscribe form.
Now, Go to Q2W3 Fixed Widget to download and install the sticky sidebar WordPress plugin.
If you want to use other methods or you don’t know how to install WordPress plugin, then you should learn this from my last post which is plugin installation tutorial guide.
If you want to use this plugin for sticky sidebar WordPress, then keep reading this post.
How to Make a sticky sidebar WordPress widget after plugin installation
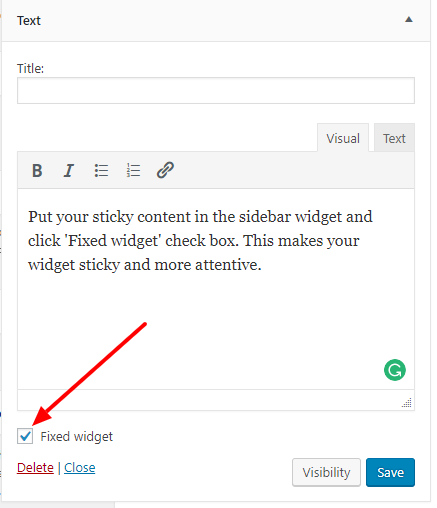
After you have installed and activated the WordPress plugin, go to Appearance>>Widgets and use any sidebar widget to drag-n-drop to your registered sidebar. Now, drag-n-drop any widget to your sidebar which you want to make it sticky.
You can see that every widget contains the new checkbox called ‘fixed widget‘. You can use this check box for many WordPress widget to make them sticky. Now, click the checkbox to make your widget, fixed and click save, to save all your settings and widgets.

After you have done with the settings, open and scroll down the page. You can check that on scrolling of the page, the fixed sidebar remains sticky to the sidebar.
Useful Settings on Sticky Sidebar WordPress Widget Plugin
If you want to make some settings changes you can do so. Go to Appearance and click ‘Fixed Widget Option‘ and check the settings. Below are the different settings you can use to make some useful changes.
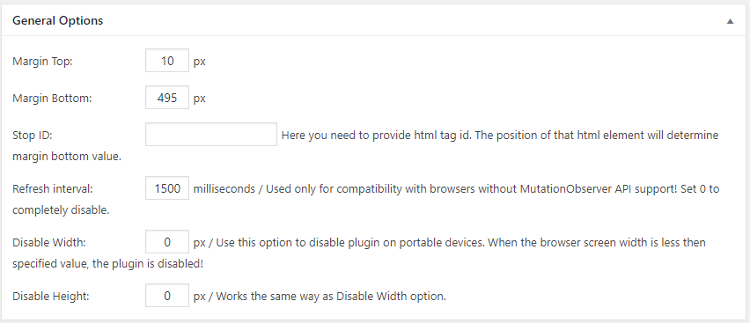
Make setting in General Options
Here, In the settings, you can set the ‘margin-top‘ and margin-bottom to set the margins of the sticky widget. These margins are helpful when your sticky widgets get overlapped with the header or the footer.

You can also the display for your desktop, phone or tablet with the disable width and height option. This makes your widget to display in the specified width and heights only. The option can be useful when you want your website to and looks good in all the screen with responsiveness.
In addition to all these, you can ‘Stop ID‘ to set margin-bottom value. This will stop the sticky widget to stop by this ID. However, I am not using this setting for stop ID to make any changes to my sticky sidebar. But you can use and check the changes the setting made to your sticky sidebar.
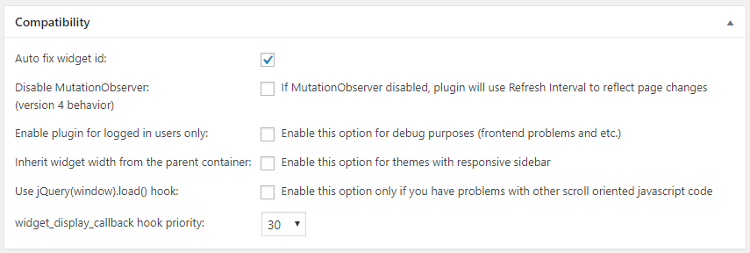
Make setting in Compatibility options
With the compatibility options, you can auto fix widget id. Enable the ‘Enable plugin for logged in users only‘ to make a sidebar visible only to the logged in users. If your visitor is not logged in, your regular users can’t see the plugin change unless they logged in.

This setting can be useful when the plugin conflict with the other scrolling plugins. It’s not necessary to enable ‘Use Jquery(window).load() hook‘ if your plugin works perfectly.
Include custom ids to make sticky custom content
If you want to set the fixed widget with your custom ids, you can use ‘Custom HTML IDs‘ option. In this text area box, you can put multiple custom ids with each one in the new line. This makes all those ids sticky and you have to set and manage those new custom ids HTML elements to look good

Uses and Benefits of sticky sidebar WordPress widget
The sticky sidebar gives you the following benefits in :
promoting ads: Add your sticky advertisement for which you want to get more clicks. Sticky ads attract and give more attention to the reader and have the ability.
Increasing email subscriber: Increase email list is the main thing every blogger should focus to increase readers. Visitors are more important part of a successful blog. If you want to have a successful blog, you need to increase your email list first. For this, a sticky sidebar with email subscription form can boost your email list.
sticky menu bar: A sticky menu bar can help visitors to switch from one page to another easily. This can increase your click-through rate and increase your website’s ranking.
Get more social likes: To get more likes, you can put your social widgets in the sticky sidebar to get more attention of visitors. This will give you more likes. You can also put sticky social sharing widget in the sticky sidebar to get more sharing of your post in the social media pages.
Conclusion
Creating a sticky sidebar is not a difficult task in WordPress. You can use any plugin, but the plugin I described here, is the most used and effective way to create a sticky sidebar in just single click.
The sticky sidebar is the oldest and still using technique by many bloggers to get more subscribers for their blog. You can use that too on your blog to get more clicks on ads, more social likes, boost your email list, etc.
Hope, you like this post. If you want some help you can email to Tutorialdeep email id [email protected].
Feel free to comment below for any query. I reply fast on my social media profiles of facebook and twitter, so you can use that too.
Which plugin are you using to make sticky sidebar WordPress widget? Let us know by commenting below.

Hello,
I am using the human theme and this plugin Q2W3 is not working for the latest version of this theme.
Do you have any solution?
P.S.: It was working fine in an older version of the same theme.