Are you looking for an easy guide to add Google Analytics in WooCommerce?
By using enhanced eCommerce tracking features of Google Analytics, you can easily track the performance of your WooCommerce store.
But, how you can enable it on Google Analytics and use on your WooCommerce store to track your performance and sales. If you are using WordPress and its WooCommerce plugin for your online store, you can easily do this without any coding knowledge.

In this post, you will learn a step-by-step process to easily add Google Analytics in WooCommerce.
Affiliate Disclosure: At Tutorialdeep, we believe in transparency for our users. In this blog, there are some referral links. If you signup with these links we will earn some commission with no extra cost to you. We recommend these links because these are our trusted brands.
How To Add Google Analytics in WooCommerce (Step-by-step)
To add Google Analytics to your online WordPress store, you have to use the Google Analytics plugins for WordPress that also provides addon to easily connect with the WooCommerce store.
MonsterInsights is the #1 Google Analytics plugin trusted by more than 2 million professionals to connect Google Analytics with your WooCommerce store. It helps you to easily connect with Google Analytics. After that, you can install its eCommerce addon to connect with WooCommerce and track your store performance. You can find more about this plugin in the Monsterinsights review post.
Follow the steps given below to add Google Analytics in WooCommerce:-
Step 1: Signup and Create Account with MonsterInsights
First of all, you need to open the MonsterInsights homepage to start creating your account.
➜ Click Here to Go to MonsterInsights Homepage
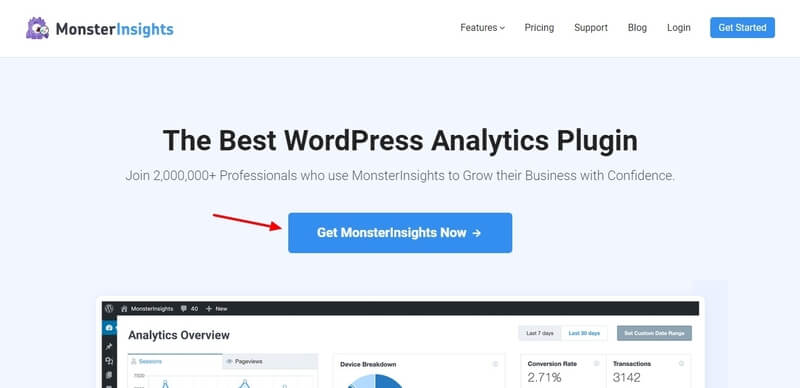
On the homepage, click the ‘Get MonsterInsights Now’ button to create an account with MonsterInsights.
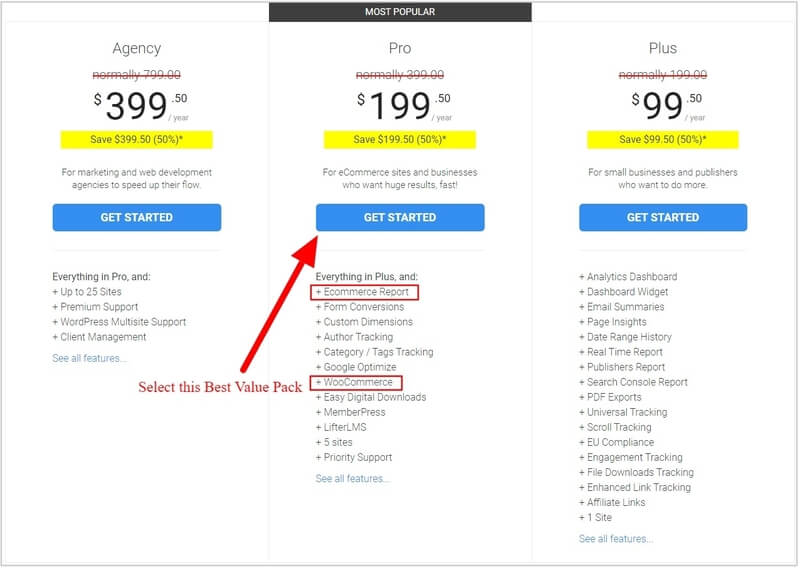
A pricing page will open where you have to select a plan for your MonsterInsights account. There are three plans of MonsterInsights and you need to choose the ‘Pro’ plan that provides eCommerce addon with all the essential features required in the best Google Analytics plugin. It can give you huge results with everything you need to easily analyze the performance to grow your online eCommerce store.
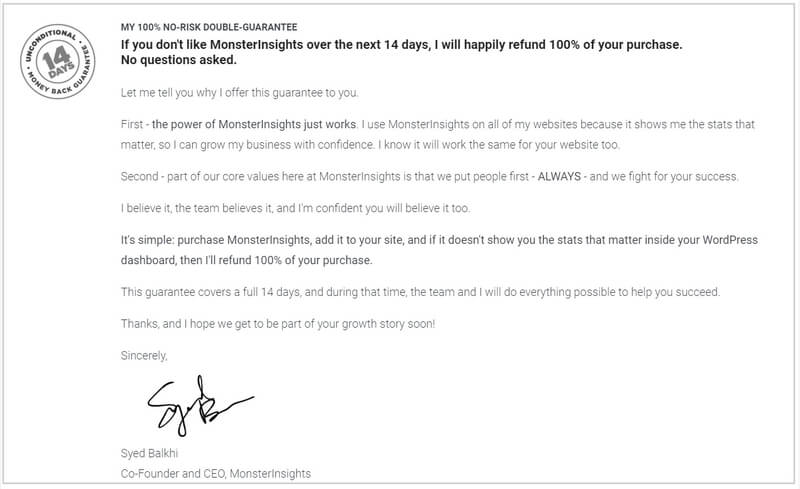
The founder of MonsterInsights is very confident about their product and its features. They also guaranteed full money back double-guarantee. If you are not satisfied with its features over the next 14-days, they will happily refund 100% of your money with no questions asked.
So, MonsterInsights premium plan comes with a satisfaction guarantee. See the image below showing the 100% no-risk double-guarantee with the sign of the founder of the plugin.
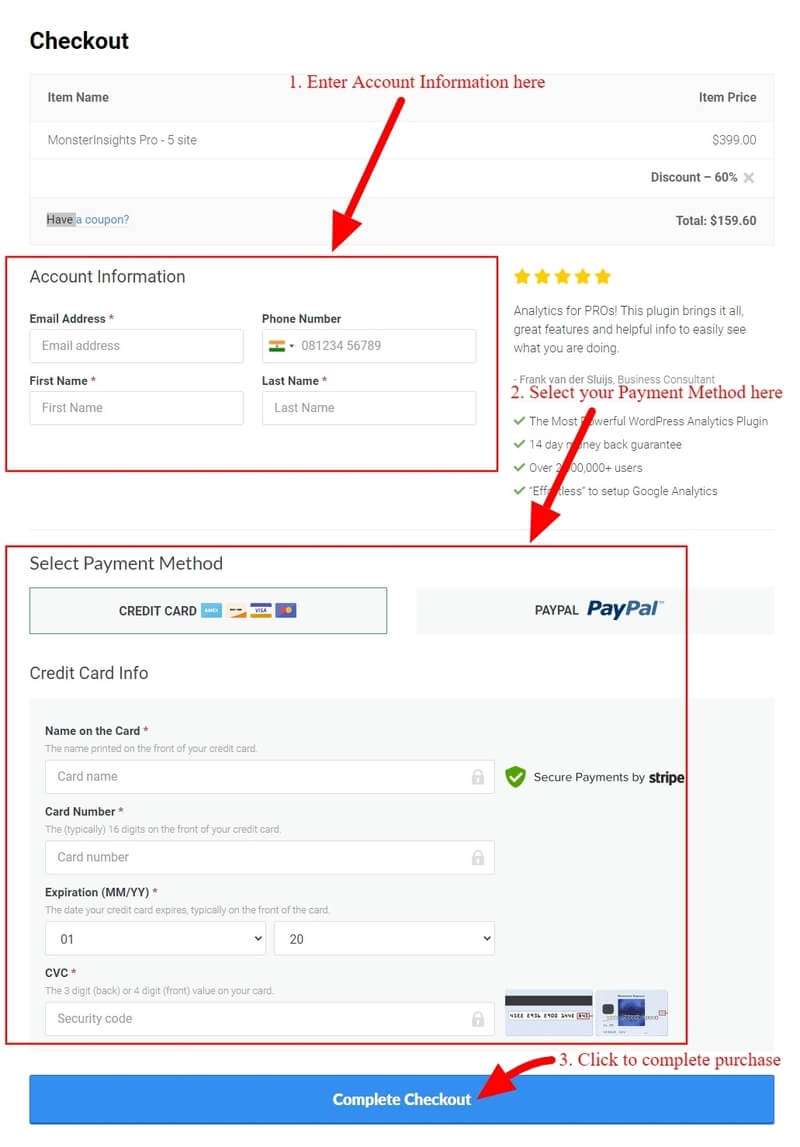
After you click on the ‘Get Started’ button given under the ‘Pro’ plan in the pricing page above. A page will open where you have to enter your account information and payment information to complete the purchase.
Enter your name, email, and phone number for the account information. Also, provide your payment details and click the ‘Complete Checkout’ button to complete the purchase of the MonsterInsights plugin.
After that, log in to your email account to click the confirm button and verify your email to complete creating your MonsterInsights account.
Step 2: Install MonsterInsights Plugin and Connect with Google Analytics
Now, you have done with creating an account with MonsterInsights. Login to your WordPress admin dashboard to start installing the MonsterInsights plugin on your website.
Go to the WordPress menu option Plugins >> Add New and search for the plugin as showing below.
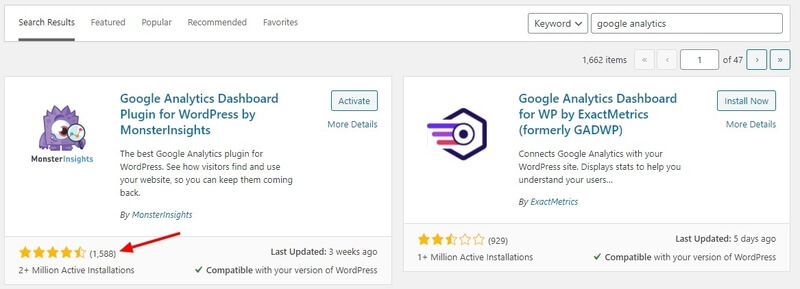
When you get the plugin, click the ‘Install Now’ button given under the MonstInsights plugin to install and activate the plugin.
After that, you need to follow the step-by-step process to connect with Google Analytics using MonsterInsights in the guide whose link is given below. After that, return to this page to read further and follow other steps.
Follow this guide to Connect with GA ➔ How to Connect with Google Analytics in WordPress
Step 3: Enter Activation Key to Activate with MonsterInsights Account
Now, you have completely installed the plugin and successfully connected your website with Google Analytics above. It’s time to enter your MonsterInsights license key to connect with your ‘MonsterInsights Pro’ account you have created above.
Login to your MonsterInsights accounts to get the license key. After you get your license key, go to WordPress dashboard menu option Insights >> Settings and click the ‘General’ tab there. Enter your license key in the input box as indicated below in the image.
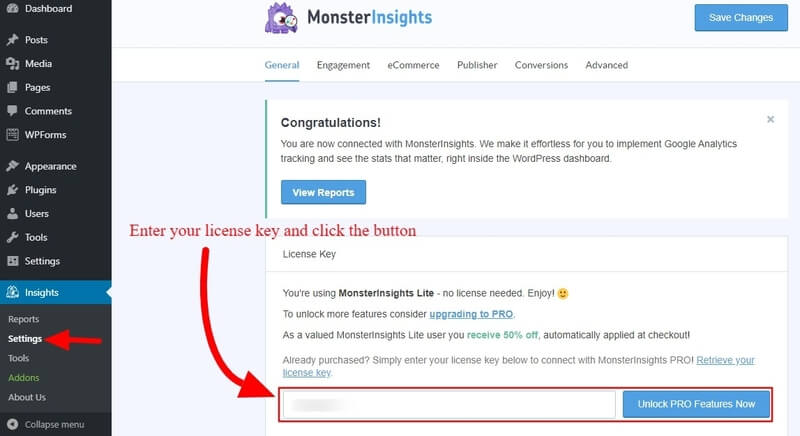
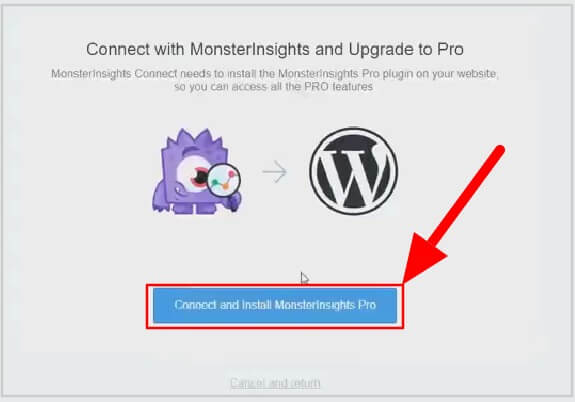
After that, click the ‘Connect and Install MonsterInsights Pro’ button to complete connecting with your MonsterInsights Pro account for premium features.
Step 4: Install and Activate MonsterInsights eCommerce Addon
After the above all process, you need to install the eCommerce addon that helps you to add with WooCommerce to track your store performance.
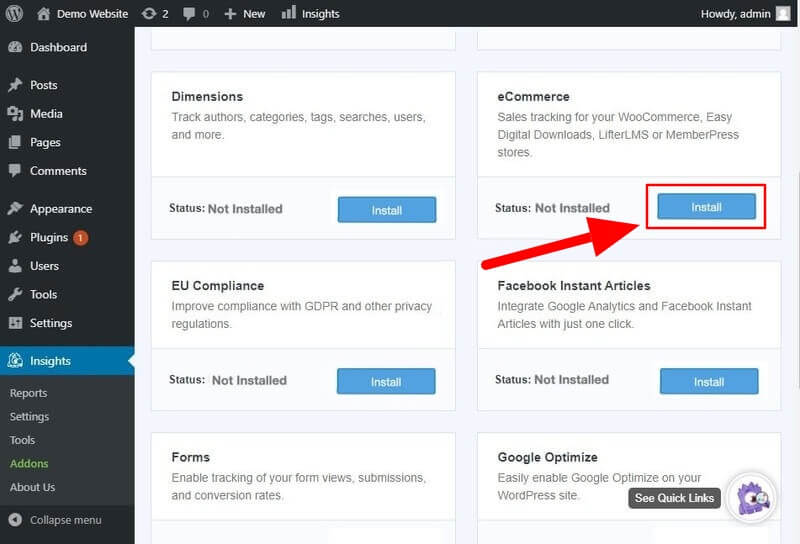
To install the eCommerce addon, go to the WordPress dashboard menu option Insights >> Addons.
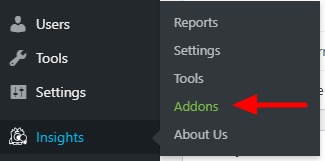
A page will open where you will get all the MonsterInsights addons. You need to scroll down to find the eCommerce addon, click the ‘Install’ button given under the eCommerce addon to install and activate it on your WordPress WooCommerce store.
Step 5: Enable Enhanced eCommerce Settings in Google Analytics
After you have done installing the eCommerce addon on your website, it will not starts tracking your WooCommerce store. It also requires to enable the ‘Enhanced the eCommerce Reporting’ in your Google Analytics account.
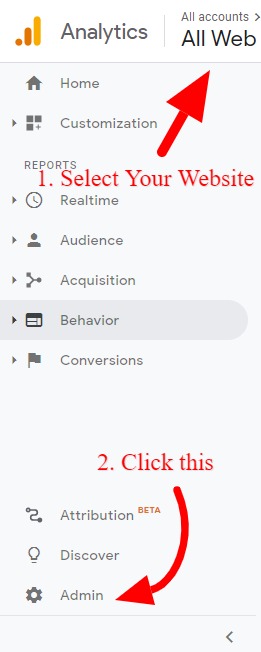
Login to your Google Analytics account and select your website. After that, click the ‘Admin’ menu option given on the left-hand side menu on your Google Analytics dashboard.
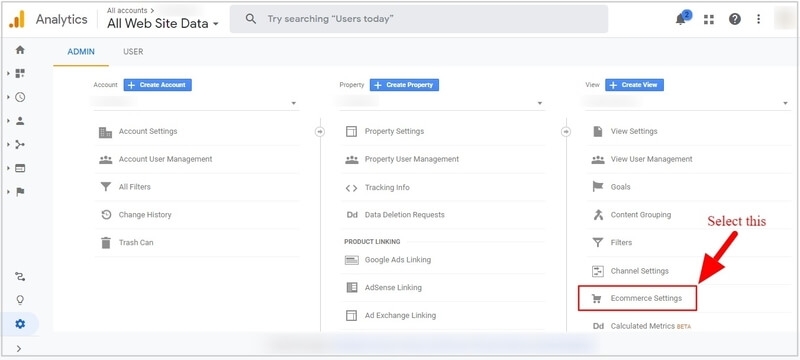
Furthermore, select the ‘Ecommerce Settings’ to enable ECommerce reporting.
Click the indicated place given in the image below to enable eCommerce and enhanced eCommerce tracking.
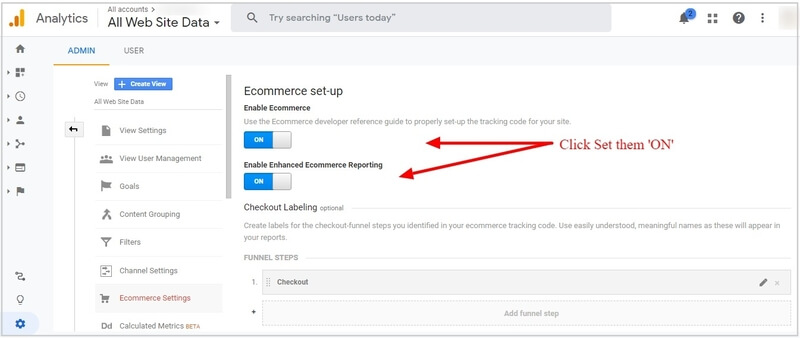
You have now completed enabling the eCommerce settings in your Google Analytics account.
Step 6: Enable Enhanced eCommerce Tracking in MonsterInsights
To start tracking the performance of your online store, you also need to enable the enhanced eCommerce tracking on your MonsterInsights settings.
Go the WordPress dashboard menu option Insights >> Settings to open the MonsterInsights settings. Here, you need to click the ‘eCommerce’ tab to get the eCommerce setting options.
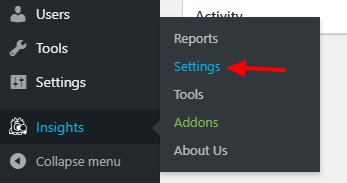
Furthermore, click the radio button given with the ‘Use Enhanced eCommerce’ to enable enhanced eCommerce tracking features on your WooCommerce website. See the image below indicated the radio button to click.
![]()
Finally, click the ‘Save’ button to save all changes you have made.
That’s all!
This is all about the process of how to add Google Analytics in WooCommerce. You can now start checking all the essential enhanced eCommerce tracking reports on your eCommerce website.
Let’s find out how you can check the enhanced tracking reports of your WooCommerce store generated by MonsterInsights.
Reports Generated by MonsterInsights for WooCommmerce Store
After you have done with all the above steps, you can start checking tracking reports of your WooCommerce store generated by MonsterInsights.
To get a tracking report, go to your WordPress dashboard menu option Insights >> Reports and click the ‘eCommerce’ tab.
Here, you will get all the tracking reports of your WooCommerce store. Below are the screenshots of tracking reports generated by MonsterInsights for the WooCommerce store.
Overview of WooCommerce Store
The overview report is the overall performance report of your WooCommerce store. You will get the conversion rate, the number of transactions, and the revenue of your eCommerce store.
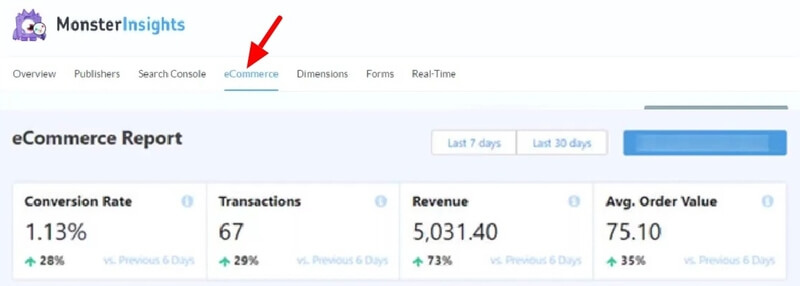
This report is helpful to get a summary of your eCommerce tracking performance.
Top Products
If you want to check top products that give you more sales, you can check the reports here. It gives the product name, the number of sales, and the revenue generated by each product.
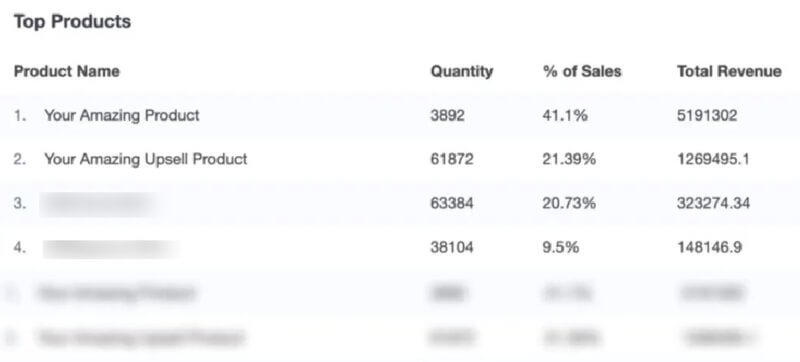
This report can be useful when you want to generate more revenue from your eCommerce store. You need to optimize the top performing product or display an offer to generate more sales and revenue.
Top Conversion Sources
The top conversion sources are the referral websites that bring more targetted traffic to your eCommerce store. You can check the top-performing websites that help you increase your revenue and sales.
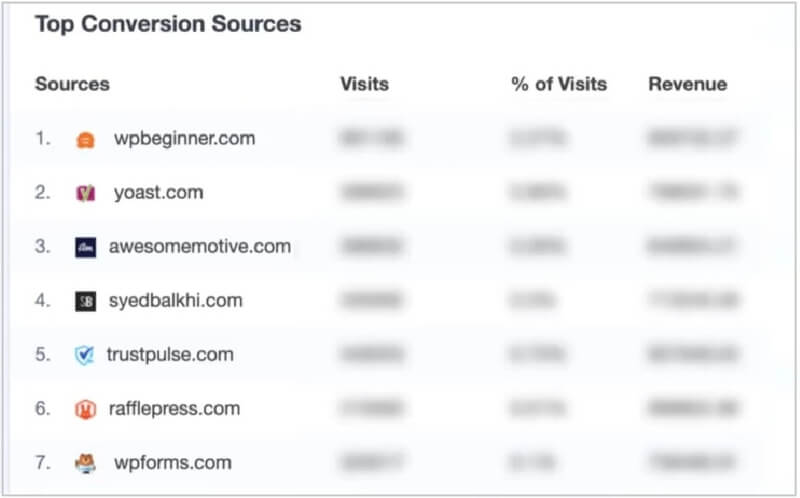
The report gives you the source URL, number of visits, and the revenue generated with the traffic from your online WooCommerce store.
Total Add/Remove to Carts and Time/Sessions to Purchase
In addition to above all, you can also check the total number of add/remove to carts products. It also gives you reports on time/sessions of purchase to track the actual time of sales.
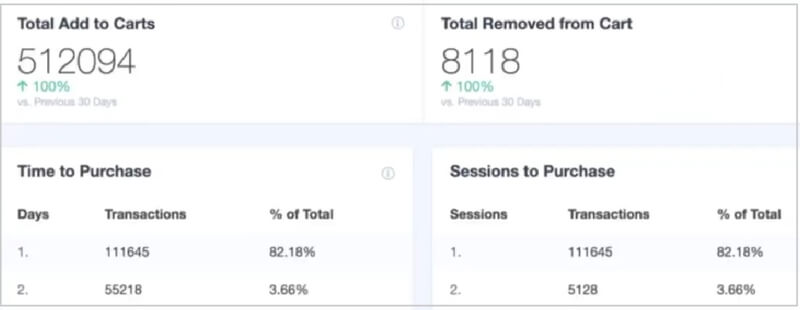
The above all reports are the enhanced eCommerce tracking reports of your WooCommerce store. These reports contain all the essential tracking reports that help you to effectively improve performance, get more conversions, and revenue.
Conclusion
MonsterInsights is the most popular and highest rated best Google Analytics plugins for WordPress that helps you to easily track your WooCommerce store.
You can get all the Google Analytics data on the WordPress dashboard, real-time stats, Enhanced eCommerce tracking, page-level analytics, affiliate links and outbound link tracking, forms tracking, Google Ads tracking, and many more at one single plugin called MonsterInsights.
In addition to above all, MonsterInsights comes with many other useful add-ons that can give you more functionality and tracking features.
➜ Click Here to Get MonsterInsights Now
You May Also Like to Read
- How to Collect Paypal Payments on WordPress Site
- Make Event Tracking with Google Analytics Easy in WordPress
- How to Boost eCommerce Sales with Sendinblue Email Plugin for Shopify
- Get Started with Mobile Exit-Intent
- How to Automate Newsletters With RSS Feed Campaigns
I hope this post helps you to easily add Google Analytics in WooCommerce store. If you have any queries regarding the tutorial given above, please comment below.
Also tell me, what other features of the MonsterInsights plugin you are using in your WordPress website? do comment below.
