Do you want to display the most popular posts on your WordPress website? Displaying popular posts on each piece of content of your website makes the content more visible to visitors.
You can display the most important content of your website to users to get more visitors to them. It can be useful for you to easily engage more visitors to your website. People are more likely to visit your website again when they find your content more useful for them.
The main goal of your website is to make visitors stay a bit longer to your website. It can significantly improve the performance of your website in search engines and help you bring more traffic.
If you are using WordPress, I recommend you to use the MonsterInsights plugin to easily display the most popular posts on your WordPress website. The plugin is also helpful to get useful insights and reports to improve performance to generate more traffic.
In this post, you will learn the step-by-step process of how to display popular posts on your WordPress website. So, let’s get started.
Affiliate Disclosure: At Tutorialdeep, we believe in transparency for our users. In this blog, there are some referral links. If you signup with these links we will earn some commission at no extra cost to you. We recommend these links because they are our trusted brands.
How to Display Popular Posts on Your WordPress Website (Step-by-step)
To add popular posts features to your WordPress website, you can use the MonsterInsights WordPress plugin. With more than 3 million users worldwide, MonsterInsights is the #1 best Google Analytics plugin to easily connect with Google Analytics. It is also the best popular posts plugin to easily display popular posts.
MonsterInsights helps you to easily connect with your Google Analytics account to easily analyze your website. You can track the performance and get reports and useful insights. After that, you can optimize your posts to generate more traffic and conversions.
Follow the step-by-step process given below to easily display the most popular posts on your WordPress website:-
Step 1: Create Your MonsterInsights Account to Display Popular Posts
First of all, open the MonsterInsights homepage to start creating an account on it. You can also use the below button to visit the MonsterInsights website homepage.
➜ Click to Visit MonsterInsights Homepage
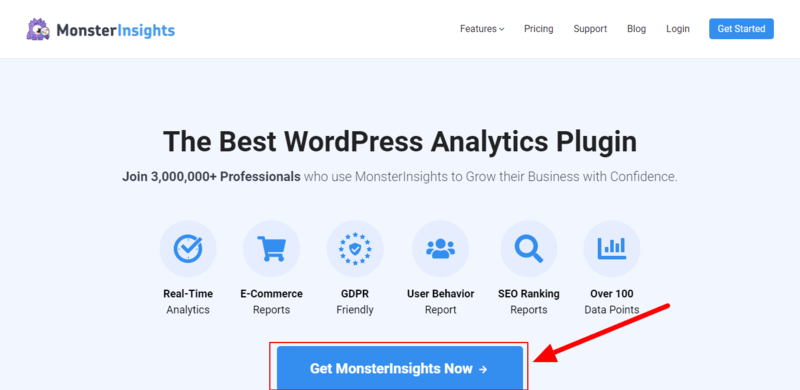
On the homepage, click the ‘Get MonsterInsights Now’ button to go to the pricing page of MonsterInsights.
On the pricing page of MonsterInsights, there are three plans available to select to create your account. Every plan of MonsterInsights comes with popular posts features with 20+ templates to create a design. The below image highlighted the ‘Popular Posts (20+ Templates)’ feature in the ‘Plus’ plan.
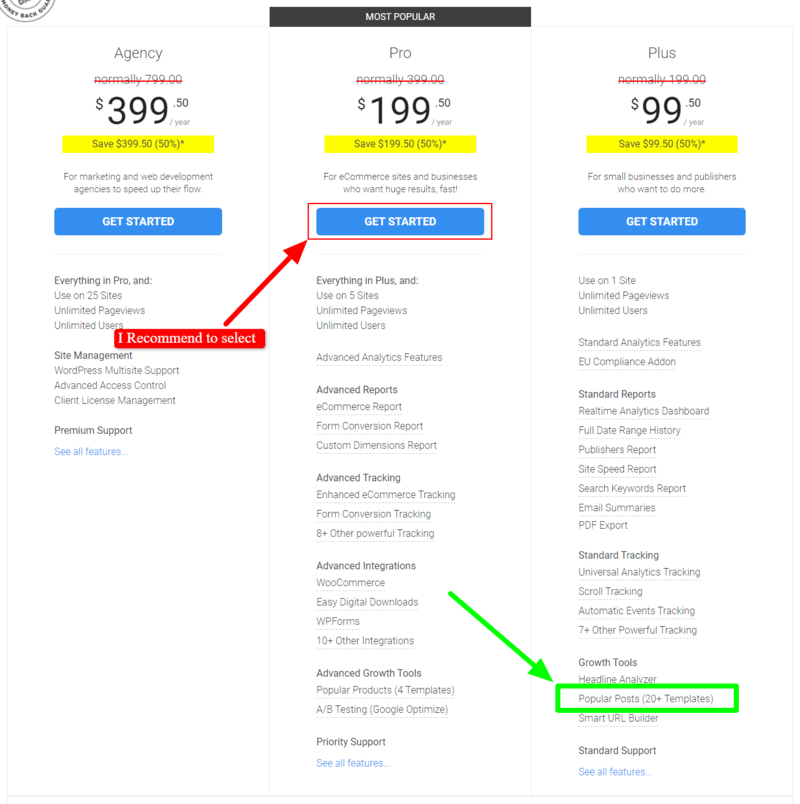
Beginners can select the ‘Plus’ plan to get all the useful features required for small businesses. For eCommerce websites and businesses, select the ‘Pro’ plan that comes with all the essential features to get huge results. If you are running a large agency, you can choose the ‘Agency’ plan that gives more advanced features.
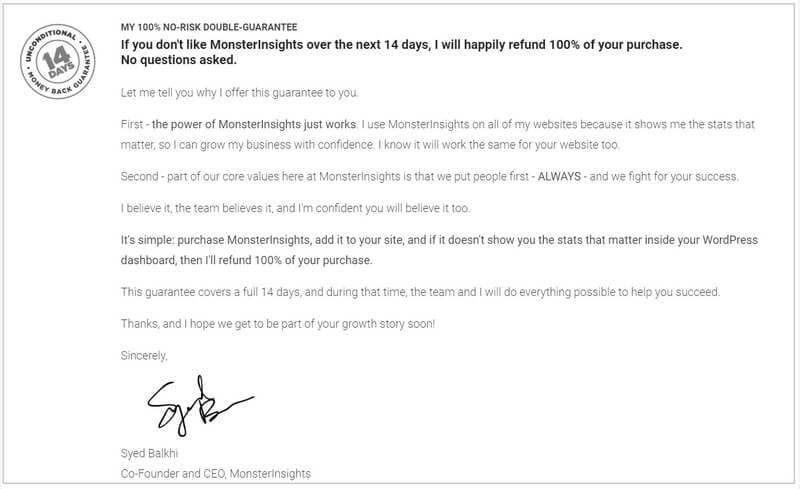
The founder of the plugin is very confident about their product and its features, If you are not satisfied with the features of the plugin over the next 14-days, they will happily refund 100% of your money with no questions asked.
So, all the premium version plans of MonsterInsights come with a full satisfaction guarantee. See the image below showing the 100% no-risk money-back double-guarantee from the founder of the plugin.
You can choose your preferred plan by clicking on the ‘Get Started’ button given under your chosen plan on the pricing page above.
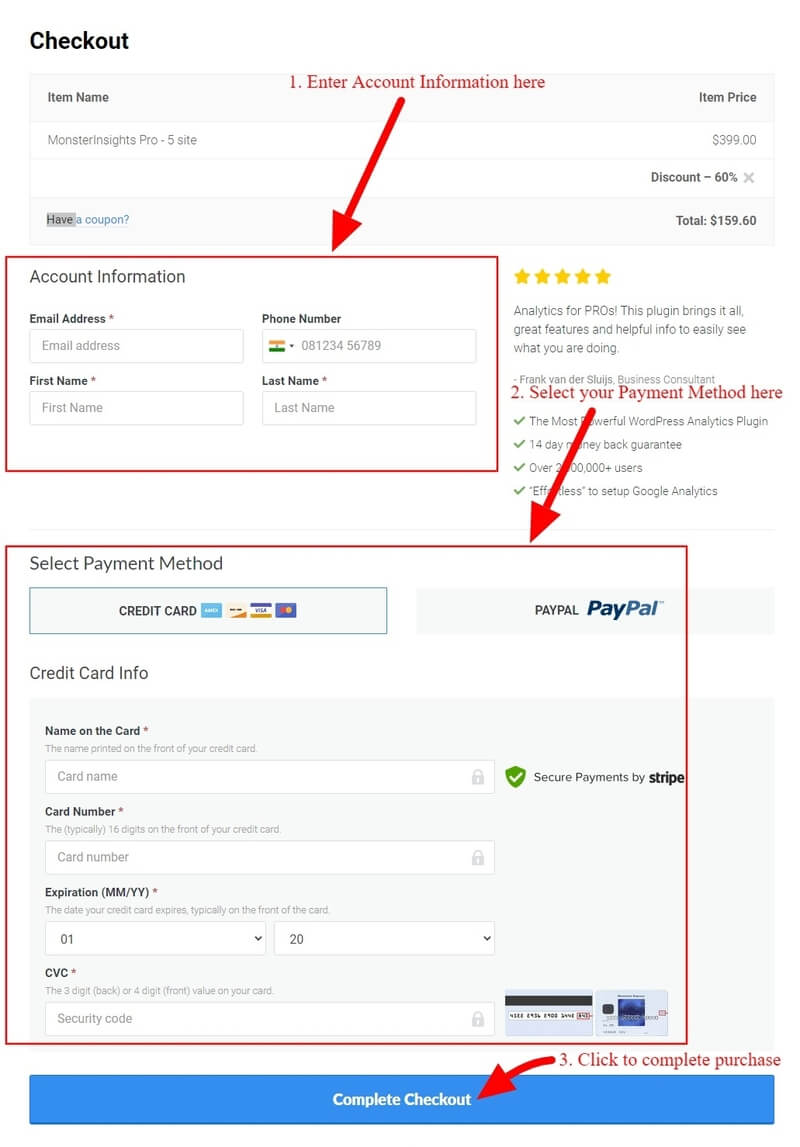
After you choose the plan, you will be taken to the checkout page where you have to fill in your account information and payment information. You will get a page where you need to provide your account information and the payment information.
Furthermore, in the ‘Account Information’ section, you have to enter your name, email, and phone number. In the ‘Select Payment Method’ select a payment method and enter details to make payment. After that, you have to click the ‘Complete Checkout’ button to complete the purchase of the plugin.
Now, log in to the email account that you have provided in the ‘Account Information’ above. In your email inbox, you will get an email from MonsterInsights that contains a verification link. You need to click that link to verify your email and confirm that it is you. This is a required process to confirm your email and complete creating your MonsterInsights account.
Step 2: Install MonsterInsights Plugin and Connect with Google Analytics
After creating an account with MonsterInsights, log in to your WordPress admin dashboard to install the MonsterInsights plugin on your WordPress website.
To install the plugin, visit your WordPress website admin dashboard menu option Plugins >> Add New. A page will open where you have to search for the plugin with the keyword ‘MonsterInsights’ as showing in the image below.
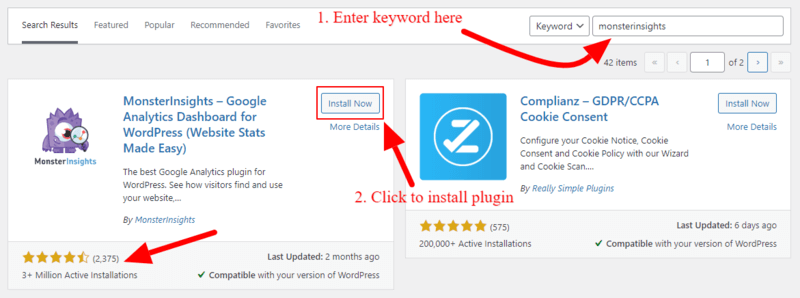
After you found the MonsterInsights plugin, you have to click the ‘Install Now’ button to install and activate the plugin on your WordPress website.
Now, you need to follow the step-by-step process given in the guide whose link is given below. The guide helps you easily connect your WordPress website with Google Analytics using the MonsterInsights plugin.
Follow this guide to Connect with GA ➔ How to Connect with Google Analytics in WordPress
After you have completed the above steps, you can return to this page again to read further steps to display popular posts on your website.
Step 3: Enter Activation Key to Activate with MonsterInsights Account
As you have successfully completed installing the plugin and connected your WordPress website with Google Analytics. You need to enter your ‘MonsterInsights Pro’ account license key in the MonsterInsights plugin on your WordPress website. This is required to connect with the MonsterInsights website to start using its ‘Pro’ features on your website.
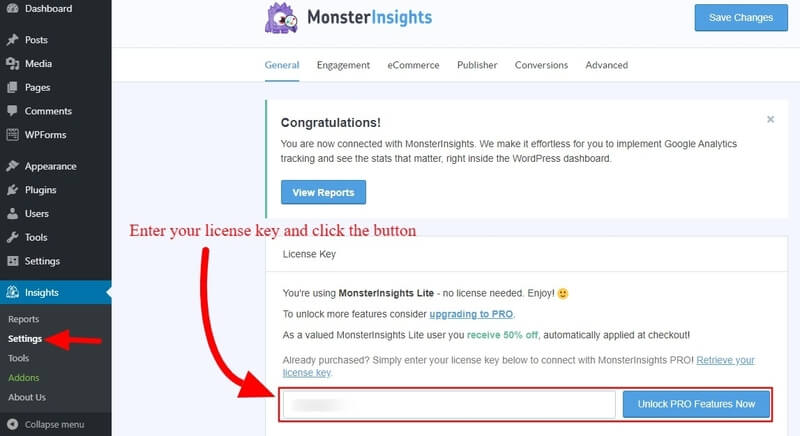
Login to your MonsterInsights accounts to get the key. After that, go to your WordPress website dashboard menu option Insights >> Settings. You will get the MonsterInsights settings page where you have to click the ‘General’ tab.
You will get the input box under the ‘License Key’ section as indicated in the image below. In this input box, you need to enter the license key of your MonsterInsights ‘Pro’ account. After you enter the key, click the ‘Unlock Pro Features Now’ button to unlock the ‘Pro’ features on your website.
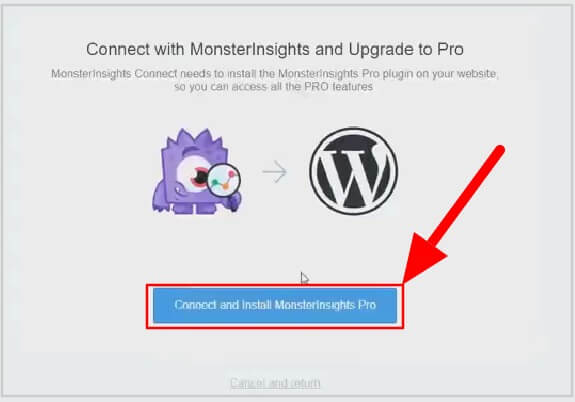
After that, you will get a popup that displays you are going to connect your WordPress website with MonsterInsights ‘Pro’ account. Here, in this popup, click the ‘Connect and Install MonsterInsights Pro’ button to complete connecting your account to get its premium features and benefits.
Step 4: Choose Theme to Display Popular Posts
Now, you have completed connecting your WordPress website with your MonsterInsights ‘Pro’ account. You can start creating popular posts for your website.
Firstly, to create beautiful-looking popular posts widgets, you need to select a theme for it. MonsterInsights comes with 20+ beautiful designed responsive themes for popular posts.
Go to WordPress dashboard menu option Insights >> Popular Posts. The below image shows the menu option that you have to select.
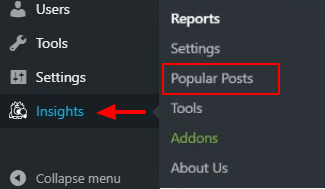
You will get a page where there are three popular posts options like ‘Inline Popular Posts’, ‘Popular Post Widget’, and ‘Popular Products’. Choose your choice to start creating popular posts.
After that, select a theme from the list of themes as given in the image below.
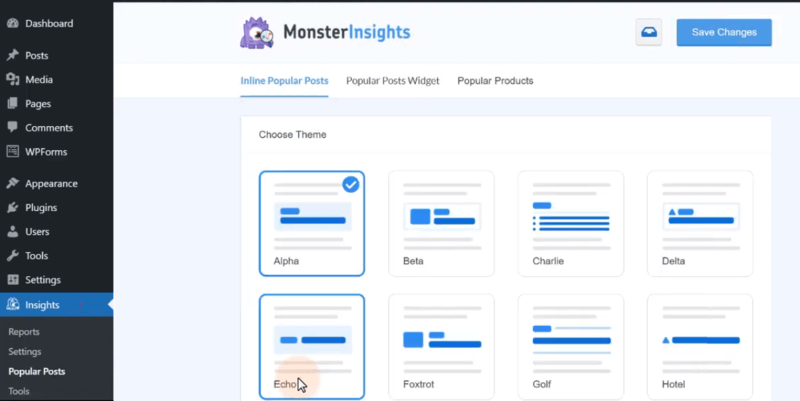
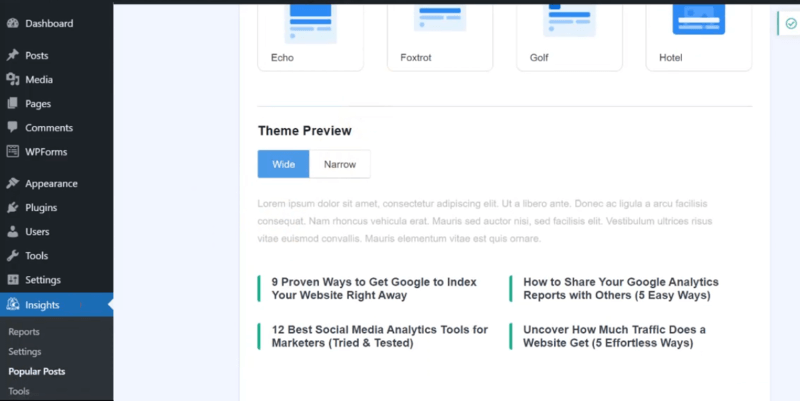
When you click the themes above, you will get the preview of the theme as showing in the image below. Click each theme one by one to choose the best theme you like the most.
Step 5: Customize Your Popular Posts
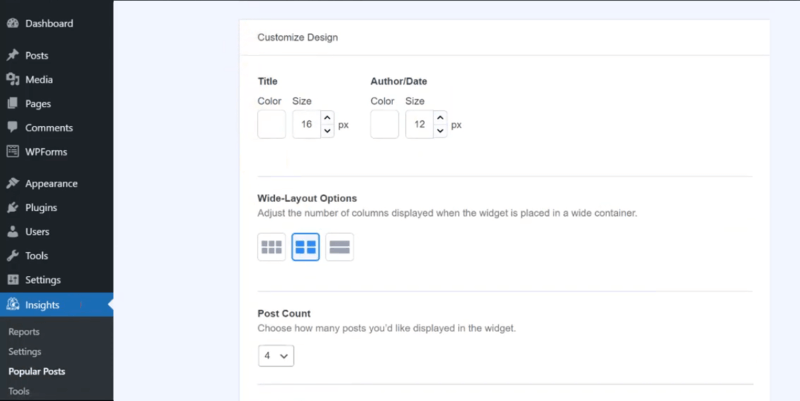
Secondly, after selecting your preferred theme, you can customize the look of the theme. There are many customization options that you can perform with the theme like color, size, layout, post count, and others.
Set each customization option as per your requirements to display the popular posts.
Step 6: Embed Popular Posts to Display on Posts and Pages
Once you have done with all the above setup, you can start embedding your popular posts to your website posts and pages.
Firstly, click the ‘Save Changes’ button to save all the setup you have done above.

After that, you have to choose from the different given display options.
There are four options that you can choose to display the popular posts like Automatic Placement, Display Using Gutenberg Blocks, Display Using Shortcode, and Display in Sidebar. You need to choose your preferred option and set it up accordingly to display your popular posts.
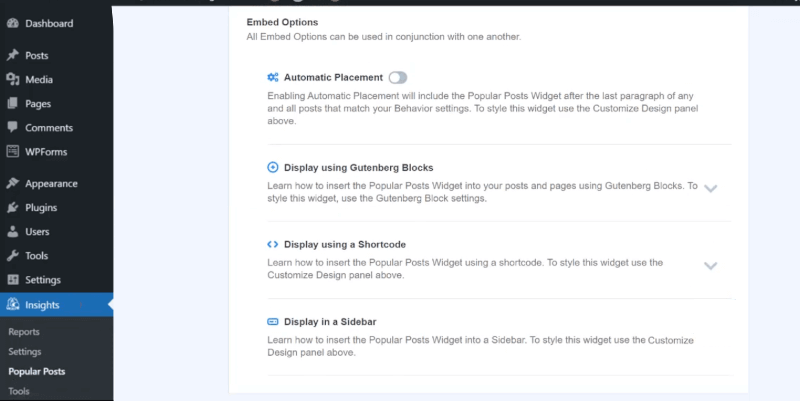
When you have done with the placement, you can check your WordPress website posts and pages to see the popular posts.
That’s all!
Conclusion: Display Popular Posts
MonsterInsights is the best solution for every WordPress user to easily install and display popular posts. It comes with tons of useful features to easily connect with your Google Analytics account to track and analyze your website performance.
After getting all the tracking reports, you can easily optimize your WordPress website to generate more traffic and get more conversion and sales easily.
➜ Download MonsterInsights Plugin Now
You may also like to read:
- MonsterInsights Review
- Make Event Tracking with Google Analytics Easy in WordPress
- Easy How To Add Google Analytics in WooCommerce
- How To Track Enhanced eCommerce in Restricted Content Pro and GiveWP
- Easy How To: Global Site Tag Support for WordPress
- Easy How To: Lead Source Tracking in Google Analytics
- How To Improve Core Web Vitals with Speed Reports
- How To Track File Downloads in Google Analytics
I hope you like this post on How to Display Popular Posts on Your WordPress Website. If you have any queries regarding the tutorial, please comment below.
Also tell me, what other features MonsterInsights you are using on your website, do commenting below.
