Do you want to get lead source tracking reports in Google Analytics?
To know your audience and generate more leads and conversions, you need to identify the source or channels through which visitors reach your website.
Traffic to your website gives you leads, conversions, and sales. By getting the source of traffic, you can easily optimize your website content to get more leads and conversions.
![]()
If you are using WordPress, I recommend the MonsterInsights plugin that makes it easier to get lead source tracking reports and useful insights.
Affiliate Disclosure: At Tutorialdeep, we believe in transparency for our users. In this blog, there are some referral links. If you signup with these links we will earn some commission at no extra cost to you. We recommend these links because these are our trusted brands.
In this post, you will learn an easy how-to guide to get lead source tracking reports in Google Analytics. Follow the step-by-step process given below to add the lead source tracking features to your WordPress website.
What is Lead Source Tracking
Lead source tracking is the process of getting channels from where you get the leads from your website. It also documents the actions and the behavior users perform on your website.
It helps you find out which marketing channel gives you more quality leads that generate more sales for your business. By tracking the lead source channel, you can easily find the most profitable channel. After that, you can optimize your content accordingly.
When you have a proper idea of the nature of leads you are generating from your website forms. There can be more chances of converting them into your loyal customers for your online business.
Reasons Behind Tracking Lead Source
There are many reasons behind tracking lead sources and a few top of them are given below:
- Identify Channels that give More Traffic: Channels are the different sources of traffic for your website. By identifying which channel gives you more traffic, you can focus more on it to get more valuable traffic for your blog or website.
- Measure the Value of Your Marketing Campaign: You can track the campaigns that give you more traffic and conversions. After that, you can create similar campaigns to run on your website for more sales.
- Track Your Leads and Conversions: You can track which channel gives you traffic that can easily be converted into sales. It gives you the pages that give you more conversions. You can find the interest of people to create similar products when running an eCommerce website.
- Know your Audience: Lead source tracking helps you easily know your audience. It helps you to grow your business more and get more customers to increase revenue.
- Get More Content Ideas: It gives reports on keywords and the pages that work great on your website. You can easily get the keyword opportunities to create more content on it. This helps you generate more traffic for your website.
- Optimize Content for more Leads: After getting useful reports and insights, you can optimize your content to increase performance and conversions.
Let’s find out the step-by-step process of lead source tracking in the below section.
How to Track Lead Source in Google Analytics Using MonsterInsights
Google Analytics overwhelm many users to check analytics reports about the user’s interaction and behavior to your website. However, you need to be an analytics expert, and it’s difficult for beginners to check lead source tracking reports on it. Google Analytics provides a difficult and complex structure and interfaces to check lead source tracking reports.
If you are using WordPress, I recommend MonsterInsights as an easier solution to overcome this problem. It helps you quickly check lead source tracking reports directly from your WordPress website. You can easily check analytics reports with just a single button click on your WordPress dashboard. In addition to this, you can also assign user roles and permissions to control who can see the tracking reports on your website.
It is the #1 best Google Analytics plugin trusted by more than 3 million professionals to connect Google Analytics and start analyzing traffic stats on WordPress. It helps you to easily connect your WordPress website with Google Analytics. After that, you can easily track the lead source and the performance of your different traffic channels. You can find more about this plugin in the Monsterinsights review post.
Follow the steps given below to add Google Analytics to your WordPress website and start getting lead source tracking reports on your WordPress website.:-
Step 1: Signup and Create an Account with MonsterInsights
First of all, visit the MonsterInsights homepage to start creating an account there.
➜ Click Here to Go to MonsterInsights Homepage
On the homepage, you have to click the ‘Get MonsterInsights Now’ button to create your account with MonsterInsights.

A pricing page will open and you will get three plans of MonsterInsights. I recommend the ‘MonterInsights PRO’ plan to get lead source tracking reports and other essential features to analyze your performance.
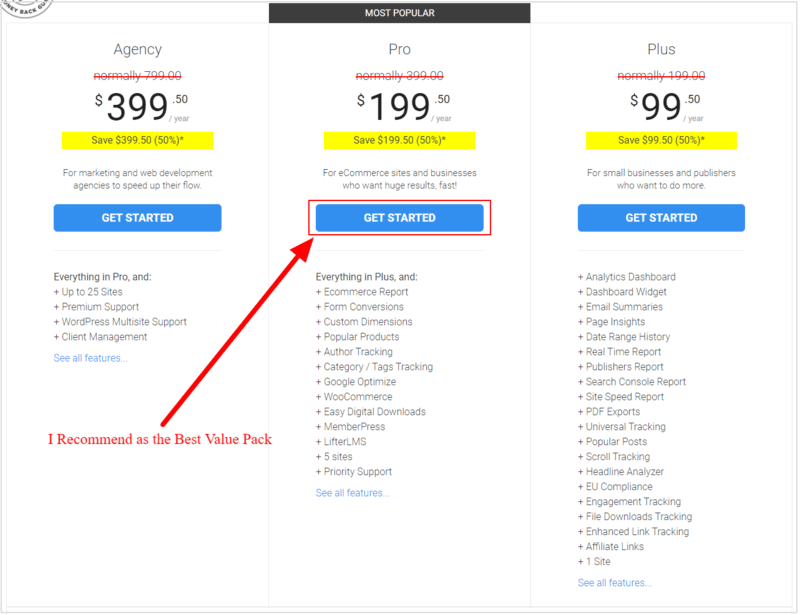
The founder of the MonsterInsights plugin is very confident about their product and its features. They also give you a full money-back double-guarantee. If you think you are not satisfied with the features and functionality over the next 14-days, they will happily refund 100% of your money with no questions asked.
So, the MonsterInsights plugin comes with full satisfaction and a 100% no-risk double-guarantee of the plugin.

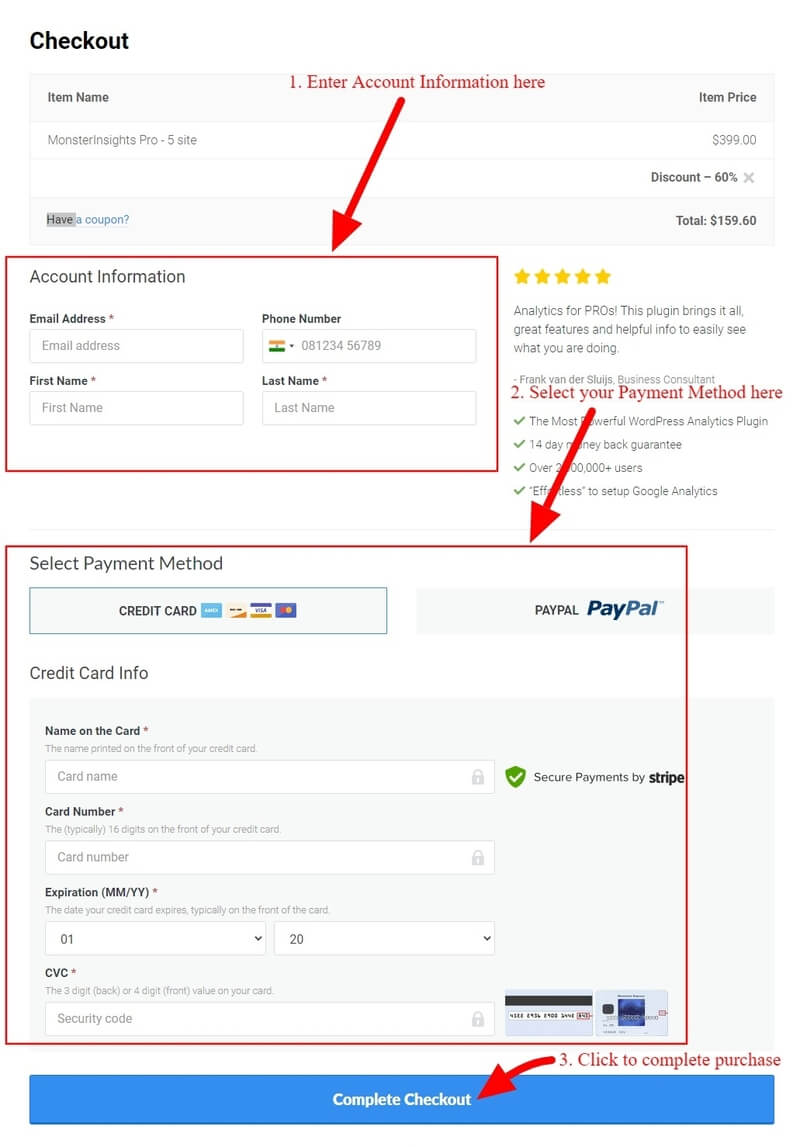
Now, when you click the ‘Get Started’ button given under your selected plan in the pricing page of MonsterInsights above. You will get a checkout page to complete the purchase of the plugin.
On the checkout page, you have to provide your account information and a payment method to complete the plugin purchase.
Enter your name, email, and phone number for the account information. Also, select a payment method and click the ‘Complete Checkout’ button to make payment and complete the purchase of the plugin.
After that, you have to log in to your email id account that you have provided above in the account information. In your email id inbox, you will get an email that contains the verification link. You have to click the verification link for email id confirmation and confirms that this is you.
Step 2: Install MonsterInsights Plugin and Connect with Google Analytics
When you have done creating an account with MonsterInsights, you have to install the MonsterInsights plugin on your WordPress website. This helps you to connect your website with Google Analytics using the MonsterInsights plugin.
To install the plugin, login to your WordPress admin dashboard and visit the WordPress dashboard menu option Plugins >> Add New. Here, you have to search for the MonsterInsights plugin as showing in the image below.
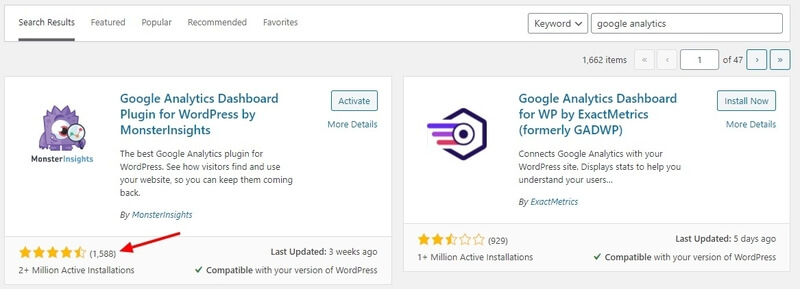
After you get the plugin, click the ‘Install Now’ button given under the plugin to install and activate the plugin on your WordPress website.
Furthermore, you need to follow the step-by-step process given in the guide whose link is given below. The guide helps you to connect your WordPress website with Google Analytics. After that, you have to return to this page to follow other steps given here below.
Follow this guide to Connect with GA ➔ How to Connect with Google Analytics in WordPress
After you have done connecting your WordPress website with Google Analytics, you can move further to follow the steps given below.
Step 3: Enter Activation Key to Activate with MonsterInsights Account
When you have completed installing the MonterInsights plugin and connect your WordPress website with Google Analytics above. It’s time to enter the license key of your MonsterInsights Pro account created above to connect.
Login to your MonsterInsights accounts to get and copy the license key. After that, go to the WordPress dashboard and visit the menu option Insights >> Settings. On the settings page, you have to click the ‘General’ tab option there. In the general tab, you need to enter your MonsterInsights account license key in the input box as showing in the image below.
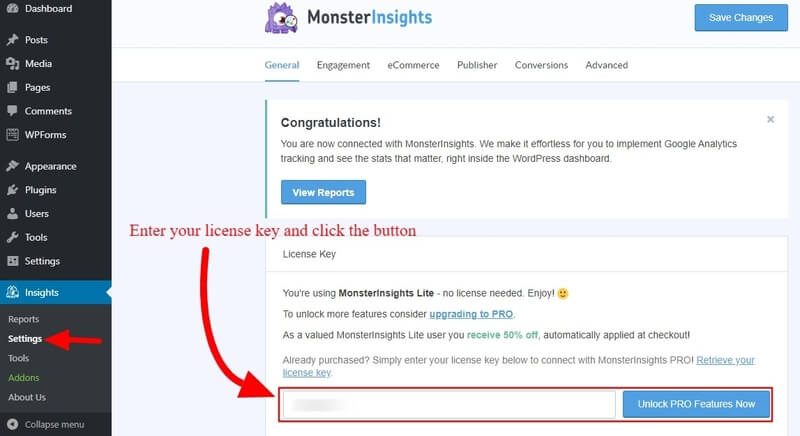
After entering the key, click the ‘Connect and Install MonsterInsights Pro’ button. This will complete connecting your WordPress website with your MonsterInsights Pro account.
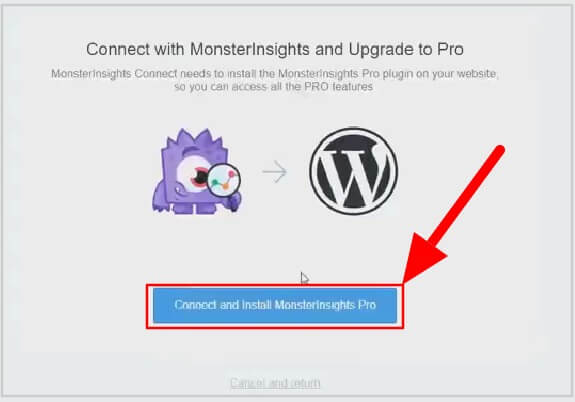
You can now start using the premium analytics features of MonsterInsights on your WordPress website. But, before this, you need to enable the reports on your WordPress website.
Step 4: Enable Reports in MonsterInsights Settings
After you have done the above steps, you can enable the analytics reports on your WordPress website. There are many analytics reports that are helpful to get lead source tracking and other useful reports.
To enable reports, you have to open the WordPress dashboard menu option Insights >> Settings.
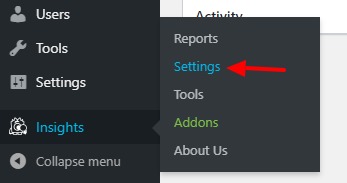
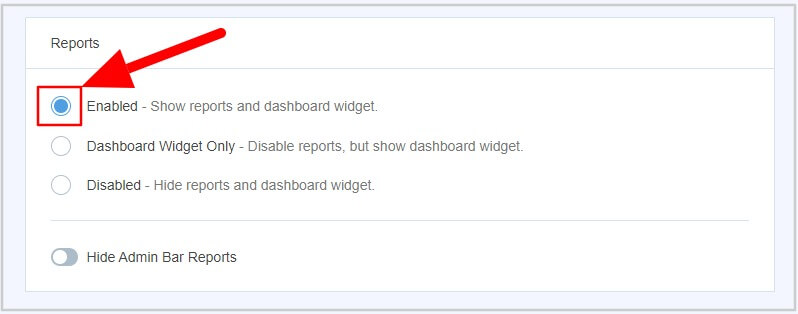
Here, you have to scroll down the page to get the ‘Reports’ section as showing below. Click the ‘Enable’ option that enables the reports and WordPress dashboard widgets on your WordPress website.
Step 5: Check Analytics Reports on WordPress
Now, let’s check analytics and traffic reports that are helpful to easily find out the lead source on your WordPress website. Open your WordPress dashboard and visit the menu option Insights >> Reports.
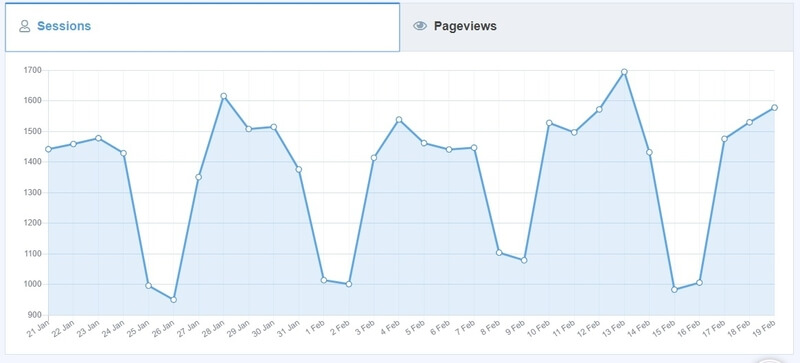
Overview Reports
It will display a graph section that contains the Pageviews and session reports. The report is useful when you want to know the daily page views of your website as given below.
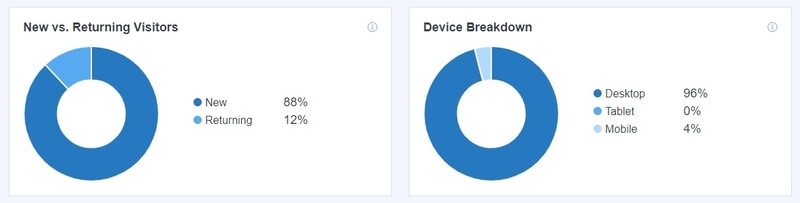
After that report section, the next section displays the New VS Returning and Device Breakdown reports as given below.
The left-hand side contains the New VS Returning visitors. The right-hand side contains the Device Breakdown reports. It is useful when you want to know the popularity of your website according to various devices.
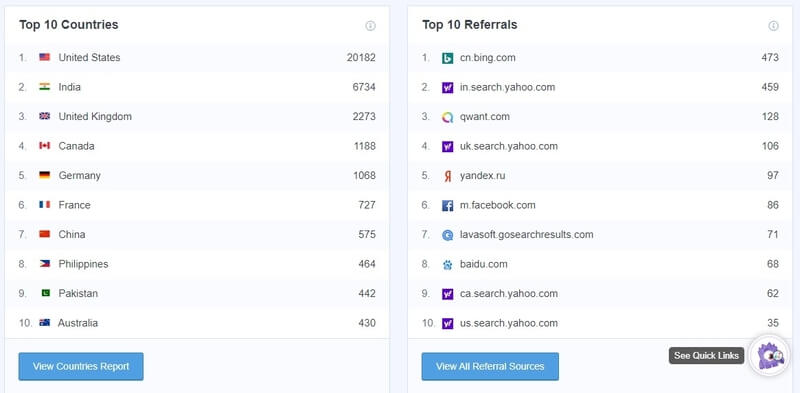
You will also get the Country wise and Referral reports. It is useful to know the top 10 country-wise popularity and the channels from where traffic coming to your website. The referral traffic can be the traffic from search engines, social media websites, and other backlink websites.
Search Console Reports
The search console reports are useful to get the search terms that hit your website in search engines. You can check the reports and find more keyword opportunities to create more content that brings traffic.
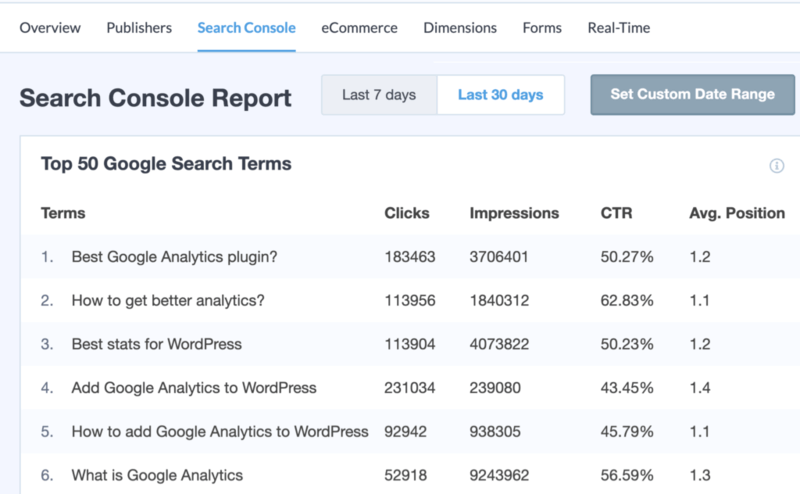
You can customize the reports according to your requirements. The ‘Set Custom Data Range’ button is useful to get the data according to the time period you have selected.
Ecommerce Store Reports
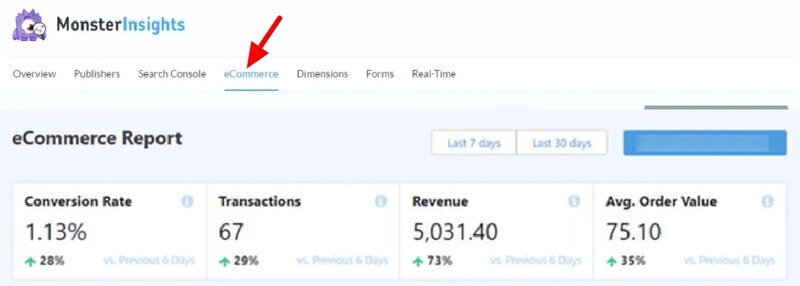
If you are running an eCommerce store, you can get all the tracking reports of your WooCommerce store. Below are the screenshots of tracking reports generated by MonsterInsights for the WooCommerce store.
To get an eCommerce tracking report, you have to click the ‘eCommerce’ tab as indicated in the image below. It gives you an overall performance report of your WooCommerce stores like conversion rate, the number of transactions, and the revenue of your eCommerce store.
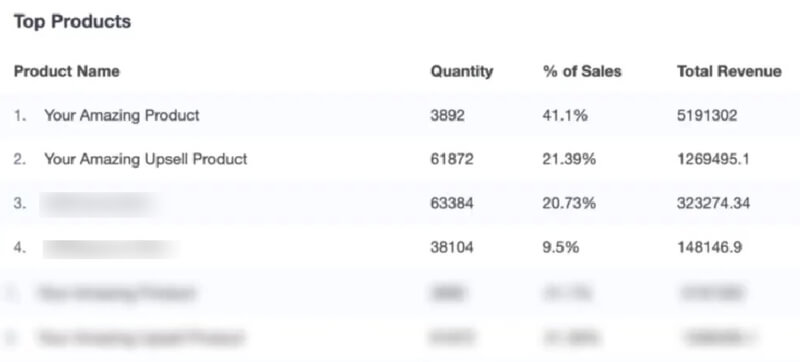
You will get a summary of your eCommerce tracking performance. It helps you check the top products brings you more sales with product name, the number of sales, and the revenue generated by each product. After that, you can create similar products to get more sales and increase revenue.
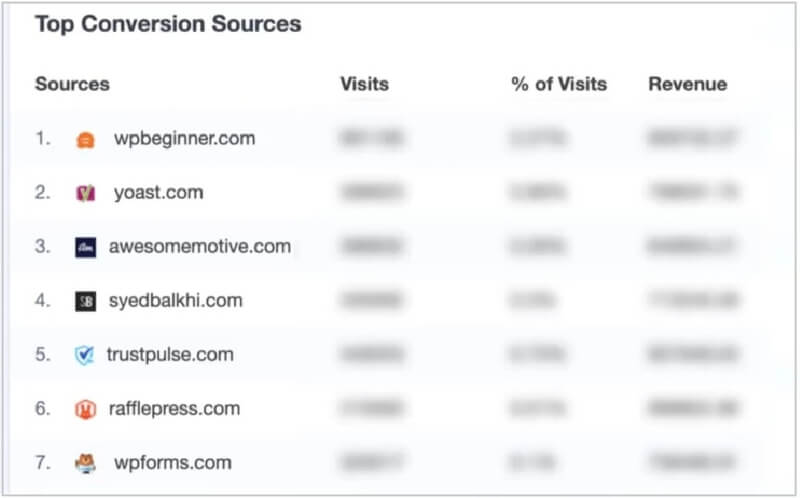
The top conversion sources are the referral websites that give you traffic to your eCommerce store that converts. You can check the top-performing channels that help you increase your sales.
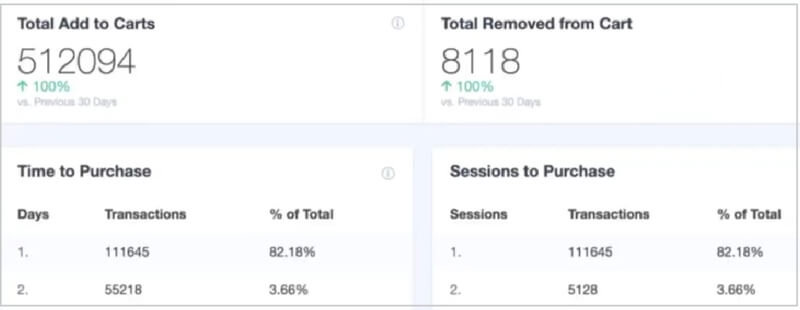
You can also check the total number of products added or removed to carts. It also gives reports on time/sessions of purchase to get the actual time of sales.
All the above reports are the enhanced eCommerce tracking reports of your WooCommerce store. These reports provide all the essential tracking reports to effectively improve performance, get more conversions, and revenue.
Follow this guide for eCommerce Reports ➔ Easy How To Add Google Analytics in WooCommerce
File Downloads Tracking
You will get the file download tracking reports as showing in the image below. The below image shows the file labels and the number of clicks you will get for the download of the files.
![]()
After getting the reports, you can easily find out which download gives you more leads. You can create more similar downloads to get more leads and conversions from your website.
Follow this guide for File Download Tracking Reports ➔ Easy How To: Track File Downloads in Google Analytics
Form Conversion Tracking
To get the form conversion tracking reports, you have to click the ‘Forms’ tab given in the reports page. The image given below shows the Form Name or ID, Impressions, Conversions, and Conversion Rate. You can customize the reports according to your needs by clicking on the ‘Set Custom Data Range’ button.
![]()
The above images show the source or medium of form conversion. It is useful to identify which form gives you more leads and conversions. After getting the report, you can optimize the content of your website to increase the performance of your website.
Follow this guide for Form Conversion Tracking Reports ➔ Easy How To: Form Conversion Tracking in Google Analytics
Getting Lead Source Tracking Reports in Google Analytics
If you want to check lead source tracking reports in Google Analytics, you have to log in to your Google Analytics account.
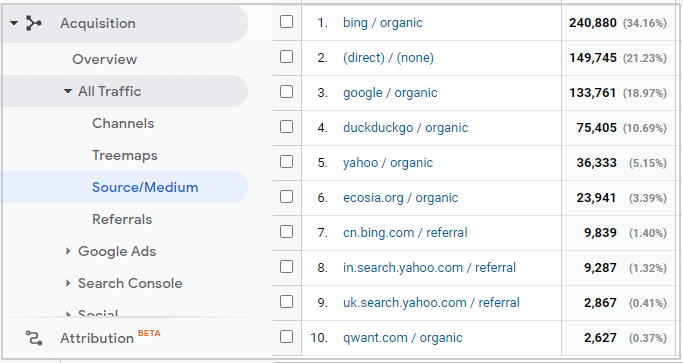
On the Google Analytics dashboard, you have to open the menu option Acquisition >> All Traffic >> Channels. Here, you will get the traffic channels that bring traffic to your website.
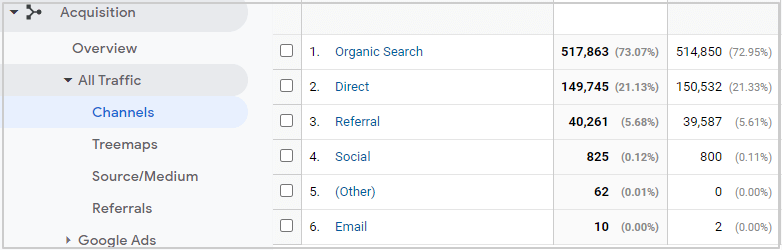
You can find the source/medium of traffic coming to your website. The below image shows the different sources and the number of traffic from these sources.
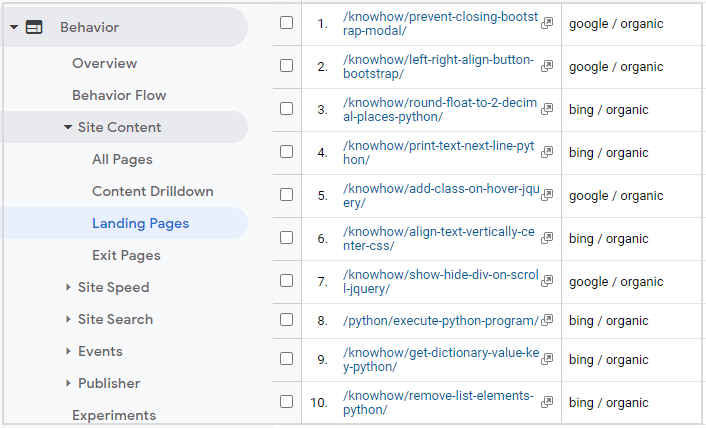
In addition to this, you can also check the landing pages where people visit your website. To check the pages, visit the Google Analytics menu option Behavior >> Site Content >> Landing Pages.
Here, you have to click the ‘Secondary dimension’ and select the option Source/Medium as given in the image below.

You will get the landing page with the number of traffic and the source/medium that brings the traffic to your website. The below image shows the links of the pages and the source or medium of traffic.
That’s all about lead source tracking reports on the WordPress website.
I hope you like this post on how to track lead sources on your WordPress website. If you have any queries regarding the tutorial, please comment below.
Also tell me, what other features you are using for MonsterInsights. Do comment below.