Do you want to collect payments online with an easy and secure Authorize.net payment collection form on your WordPress website?
If you want to sell products online on your WordPress website, you can easily create an order form and integrate it with Authorize.net using WPForms. It is the best solution for eCommerce websites to collect payments, donations, and orders online.
![Easy And Secure Authorize.net Form Solution [WPForms]](https://tutorialdeep.com/wp-content/uploads/2021/06/authorize-net-payment-wpforms.png)
In this post, you will get the step-by-step process to create an easy and secure Authorize.net form on your WordPress website. So, let’s get started.
Affiliate Disclosure: At Tutorialdeep, we believe in transparency for our users. In this blog, there are some referral links. If you signup with these links we will earn some commission at no extra cost to you. We recommend these links because they are our trusted brands.
How to Easily Create Secure Authorize.net Form Using WPForms (Step-by-step Guide)
Here is the step-by-step process to create a secure Authorize.net form for your WordPress website:-
Step 1: Signup and Create WPForms Account
First of all, go to the WPForms homepage to create your account there. You can also use the below link to open WPForm’s homepage.
➜ Click Here to Open WPForms Homepage
On the homepage, you have to click the button ‘Get WPForms’ that is given at the top right corner of the homepage.
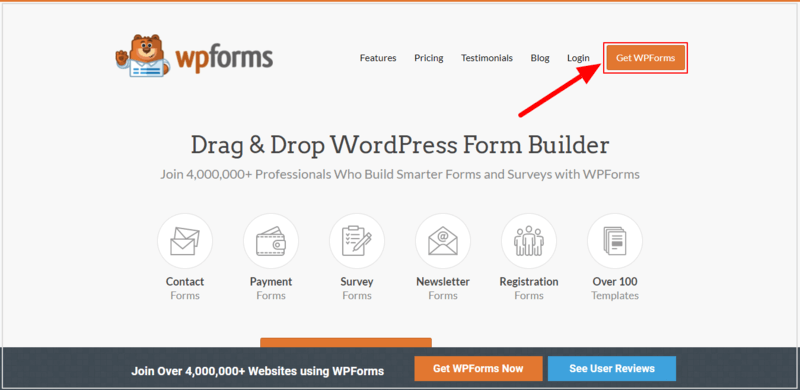
After you click the button, you will be taken to the pricing page of WPForms. There are 4 different plans available there to select for your WPForms account.
To start creating a secure Authorize.net form, you need to select the ‘WPForms Elite’ plan. The below image shows that the ‘Elite’ comes with ‘+Authorize.net’ payment solutions. Click the ‘GET STARTED’ button given under the ‘Elite’ plan indicated below.
![wpforms-pricing Easy And Secure Authorize.net Form Solution [WPForms]](https://tutorialdeep.com/images/blog/authorize-net-wpforms/wpforms-pricing.png)
Also, all plans of WPForms come with a full satisfaction guarantee to buy with confidence. The founder of the plugin guaranteed a 100% no-risk full money-back double-guarantee. If you find any problem and not satisfied with the plugin, they will happily refund the full money without asking questions.
See the below image that shows ‘100% No-Risk Money Back Guarantee!’ with the founder’s signature.

After you have selected the plan above, it will take you to the checkout page where you have to fill in your account information and payment method.
Enter you email, name, phone number, and password in the ‘Account Information section. Also, select your preferred payment method in the ‘Select Payment Method’ section. After that, you have to click the ‘Complete Checkout’ button to complete the purchase of the plugin.
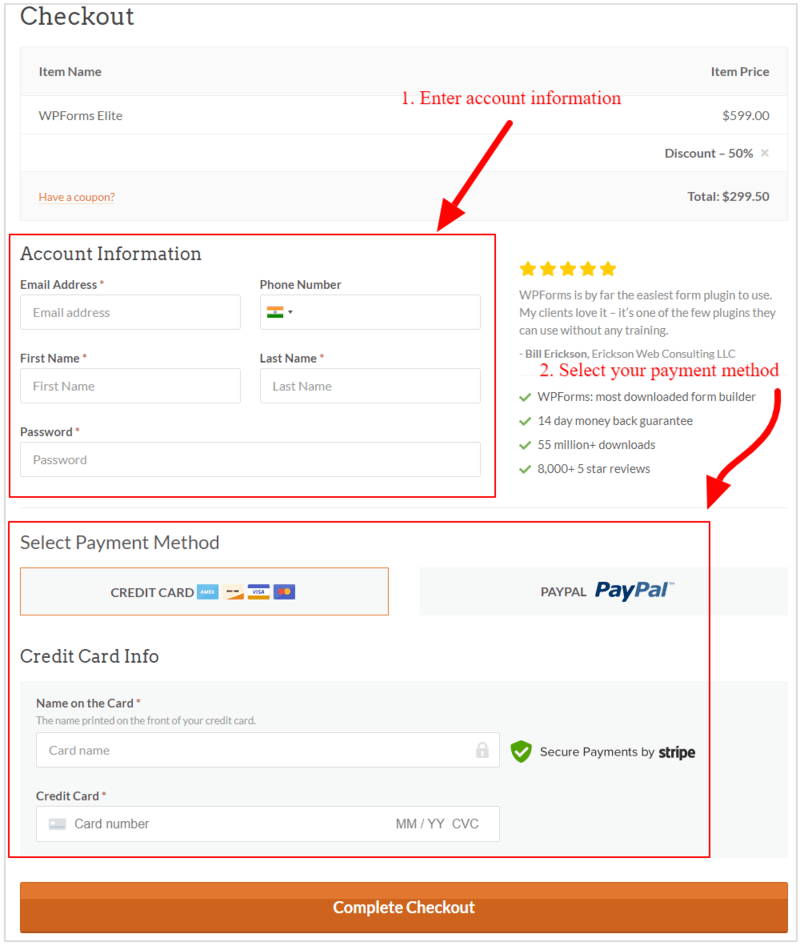
Also, log in to the email account that you have provided in the account information above. Open the email from WPForms and click the verification link to verify your email id. This is the required process to confirm your email id to complete creating your WPForms account.
Step 2: Install WPForms Plugin and Enter Activation Key
After you have created an account with WPForms, log in to your WordPress website dashboard and visit the menu option Plugins >> Add New.
Here, you will get a search box where you can search for the plugin you want to install. Search for the ‘WPForms’ plugin as showing in the image below. After you found the WPForms plugin in the search result, click the ‘Install’ button to install and activate the plugin on your WordPress website.
![wpforms-plugin-search Easy And Secure Authorize.net Form Solution [WPForms]](https://tutorialdeep.com/images/blog/authorize-net-wpforms/wpforms-search-plugin.png)
After you completed with the installation of the plugin, visit the WordPress dashboard menu option WPForms >> Settings. Here, you need to enter your ‘WPForms Elite’ account license key that you have received above. After you enter the key, click the ‘Connect’ button to complete connecting your WordPress website with the WPForms Elite account.
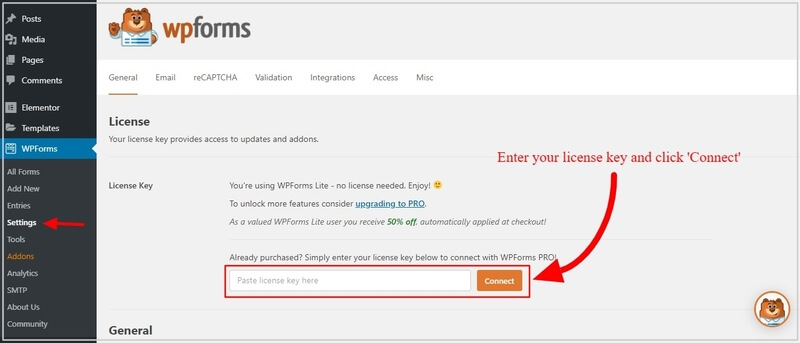
Now, You can start creating an order form and connect it with Authorize.net to collect payments online. After that, you can add it to your website posts and pages.
Step 3: Create a WordPress Order Form
To create, go to WordPress dashboard menu option WPForms >> Add New to start creating order form.
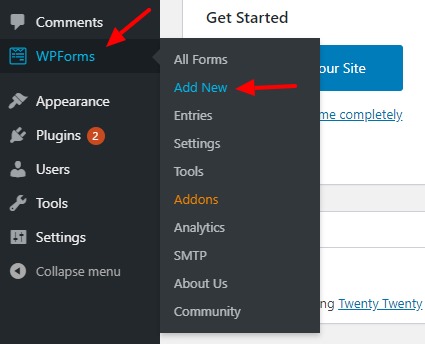
You will get many pre-made templates that are useful to quickly create any type of forms you want. Select’ Create a Billing/Order Form’ to create an order form for your website.
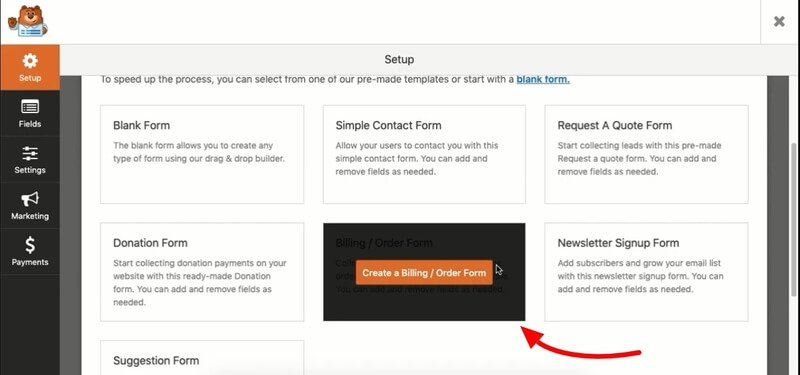
There are many form fields you already present in the template as showing in the image below. You can add more fields or modify them to make them suitable for your website with proper setup.
![WPForms billing/order form Easy And Secure Authorize.net Form Solution [WPForms]](https://tutorialdeep.com/images/blog/authorize-net-wpforms/wpforms-billing-order-form.jpg)
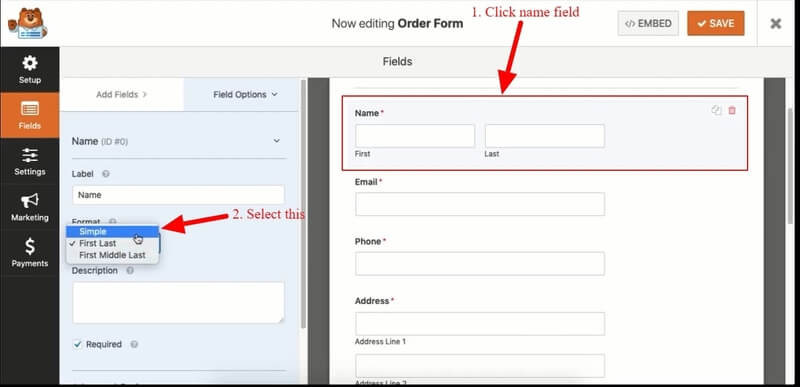
The form contains the ‘Name’ field with two input boxes. To make it single, you have to click on the Name field as indicated in the image below. After that, select the ‘Simple’ format to change it to a single input box.
The two inputs boxes changes to a single input box for the Name field.
After that, you can add available items or products on your website to the form to sell online. The pre-made form contains three items at the start as showing in the image below. You can click on it to change the name of the items and set a price according to your requirements.
Click on them to rename the products and their price. Also, add more items to it with name and price when you have more products to sell online.
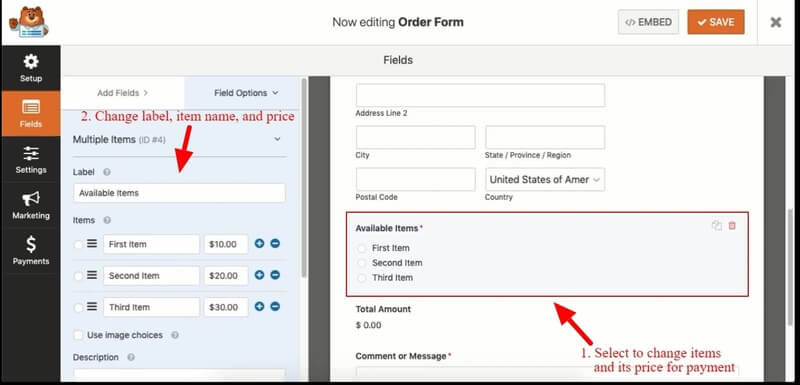
The above image shows the available items on your order form. You can add, edit, and delete products by clicking on them and the plus/minus buttons as showing in the image above.
Step 4: Configure Order Form Settings
After creating your form, you have to make form settings to get the required result from your form on submission. To get the form setting options, you have to click the ‘Settings’ tab option.
There are three setting options you can set for the form that are General, Notifications, and Confirmations.
General Settings
To make general form settings, click the tab Settings>>General to get the general setting options.
![wpforms-billing-order-form-general-settings Easy And Secure Authorize.net Form Solution [WPForms]](https://tutorialdeep.com/images/blog/authorize-net-wpforms/wpforms-billing-order-form-general-settings.jpg)
Here, you can set up general setting options like Form Name, Description, CSS class, Submit Button text, and submit button text, Submit button processing text, etc.

Also, you can enable AJAX form submission that is useful to submit the form without any page refresh.
Notifications Settings
To make notifications settings, click the tab Settings>>Notifications to get notifications settings tab. It is helpful to make setting options like the sender email address, email subject, from name, and email. This setting allows you to modify the notifications users get on form submission.

Also, you can make settings like reply-to, and a message from users.
Confirmations Settings
To make confirmation settings, click the tab Settings >> Confirmations to get the setting options.
It provides you many setting options to change the message type and confirmation message text content. The image below shows the various settings for confirmations on form submission.
![payments-wpforms-billing-order-form-confirmations-setting Easy And Secure Authorize.net Form Solution [WPForms]](https://tutorialdeep.com/images/blog/authorize-net-wpforms/wpforms-billing-order-form-confirmations-setting.jpg)
You can also make settings to display a page or redirect to other URLs on form submission.
Step 6: Add and Enable Payment Option
In this post, I will teach you to connect your order form with your Authorize.net account to accept payments online. So, let’s get started.
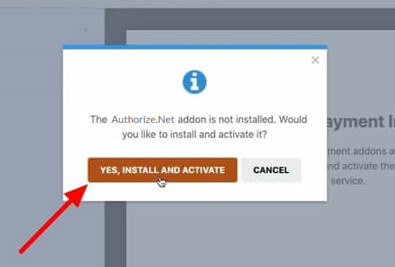
Firstly, you have to add the Authorize.net addon of WPForms on your WordPress website to enable it for your order form. Click the ‘Payments’ tab and click the ‘Authorize.net’ option as showing in the image below.
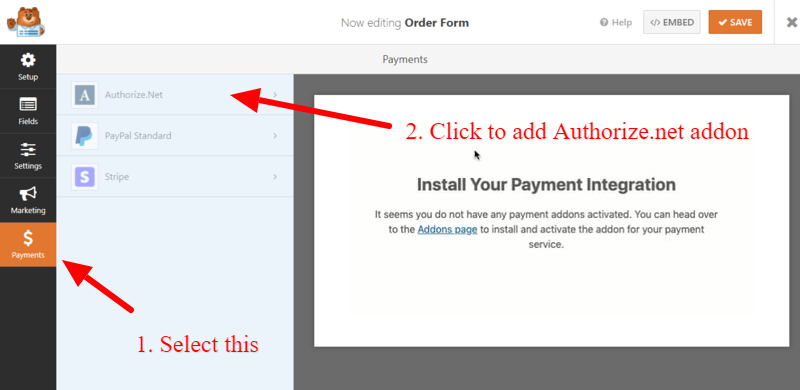
You will get a popup that displays the alert that the Authorize.net addon is not installed on your WordPress website. Click the ‘YES, INSTALL AND ACTIVATE’ button to install the WPForms Authorize.net addon on your website.
After you activate the addon, you will get a notification that the addon gets activated. Now, you have to click the ‘YES, SAVE AND REFRESH’ button to refresh the Authorize.net add-on and install this add-on properly.
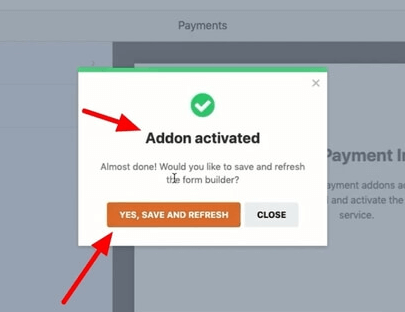
Now, your Authorize.net add-on is ready to enable and use on your order form to collect payments online.
To enable the addon, click the checkbox ‘Enable Authorize.net Payments’ to enable the Authorize.net payment option. Enter your Authorize.net account details to start using it with your form.
![wpforms-click-enable-paypal-make-settings Easy And Secure Authorize.net Form Solution [WPForms]](https://tutorialdeep.com/images/blog/authorize-net-wpforms/authorize-net-payment-settings.png)
The above image indicates places to enable Authorize.net and fill in other details to properly set up the addon.
Step 7: Embed Your WordPress Order Form Using Shortcode
Once you have completed creating your Authorize.net form with proper settings, you can click the ‘SAVE’ button to save the Authorize.net form. The below image shows the ‘SAVE’ button to save your form.

Now, you can embed your Authorize.net form to display on your WordPress website posts and pages. To embed the form, you have to click the ‘EMBED’ button that you will get on the top right corner of the screen. See the below image indicated the ‘EMBED’ button.
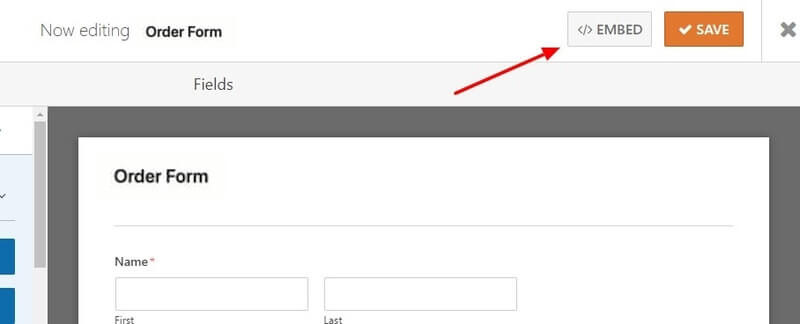
A popup will start to appear that contains the shortcode for the Authorize.net form you have created above. You need to copy this shortcode and paste it on your posts and pages where you want to display the form.
![wpforms-embed-get-shortcode Easy And Secure Authorize.net Form Solution [WPForms]](https://tutorialdeep.com/images/blog/authorize-net-wpforms/wpforms-embed-get-shortcode.jpg)
After you completed adding the shortcode, you will get your form displays on your website posts and pages. Now, your website users can fill the form to make payments online.
That’s all about creating your Authorize.net form to start collecting payments on the WordPress site.
Conclusion
WPForms is the #1 best form builder plugin that comes with many options to easily create your Authorize.net form. It also comes with 100+ pre-made templates to quickly create any type of form in minutes.
In addition to this, there are many useful addons of WPForms you can use to extend the functionality of the plugin. These addo-ns make the plugin more powerful and more than a contact form plugin for WordPress.
➜ Click Here to Get WPForms Now
You May Also Like to Read
- WPForms Review
- WPForms Discount Code
- How to Make a File Upload Form in WordPress Website
- How to Use Email Marketing to Skyrocket Your Sales
- How To Create an Engaging Multi-Page Form
I hope this post helps you to easily create an Authorize.net form for your WordPress website. If you have any queries regarding the tutorial given above, please comment below.
Also tell me, what other features of the WPForms plugin you are using on your WordPress website? do comment below.
