Do you want to create multi-page form for your website?
You can increase the performance of long size forms by converting it to multi-page forms. It gives you more conversions and more user inputs from your visitors without scaring them from a longer size.
Many industries and businesses require to use longer forms to get user inputs. But, it’s not a great way to add all fields in a one-single page. You need to break them in small pieces to change longer looking form into an optimized level with a progress bar.
In this post, you will learn how to create an engaging multi-page form with the step-by-step guide given below.
What is the Multi-Page Form?
A multi-page form is the longer size form divided into multiple smaller pieces of forms in a series of levels or stages. It helps users to easily understand each part of the forms to fill out in levels or stages.
It can be split into smaller pieces and display in stages using a progress bar that confirms the progress and completion of the form. A progress bar is the step-by-step indicator of the number of steps in a form.
Why You Should Use Multi-Page Form?
Below are the reasons behind using the Multi-page forms on your website:-
- ✓ Increase Conversions: Converting your larger forms into small pieces can give you more conversions. Users are more likely to fill the form without the scaring with the long-size.
- ✓ Make Form More Attractive: The form contains the colored progress bar that looks more attractive than the simple and longer form. People find it eye-caching on your pages to fill out.
- ✓ Easy to Fill Form: Smaller forms in pieces are easy to understand each part and the requirements for each field. They are easy to fill with the required details and inputs.
- ✓ More Engaging: The multi-page forms are way more engaging than the simple and longer forms.
Let’s start creating the multi-page form for your website with a step-by-step process given below.
Affiliate Disclosure: At Tutorialdeep, we believe in transparency for our users. In this blog, there are some referral links. If you signup with these links we will earn some commission with no extra cost to you. We recommend these links because these are our trusted brands.
How To Create an Engaging Multi-Page Form [Step-by-Step]
WPForms is the best contact form plugin to use and create a multi-page form for your website. It is more beginners friendly and the highest 5 stars rated plugin in the WordPress repository.
You need to install and activate the WPForms plugin to start creating the multi-page form in WordPress. it requires a basic license of WPForms plugin to start creating a multi-page form for your website.
So, let’s get started.
Step 1: Sign up with WPForms Basic to Create An Account
WPForms is the best form builder plugin that also comes with a page break field to break your form into small pieces.
Let’s create an account on the WPForms form plugin.
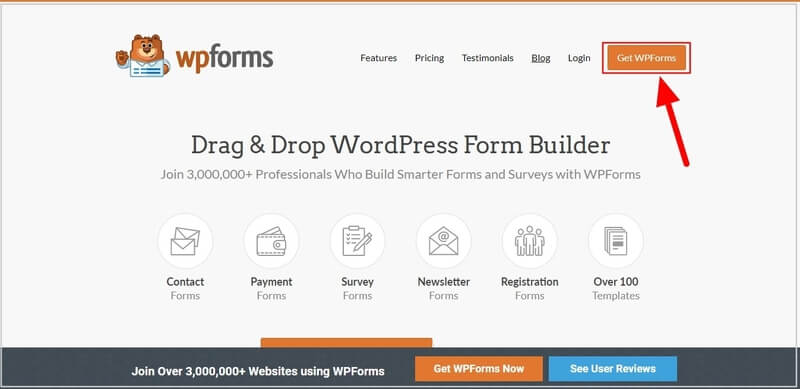
First of all, open the WPForms homepage to create an account.
➜ Click Here to Go to WPForms Homepage
On the homepage, click on the ‘Get WPForms’ button given at the top right corner of the homepage to go to the pricing page.
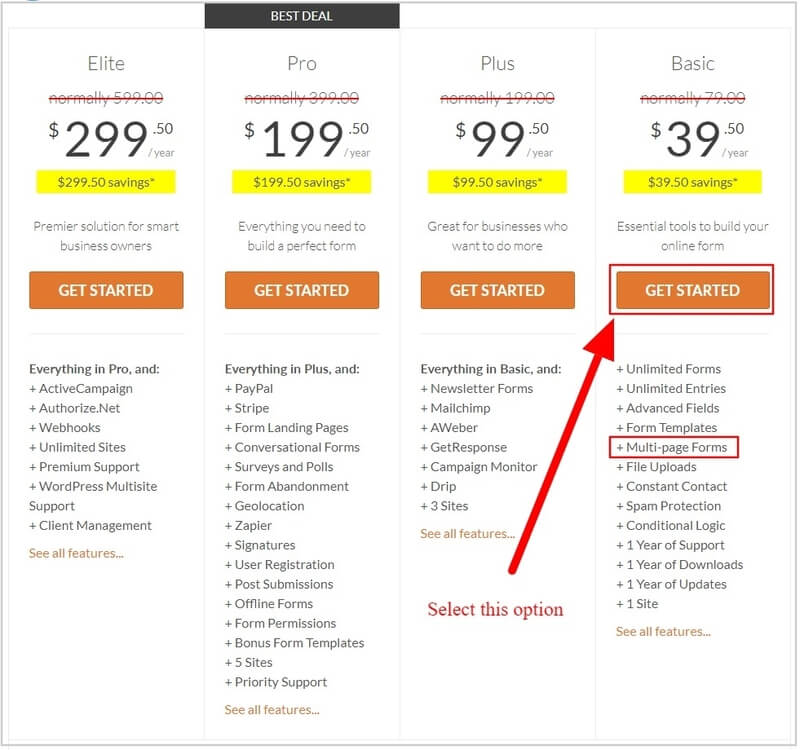
On the pricing page, you have to select the basic plan that provides a page break field to create a multi-page form.
Select the WPForms ‘Basic’ plan as indicated below and click the ‘GET STARTED’ button given under the ‘Basic’ plan.
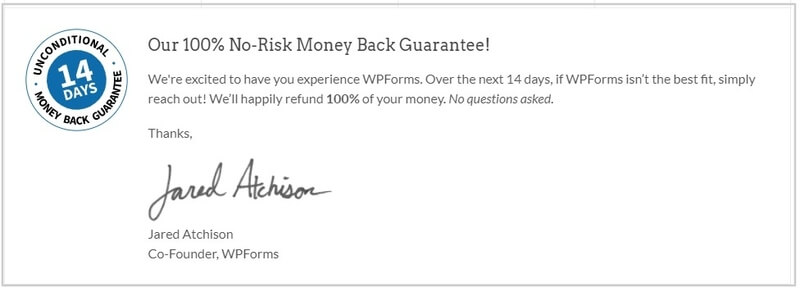
Also, all plans of WPForms come with a satisfaction guarantee to buy the plugin with confidence. The founder of the plugin guaranteed a 100% no-risk money-back guarantee with no questions asked. If you experience any problem or found WPForms is not the best fit for your business, they will happily refund all your money back.
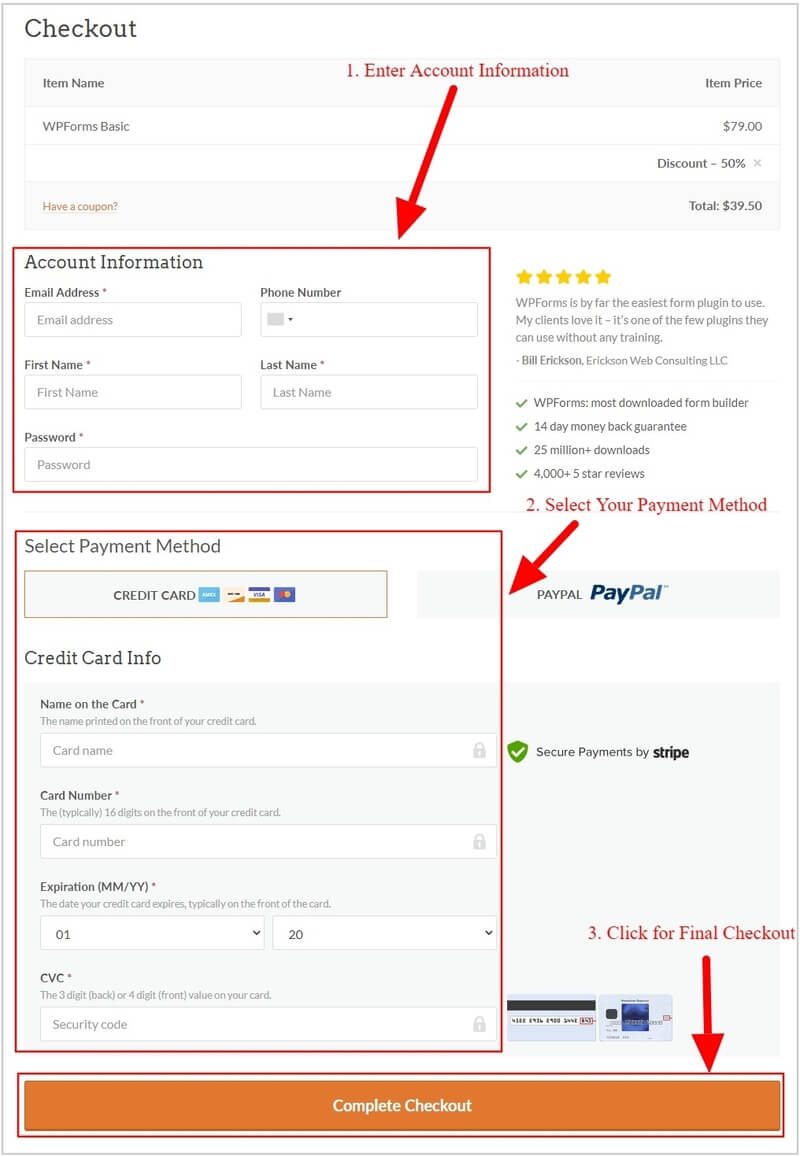
After you have selected the basic plan above, you will get a checkout page where you need to fill your account information and provide a payment method to make payment. After you have done filling details, click on the ‘Complete Checkout’ button to complete the purchase.
Now, login to your email account that you have provided above to verify your email id. Click the verification link on your email id to complete creating your WPForms account.
Step 2: Install WPForms Plugin and Enter Activation Key
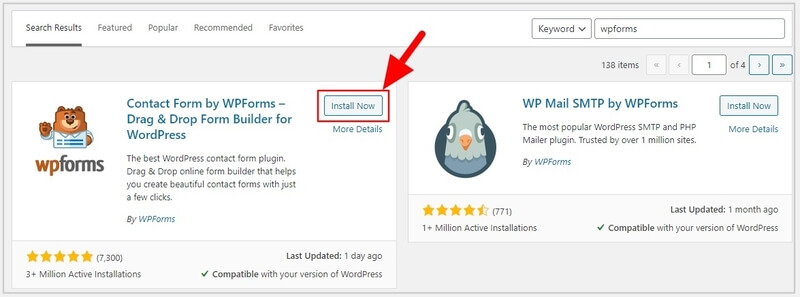
After you have done with creating your WPForms account, log in to your WordPress website dashboard, and go to dashboard menu option Plugins >> Add New.
You will get a page where you have to search for the ‘WPForms’ plugin as showing below. When you found the plugin, click on the ‘Install’ button given under the plugin to install and activate the WPForms plugin on your WordPress website.
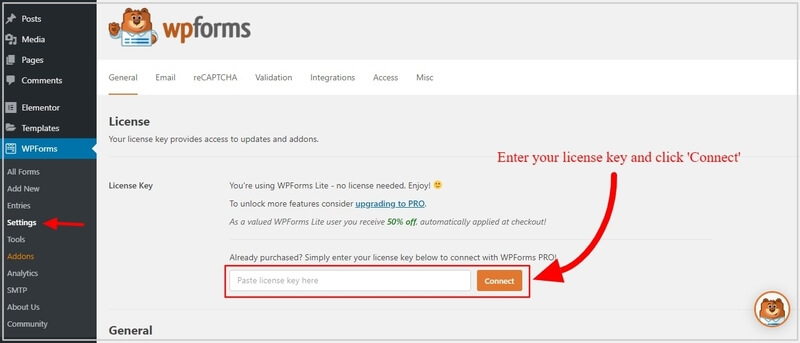
Furthermore, you have to open the WordPress dashboard menu option WPForms >> Settings. Here, you need to enter the license key of your WPForms account that you have received above.
After entering the license key, click the ‘Connect’ button to connect with your WPForms basic account.
Now, let’s start creating the form and add it to your website posts and pages.
Step 3: Create A Simple Form for Your Website
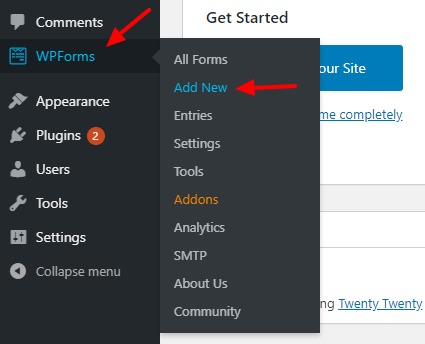
To create your form in WordPress, go to the WordPress dashboard menu option WPForms >> Add New.
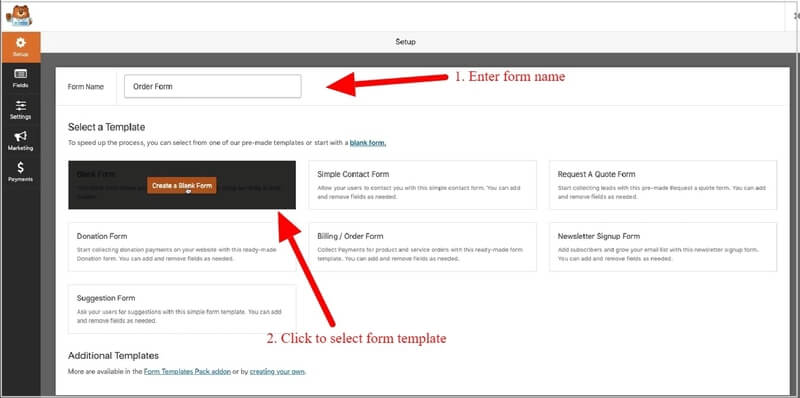
You will get the WPForms page where you have to select the template to Create your Form. WPForms comes with many pre-made templates that help you easily create your form in just a single click.
Enter the name of the form and click on the ‘Create a Blank Form’ to get the blank form template.
A blank form template is a template that contains no form fields. You have to drag-n-drop the field to add them to the form.

Add as many form fields as you require to create your longer size form to convert to small pieces of form.

After you have completed adding the form fields to your form as per your requirements, let’s break it into small pieces to create a multi-page form for your website.
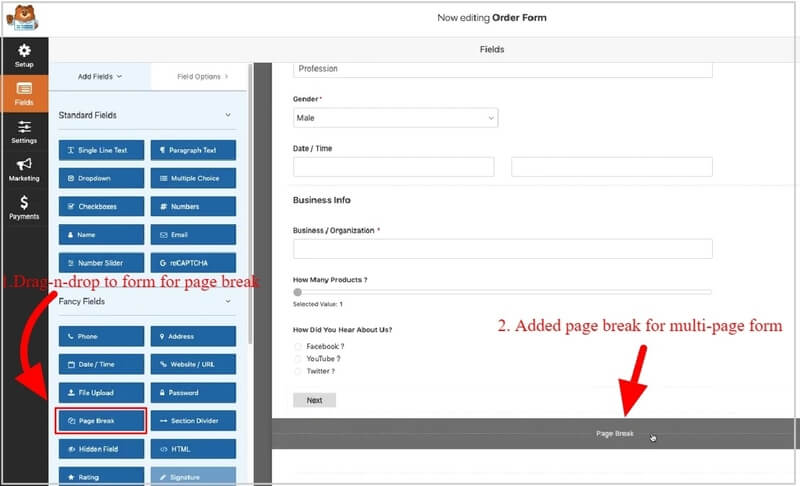
Step 4: Add Page Break Field to Split Your Form into Pages
Now, you have to add the page break field to the form from where you want to break them into small pieces. The below image showing the added page break field in the form. You can add as many page break fields as you want to create stages or levels in your form.
After you have done with adding the page break fields, you have to add a progress bar, pagewise title, next, and previous button.
Step 5: Make Page Break settings to Add a Progress Bar
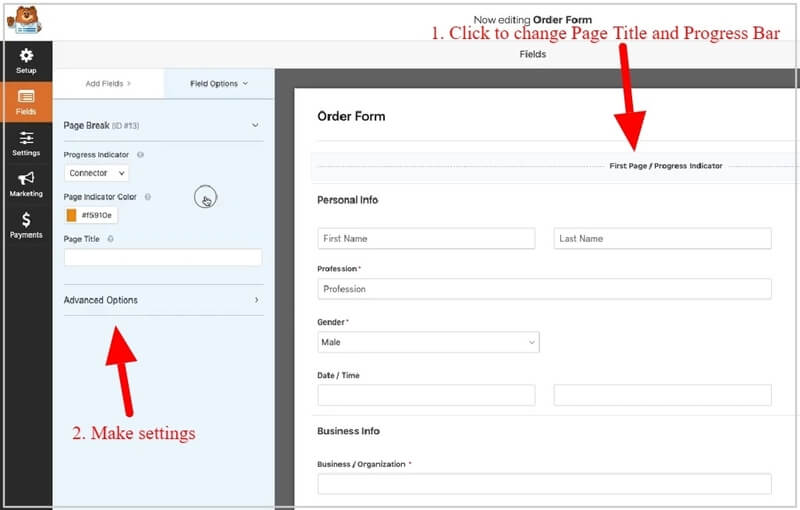
To add a progress indicator to your form, you have to click the page title and progress bar indicator as showing the image below. The below image showing the ‘First Page/Progress Indicator’ to click and get the various setting options.
Here, you have to select the ‘Connector’ option as the Progress Indicator and the color for the progress bar. After that, enter the page title for each stage of the form.
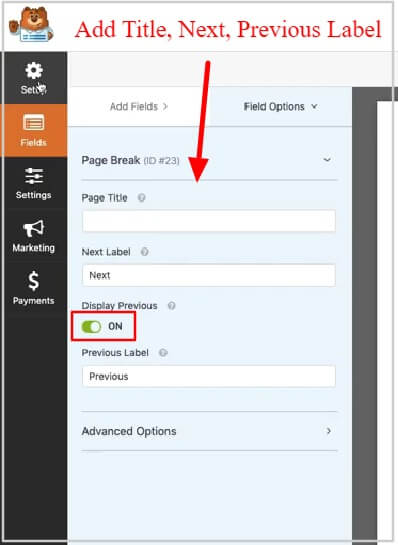
Now, click the added ‘Page Break’ field in the form as indicated in the image below. This will open the page break setting options where you have to provide a page title and next label for the next button.
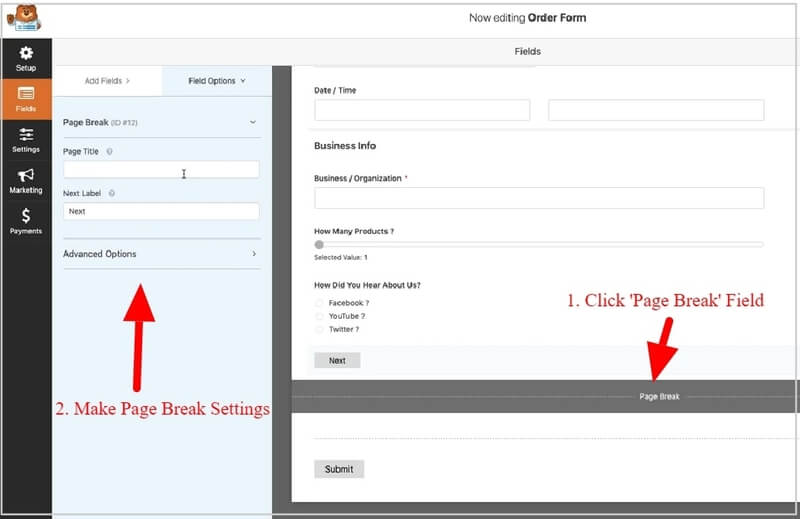
After that, click on the radio button given under the ‘Display Previous’ option to display the previous button to the multi-page form. You can also change the label of the previous button.
You can add as many fields as you want to add to the form and add the page break field to break them into more small pieces
After you have done with creating your multi-page form, you can click the ‘Save’ button to save your form.
Congratulations, you have successfully created your multi-page form to add to your website.
Step 6: Configure Multi-Page Form Settings
Once you have completed with creating the multi-page form, you can now make form settings to collect the required output from your forms.
You have to click the ‘Settings’ options to start making form settings. There are three setting options available in WPForms which are General, Notifications, and Confirmations. Let’s start making these settings.
General Form Settings
It can be useful to change the general setting option like form name, submit button, button processing text, and more. To make general settings, go to Settings>>General option as given in the image below.

The General settings contain options like Form Name, Description, CSS Class, submit button text, and Submit button processing text.

In addition to this, you will also enable AJAX form submissions which is useful when you want to submit the form without page refresh.
Notifications Settings
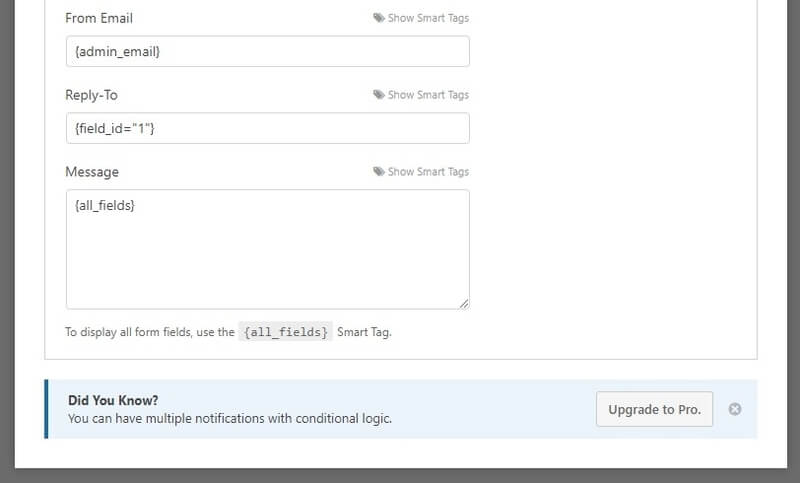
For the Notifications setting, go to Settings >> Notifications. You can change the default notifications when someone fills the form details and submit the form. You can easily change setting options like sender email address, email subject, from name, and email.
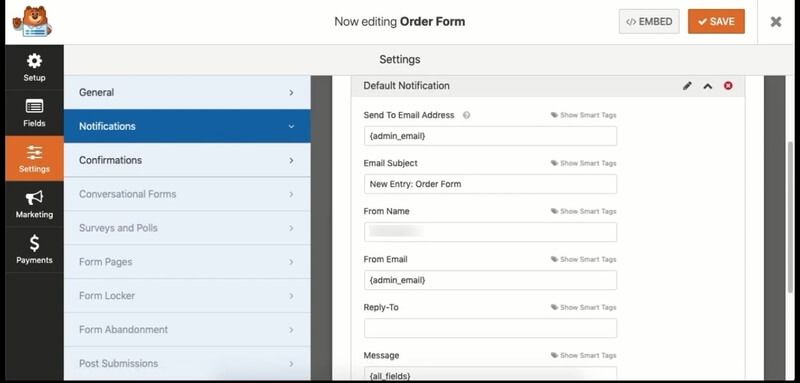
Furthermore, you can also make setting options like reply-to, and a message from users. The message also contains the smart tags to display all form fields in the result.
Confirmations Settings
Similarly, to make Confirmations setting, you have to visit Settings >> Confirmations to get setting options. It can be useful for forms to get confirmation when users submitted the form. You can also change the message type and add confirmation messages text content to display when users submit the form.

Furthermore, it can also be configured to show a page on submission or redirect to other URLs.
Save all your settings by clicking on the ‘Save’ button given at the top-right corner.
Step 7: Embed Multi-Page Form Using Shortcode
After you are done with creating a multi-page form and properly make all the settings, you can now embed your form to your website posts and pages using shortcodes. To embed the form, you have to click the ‘EMBED’ button given at the top-right corner of the screen. See the image below indicated the ‘EMBED’ button to click.
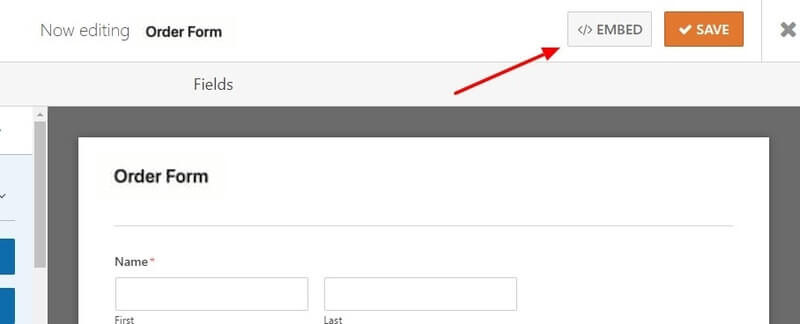
A popup will start to appear where you will get the shortcode as given below for the created form. You just need to copy and paste the shortcode to the place where you want to display the multi-page form.

Your form now starts showing on your added posts and pages where you have inserted the shortcode.
That’s all about making a multi-page form in WordPress using the WPForms plugin.
Conclusion
It’s easy to create a multi-page form with the help of the WPForms plugin in WordPress. It comes with many pre-made templates to create your forms in minutes. After that, you can more fields to it to create any type of form you want. You can take the benefits of this contact form plugin to get a user’s inputs.
You May Also Like to Read
- WPForms Review
- Make a File Upload Form in WordPress Website
- How to Use Email Marketing to Skyrocket Your Sales
- Collect Paypal Payments on WordPress Site
I hope this post helps you to easily make a multi-page form on your WordPress website. If you have any queries regarding the tutorial given above, please comment below.
Also tell me, which plugin you are using to create contact forms in WordPress? do comment below.