Do you want to know how to install a WordPress plugin on your website. You can add more features and functionality to your website by installing a plugin.
There can be different way to install WordPress plugins. Installing free and premium plugins requires different methods.
If you are a beginner, You should know the exact step-by-step process to install the free and premium plugins on your WordPress website.
Well, that’s exactly what I am going to share with you a step-by-step guide here in this post. So, let’s get started.
Method 1: Search and Install a WordPress Plugin (For Free Plugins)
This is the simplest way of installing free plugins on your WordPress website. To install WordPress plugins with this method, You should know the plugin name to search. You can only install free plugin with this method.
So, let’s start step-by-step process to search and install a WordPress plugin:-
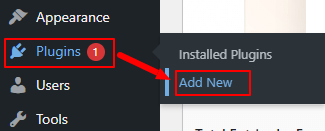
Step 1: Login to WordPress and Visit Plugins >> Add New
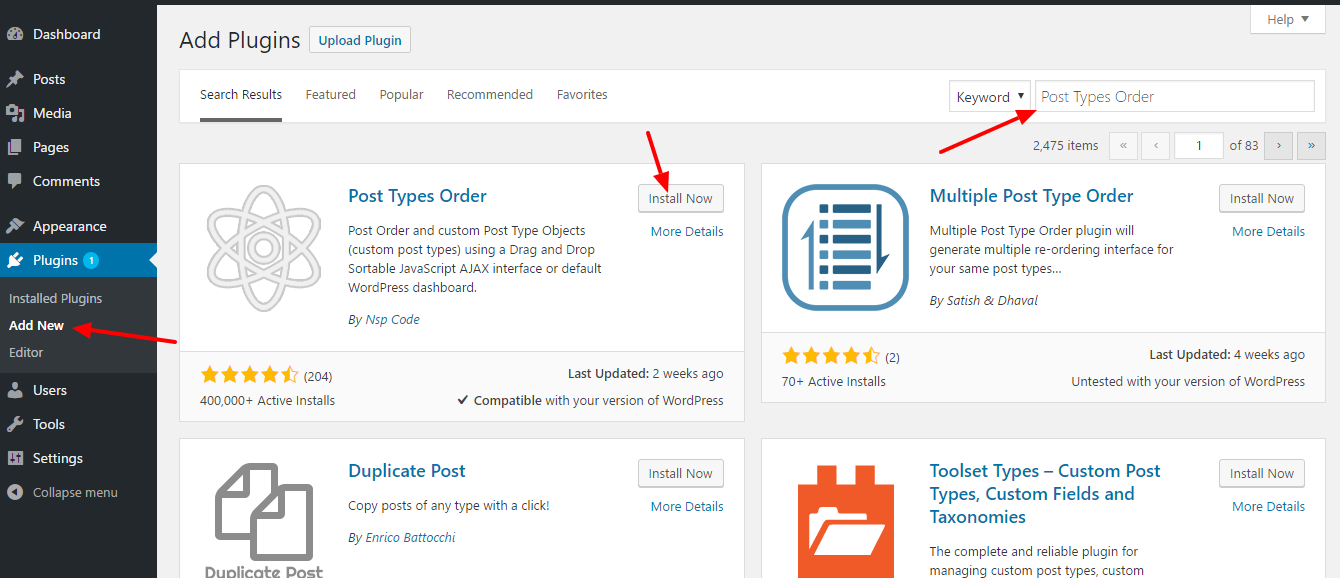
Login to your WordPress admin panel by using your admin username and password. After that, go to the location Plugin >> Add New.

Step 2 Enter Plugin Search Term Keyword to Find
You will be taken to a page where you will get a search input box. Enter your search term in the keyword input box. Put the exact keyword match with the plugin you want to install.

After you enter the keyword, click outside anywhere to start the auto search process. You will get the list of plugins from which you have to find your plugin to install.
Step 3 Click on Install button to Install the Plugin
Before installing any plugin you should check and views the details of the plugin. Install only when you find the plugin useful for you. Remember to check the reviews of the plugins and the number of installation plugin have.

One wrong plugin can break your website. So, be careful before installing any plugins. If the review is not good by the reviewers, then don’t install the plugin. This may contain some malicious code that can affect your blog.
After you find the best plugin for your WordPress website, click on the install button to start the downloading process of the plugin. This process checks for the plugin and begins installing it.
Step 4 Finally, Activate Plugin to Make it Working on WordPress
After successful installation of the plugin, You just need to activate your plugin to make it working on your WordPress website. Click on the Activate button of the plugin and wait for the process. After a few seconds, your new plugin gets activated.

You will get it in the installed in the plugins list as shown in the image below.

Don’t forget to regularly update your plugin. A regularly updation of the plugin can make your website more secure. You will find your plugin in the list of activated plugins. The activated plugins will appear in the dashboard with the light blue line strip.
That’s it, you have successfully installed your WordPress plugin with search and install method.
Method 2: Upload and Install a WordPress Plugin (For Premium/Paid Plugins)
The previous method search and install is the very beginner friendly method. But you can install only the free plugins using this.
If you want to install the premium or paid plugins, you should learn upload and install method. So, let’s see the step-by-step process upload and install a WordPress plugin.
Step 1: Download Premium/Paid Plugin Zip File
To use this method, you should have a downloaded copy of the premium plugin. A downloaded plugin is a zip source file format. You don’t need to unzip the plugin for this method.
Remember to check the review of the plugin before downloading it. This is important to make your website secure. Select the best-reviewed plugin, check the details about the plugin and see the user experience with the plugin.
Step 2: Login to WordPress and Visit Plugins >> Add New
Login to your admin panel and go to Plugin>>Add New page.

Step 3: Click on the Upload Button

On the add a new plugin page, Click on the upload button located at the top of the page. This will let you to the plugin, upload source page. Retain a copy of the zip source file of the plugin for the next step.
Step 3: Select your Plugin Source File and Install

Click on the Choose file button and browse your computer. Select your retain copies of the zip source file and click on the install now button.
This will begin installing the plugin for your website. Your plugin now automatically unzipped and its folder placed in the location http://yourwebsite/wp-content/plugin/. You can check your plugin is present in the location.
Step 4: Activate Uploaded Plugin

After you successfully install WordPress plugins, you have to activate your plugin to get it working for you.
Do all the configurations required for the plugin. The premium version of the plugin contains some extra features. Get support from the plugin provider and do all extra settings with the plugin.
Method 3: Manually Install a WordPress Plugin via FTP
When you have any problem to upload your free or paid plugin from your WordPress website dashboard. You can use this method to upload your plugin to your WordPress website.
So, let’s see the step-by-step process upload and install a WordPress plugin via FTP.
Step 1: Download FTP Client Filezilla and Connect Your Server
This method requires an FTP client to transfer your files from your local system to server host.
Filezilla is the best FTP Client you can use every time when you want to upload files.
Step 2: Download the Plugin Zip File
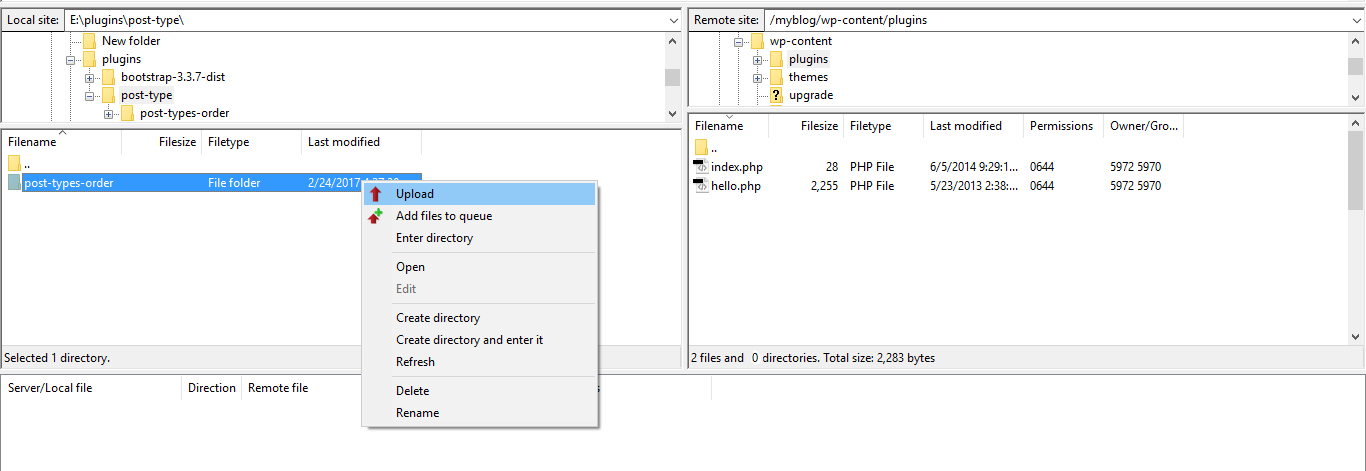
Download the plugin you want to install in zip format. Extract the zip source file and upload the folder in the location /wp-content/plugins/.
To upload your plugin folder using FTP, You need FTP username and password created on your hosting. If don’t create yet, login to your CPanel and create one for you. If you can’t create your FTP username and password. Contact your hosting provider.
Step 3: Upload Your Plugin Zip File to your Website Via FTP

Connect your server using the FTP username and password via Filezilla. After connection, open the location ‘/wp-content/plugins/’ in the web server.
Now, upload the plugin folder from your computer to this location. This uploading process may take a few minutes.
Step 4: Go to Plugins List and Click Activate

After the uploading of the plugin to the web server is completed, you need to login to your WordPress admin panel and go to Plugins >> Installed plugins page.
Here, you can find your installed plugin in the plugin lists.

Finally, activate your installed plugin by clicking on the activate button of your uploaded plugin. This succesfully installed and activate your uploaded plugin to your WordPress website.
Now it’s time for you to go to the settings page and do all the configurations.
Plugins are the ways to add extra functionality to your WordPress website. WordPress repository maintained by many developers. You can use the plugins for your specific needs. These plugins are regularly updated by the developers and reviewed by the users.
Some plugins contain some malicious codes you can find from reviews. Check the reviews and the number of users installed the plugins. The more the number of users installed the plugin, The more useful the plugin is for you.
Choose the best-reviewed plugins when you want to know how to install WordPress plugins.
Conclusion
Now, You know how to install WordPress plugins. By installing the plugin, you can add any features to your blog you want. You can create a powerful website with the plugins.
You don’t need to develop new plugins. Because there are almost every plugins already available in the WordPress repository. However, you can create your one if you want to submit a plugin in the WordPress repository.
But find a useful and safe plugin for your self-hosted blog.
Before installing the plugin, see from the popularity and the features plugin have. If you find the plugin useful and safe for your blog you can install it.
If you liked this article, then please consider sharing it with your friends and leaving a comment below.In case you are not able to install WordPress plugins or you are stuck somewhere else. Feel free to ask via comment below.
If you want some help with any plugin, You can also contact me at [email protected].
