
Someone fills out your contact form. They’re interested, they took the time to type in their details, and for a brief moment, they’re one of the warmest leads your business will ever have.
Then… nothing happens. No confirmation, no follow-up, no next step – just silence, while their interest slowly cools and they move on to whichever competitor responds first.
This happens more often than most businesses realize, and it’s rarely intentional. It’s usually just a gap in the process: the form works fine, but nothing automated kicks in after someone submits it.
Fixing that gap – setting up a proper automatic follow-up after a contact form submission – is one of the highest-leverage improvements you can make to your entire lead generation process, and it doesn’t require hiring anyone or writing a single line of code.
This guide walks through exactly how to do it, step by step.
Why Automatic Follow-Up Matters More Than Most Businesses Realize
Response speed is one of the most well-documented factors in lead conversion, and the data consistently points in the same direction: leads contacted within minutes of submitting a form convert at dramatically higher rates than leads contacted hours or days later.
Interest fades fast, especially online, where a visitor typically has several other options a search away.
Here’s what makes this specifically worth automating rather than relying on manual follow-up:
Manual follow-up depends on someone being available. If a lead comes in at 9 PM on a Saturday, and your team doesn’t check the inbox until Monday morning, that lead has had two full days to lose interest, find a competitor, or simply forget why they reached out in the first place.
Automatic follow-up works around the clock. A form submission can trigger an immediate confirmation email, add the lead to a nurture sequence, and notify your team – all within seconds, regardless of what time it is or who’s currently working.
It removes the “did that actually work?” moment for the visitor. An immediate, personalized response reassures someone that their submission went through and that a real business is on the other end, which matters more for trust than most businesses give it credit for.
It buys your team time without losing the lead. Even if a real human follow-up won’t happen for a few hours, an automatic response in the meantime keeps the lead warm and engaged instead of leaving them wondering if they should look elsewhere.
What “Automatic Follow-Up” Actually Includes
This isn’t just about sending one confirmation email. A complete automatic follow-up system for contact form leads typically includes several layers working together:
- An instant confirmation. The moment someone submits, they see a message and/or receive an email confirming their submission was received.
- A more detailed first response. Within minutes, a slightly more substantial automated email goes out – thanking them, setting expectations for when a real person will follow up, and often including something useful (a resource, a calendar link, an FAQ).
- A short nurture sequence. For leads that don’t convert immediately, a series of follow-up emails spaced over the following days or weeks keeps your business top of mind without requiring manual effort each time.
- Internal team notification. Your sales or support team gets notified immediately, ideally with the lead’s details already organized, so a human follow-up can happen quickly when it matters most.
- CRM or spreadsheet syncing. The lead’s information is automatically logged somewhere your team actually works from, rather than sitting only in an inbox.
Each of these layers used to require real technical setup – email automation platforms, API integrations, custom scripts to connect a form to a CRM. Today, a no-code form builder like Jotform can handle most of this directly, without needing separate tools stitched together.
Step 1: Set Up an Instant Confirmation
This is the most basic layer, and it should never be skipped. As soon as someone submits your contact form, they should see a clear on-screen confirmation message and receive an automatic confirmation email.
In Jotform, this is set up under Settings > Thank You Page for the on-screen message, and Settings > Notifications > Autoresponder Email for the automatic email.
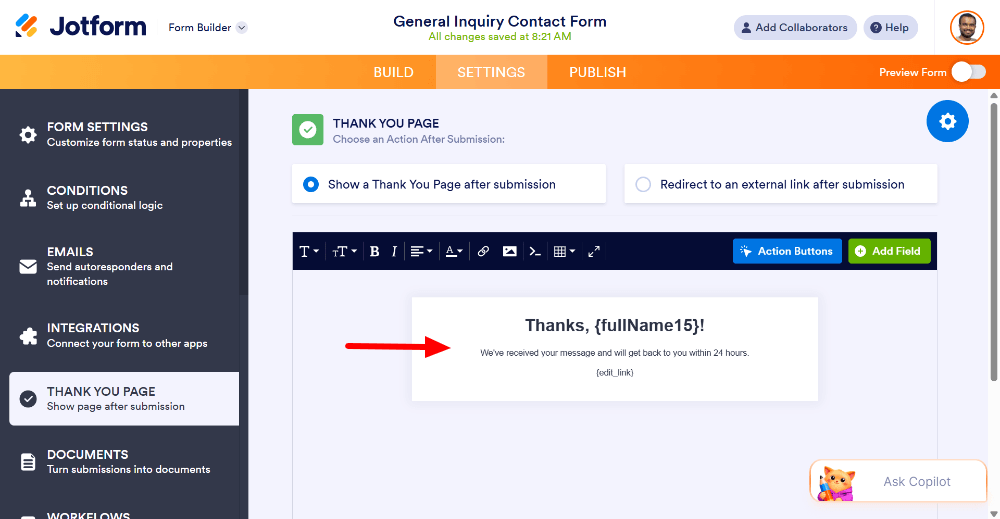
Keep the message specific rather than generic – something like “Thanks, [Name]! We’ve received your message and will get back to you within 24 hours” is far more reassuring than a plain “Your form has been submitted.”
Step 2: Personalize the Follow-Up With Merge Fields
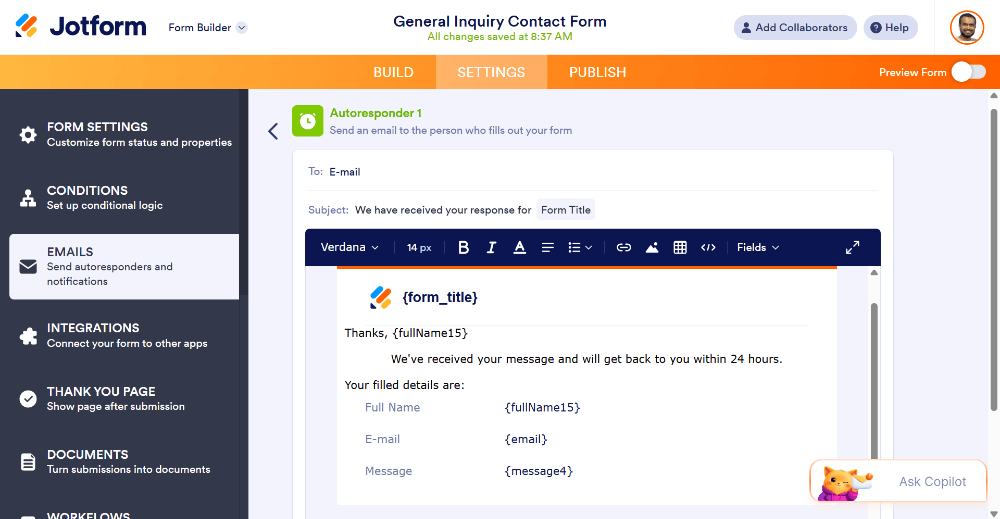
A generic “Dear Customer” email feels automated in the worst way. Most modern form builders let you insert merge fields – placeholders that automatically pull in the actual data someone submitted, like their name, the service they’re interested in, or which option they selected from a dropdown.
In Jotform, this is done by inserting fields like {Name} or {Service Interested In} directly into your autoresponder email template. The result reads like a real, individual response, even though it’s fully automated.
Step 3: Build a Short Nurture Sequence
A single confirmation email is a good start, but leads who don’t convert immediately benefit from a short series of follow-ups rather than total silence after the first message. A simple three-email sequence works well for most businesses:
- Email 1 (immediate): Confirmation and a warm thank-you.
- Email 2 (1–2 days later): A slightly more informative message – answering a common question, sharing a helpful resource, or offering a specific next step like booking a call.
- Email 3 (5–7 days later): A gentle check-in for anyone who hasn’t responded yet, without being pushy – something like “Just checking in – happy to answer any questions whenever you’re ready.”
If you’re using Jotform alongside an email marketing tool (like Zoho Campaign, Contant Contact, Kit, etc.) you can connect the two so that every new form submission automatically enrolls the lead into this exact sequence, without your team lifting a finger.
Step 4: Notify Your Team Immediately
Automated emails to the lead are half the picture – the other half is making sure a real person on your team knows a new lead just came in, so a genuine human follow-up can happen quickly. Set up a notification that goes beyond just an email sitting in a shared inbox.
In Jotform, this can mean connecting the form to Slack, so a new submission posts directly into a channel your team is already watching, or setting up SMS notifications for time-sensitive leads that need a same-day response.
Step 5: Sync Leads Into Your CRM or Spreadsheet Automatically
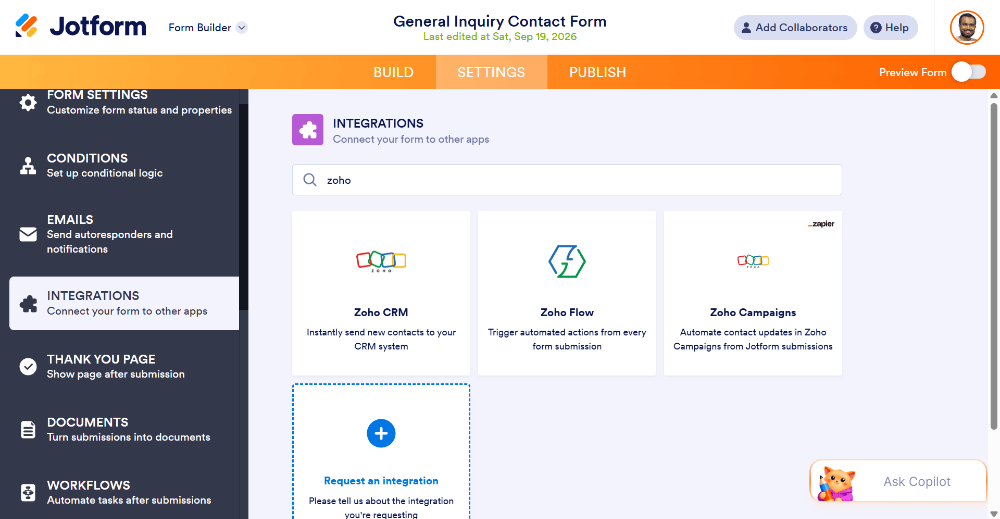
If a lead only exists in an email inbox, it’s easy for it to get buried, forgotten, or duplicated across different team members’ notes. Connecting your form directly to a CRM (like Zoho CRM, Keap, HubSpot, Salesforce, or a simpler spreadsheet-based system) means every submission is automatically logged in one organized place, with fields like name, email, and submission date filled in consistently every time.
In Jotform, this is set up under Settings > Integrations, where you can connect directly to popular CRMs or to Google Sheets with just a few clicks – no API keys or custom code required for most standard integrations.
Step 6: Route Different Leads Differently With Conditional Logic
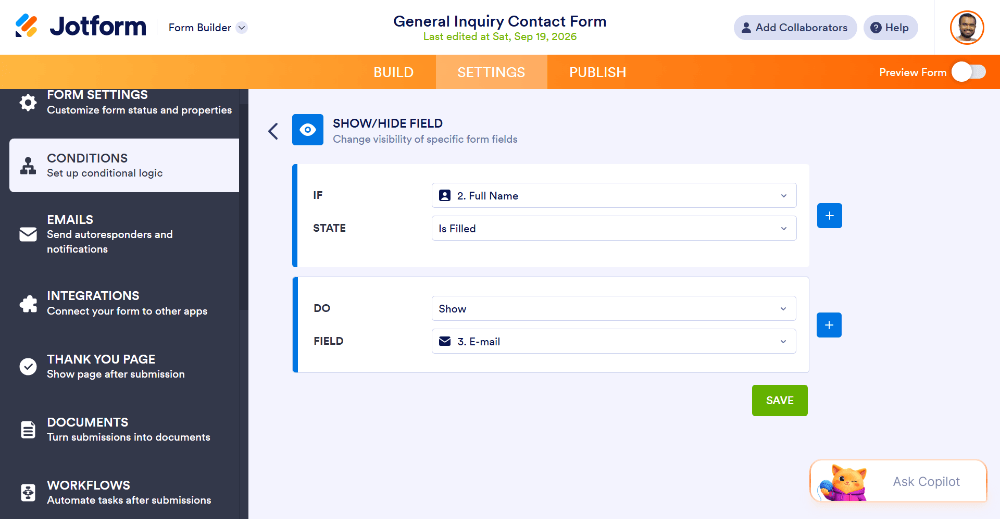
Not every lead needs the exact same follow-up. Someone requesting a demo is in a very different stage than someone just downloading a free guide. Conditional logic lets your form’s automated response adjust based on how someone answered a specific question.
For example, if your form includes a dropdown asking “What are you interested in?”, you can set up different autoresponder messages or route the notification to different team members depending on the answer – sales inquiries go to one person, support questions go to another, all automatically.
Step 7: Test the Entire Sequence Before Relying on It
Before trusting this system with real leads, submit a test entry yourself and follow it through completely:
- Confirm the instant confirmation message and email both appear correctly, with merge fields populated properly.
- Wait for (or manually trigger, if your platform allows) the next email in your nurture sequence, and check that the timing and content are right.
- Confirm your team notification actually arrives – in Slack, SMS, or wherever you set it up.
- Check that the CRM or spreadsheet entry appears correctly, with no missing or garbled fields.
This step matters more than it might seem. A broken merge field (showing “{Name}” literally instead of a real name) or a notification that silently fails to send can undermine the entire system without you realizing it until a real lead slips through.
Common Mistakes to Avoid
Making the first response too generic. A confirmation that reads like a form letter undercuts the trust you’re trying to build. Personalize it with merge fields at minimum.
Following up too aggressively. A nurture sequence that sends daily emails can feel like spam rather than helpful follow-up. Spacing messages a few days apart, with genuinely useful content in each one, performs much better.
Forgetting to test the full sequence, not just the first email. It’s easy to set up the instant confirmation and assume the rest works – but a broken integration further down the chain (a CRM connection, a delayed email) often goes unnoticed until a real lead is affected.
Not routing leads differently based on intent. Treating a hot, ready-to-buy lead exactly the same as someone casually browsing wastes the urgency that a fast, tailored response could otherwise capture.
Relying only on email with no team notification. If nobody on your team is actively alerted to new leads, even a perfect automated email sequence can’t replace the value of a timely human follow-up for leads that are ready to talk to a real person.
Why This Doesn’t Require a Developer
Everything described in this guide – merge fields, conditional routing, CRM syncing, team notifications – used to require real technical setup: API integrations, custom email automation scripts, and ongoing maintenance as each connected service updated its own systems. A no-code form builder like Jotform collapses most of this into visual settings panels and one-click integrations, meaning a small business owner or marketer can set up a genuinely sophisticated follow-up system in an afternoon, without writing or maintaining any code.
If you’re learning coding, that’s great 👍
But if you actually need a form for your business, use Jotform – it saves hours.
→Try Jotform free and set up automatic lead follow-up today
Frequently Asked Questions
How quickly should a lead receive their first automated response?
Immediately – within seconds of submitting the form. This is typically the single biggest factor in whether a lead stays engaged or moves on to a competitor.
Do I need a separate email marketing tool to follow up with leads?
Not necessarily. Basic confirmation and follow-up emails can be handled directly within a form builder like Jotform. A separate email marketing platform becomes more useful for longer, more complex nurture sequences.
Can I personalize automated emails without any technical skill?
Yes. Merge fields let you insert a lead’s actual submitted information (like their name) into an automated email using simple placeholder tags, with no coding required.
How do I make sure leads don’t fall through the cracks?
Combine an automated email sequence with a team notification (Slack, SMS, or similar) and a CRM or spreadsheet sync, so leads are both engaged automatically and visible to a real person who can follow up personally.
Is it possible to send different follow-ups to different types of leads?
Yes, using conditional logic. A form can trigger different automated messages or route notifications differently depending on how someone answered a specific question.
The Bottom Line
The gap between “someone filled out my contact form” and “someone actually followed up with them” is one of the most common and most fixable leaks in a business’s entire sales process.
An instant confirmation, a short personalized nurture sequence, immediate team notifications, and automatic CRM syncing together turn a passive form into an active follow-up system – one that works whether your team is online or not, and one that no longer depends on someone remembering to check an inbox in time.
None of it requires a developer or custom code; it requires setting it up once, testing it properly, and letting it run.