
Here’s a scenario that plays out on thousands of small business websites every single day: someone lands on your homepage, reads a page or two, likes what they see… and then leaves.
No email captured, no way to reach them again, no second chance. They were interested for about ninety seconds, and then that interest evaporated the moment they closed the tab.
Getting people to visit your website is only ever half the job. The real question – the one that actually determines whether your website makes you money – is this: how do you turn a visitor into someone you can contact again?
The simplest, most reliable answer is still a form. A well-designed lead form gives visitors an easy way to request information, download something, ask for a quote, book a consultation, or just stay connected – and it turns a one-time visit into an ongoing relationship you actually control.
If you’re figuring out how to collect email leads using forms for the first time, this is exactly where to start.
The good news is you don’t need to build a complicated system from scratch to make this work. This guide walks through exactly how to collect email leads using forms, what to include to get better-quality submissions, and how to set the whole thing up without needing a developer.
What Is an Email Lead Form?
An email lead form is simply a form that asks visitors for their email address so you can follow up with them. At its simplest, that might look like:
- Name
- Email address
- Message
But the right fields depend entirely on your business. A freelancer might use:
- Name
- Type of project
- Budget
- Project details
A consultant might use something leaner:
- Name
- Company
- What do you need help with?
The important thing isn’t following a template exactly – it’s collecting just enough information to start a useful conversation, without making the form feel like a chore.
Why Use a Form Instead of Just Listing Your Email?
You could simply display your email address on your website and call it a day. But a form gives you something an inbox never will: control over the information coming in, and context before you even reply.
Compare these two scenarios. Someone emails you directly and writes: “Hi, I need some information about your service.” Not much to work with. Now compare that to a form that asks a simple multiple-choice question upfront – “What are you interested in?” – with options like Website Design, SEO, Content Writing, or Other. Suddenly you already know what they need before you’ve typed a single word back.
A form doesn’t just collect an email address. It organizes your inquiries and turns a scattered inbox into a consistent, repeatable lead collection process.
How to Collect Email Leads Using Forms: 10 Practical Steps
1. Decide What You Actually Want From the Lead
Before you build anything, get specific about your goal. Don’t add a form to your site just because every business website has one – figure out what action you’re actually trying to drive.
Do you want visitors to:
- Request a quote?
- Ask a question?
- Book a consultation?
- Request a demo?
- Download a resource?
- Join an email list?
- Simply inquire about your services?
Whatever the answer, it determines what fields you actually need. If you’re collecting leads for a free consultation, something like Name + Email + Service Needed + Message is probably far more useful than a long list of unrelated questions that don’t serve that specific goal.
2. Make the Email Field the Obvious Centerpiece
The email field is the single most important part of the entire form – everything else is secondary. Label it clearly:
Email Address *
And give people a reason for the request. A short line like “Enter your email and we’ll send you the requested information” makes the ask feel natural instead of transactional, and it quietly answers the question every visitor is silently asking: “what happens if I actually do this?”
3. Resist the Urge to Ask for Everything
The fastest way to kill a lead form’s conversion rate is to pile on fields. Picture someone trying to request a quote and being confronted with Full Name, Email, Phone, Company, Job Title, Address, Website, Number of Employees, Annual Revenue, Budget, and Message – all before the conversation has even started. Most people won’t make it past field six.
Bad form
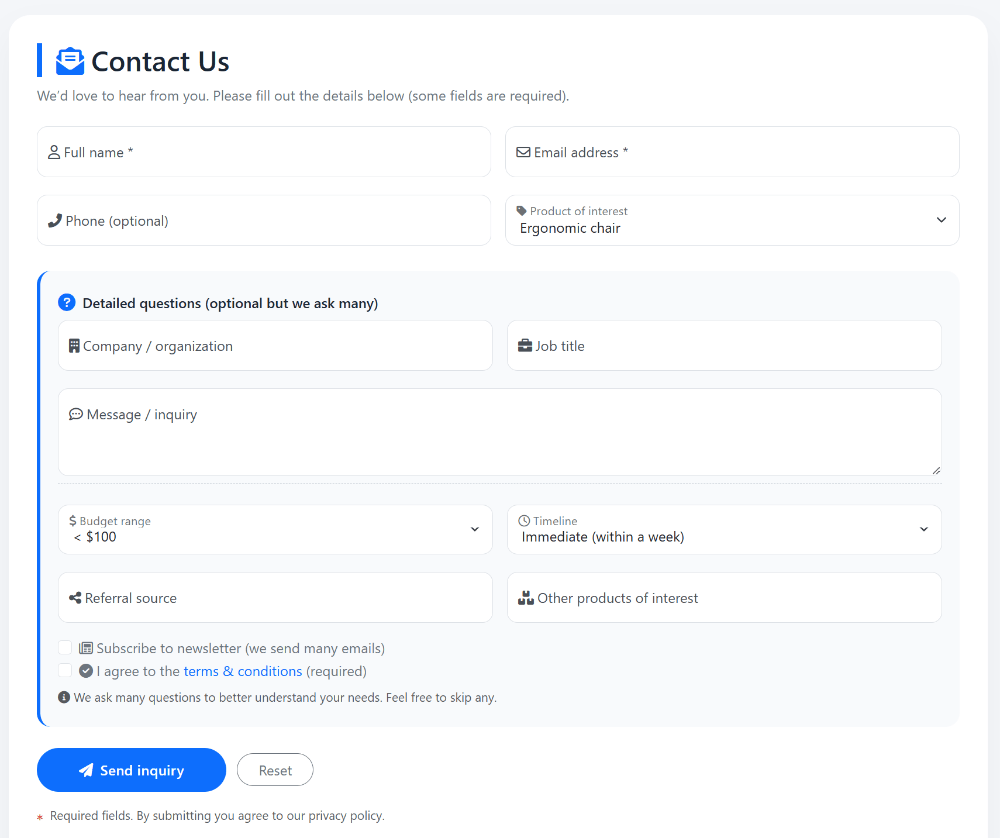
Start with only what you truly need. For many businesses, Name, Email, and one relevant question is genuinely enough. You can always ask for more once someone’s actually replied.
Good form
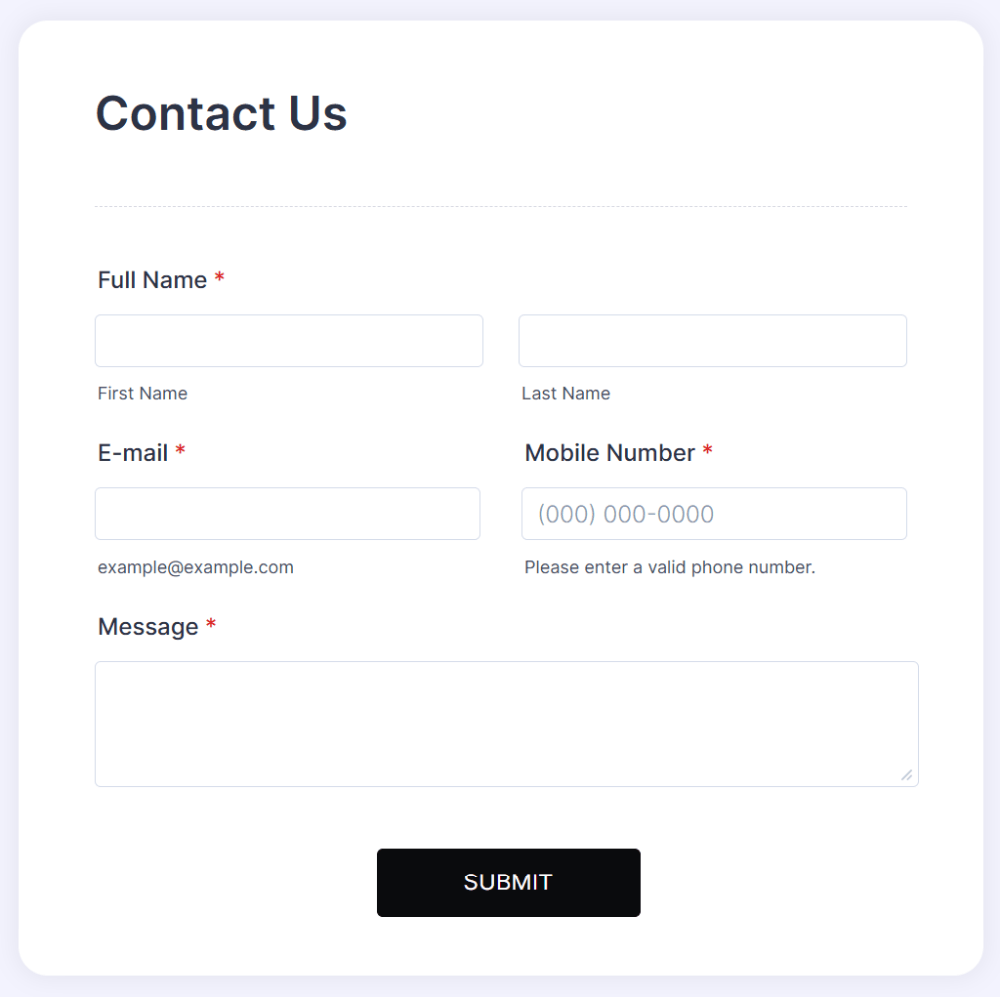
4. Give People a Reason to Actually Submit Their Email
People hand over their email far more willingly when they understand exactly what they’re getting in return. A generic heading like “Contact Us” doesn’t tell anyone anything. Compare that to:
- Get a Free Project Quote
- Request Your Free Consultation
- Get the Complete Pricing Guide
Each of these tells the visitor precisely what happens the moment they click submit – and that clarity alone can noticeably lift completion rates.
5. Use a Clear, Specific Call-to-Action
The submit button is a small piece of the form, but its wording carries more weight than it should get credit for. Instead of defaulting to a flat “Submit,” try something that names the outcome:
- Get My Quote
- Request a Consultation
- Send My Request
- Get the Guide
- Book My Consultation
The button should tell the visitor what they’re getting, not just what action they’re performing.
6. Make Sure It Actually Works on a Phone
Don’t assume every visitor is on a desktop, because most of them aren’t. Open your own form on your own phone right now and actually test it.
Check whether the fields are easy to tap, the text is readable without zooming, the form fits the screen without sideways scrolling, and the submit button is easy to reach.
Also check whether the on-screen keyboard covers up important fields while typing – a surprisingly common, surprisingly overlooked problem.
A form can look flawless on a large monitor and still be genuinely frustrating to use on the device most of your visitors are actually holding.
7. Add a Clear Confirmation Message
What actually happens after someone hits submit? Don’t leave them wondering. Instead of just refreshing the page or showing nothing at all, display something specific: “Thanks! We’ve received your request. We’ll contact you within one business day.”
That single sentence reassures the visitor their information genuinely went through. If you’ve promised to send something by email, say so directly in that same message, so there’s no gap between “I submitted this” and “I know what happens next.”
8. Set Up Reliable Email Notifications
Collecting an email address only matters if you actually follow up on it. Set up a notification so you know the moment a new lead comes in – something simple like:
New Lead Received
Name: Sarah Johnson
Email: [email protected]
Interested in: Website Design
This lets you respond while the inquiry is still fresh, rather than discovering it three days later buried under everything else in your inbox. For businesses handling a higher volume of leads, connecting your form to other tools – a CRM, a spreadsheet, a Slack channel – helps keep everything organized instead of relying on a single inbox to catch it all.
9. Use a Form Builder Instead of Coding Everything Yourself
You can absolutely build an email lead form using HTML, CSS, JavaScript, and a backend like PHP – and if you’re learning web development or need very specific custom control, that’s a completely valid approach.
But if your actual goal is collecting leads for your business, you don’t need to build every layer yourself.
A no-code form builder like Jotform lets you create forms visually, customize the fields, configure notifications, and publish the whole thing without touching a backend at all.
In practice, this usually means starting from a lead-generation or contact-form template, removing whatever fields you don’t need, adjusting it to match your business, and publishing – all in one sitting, without ever opening a code editor.
For freelancers and small businesses especially, this is the difference between having a working lead form today and having a half-finished coding project sitting untouched for weeks.
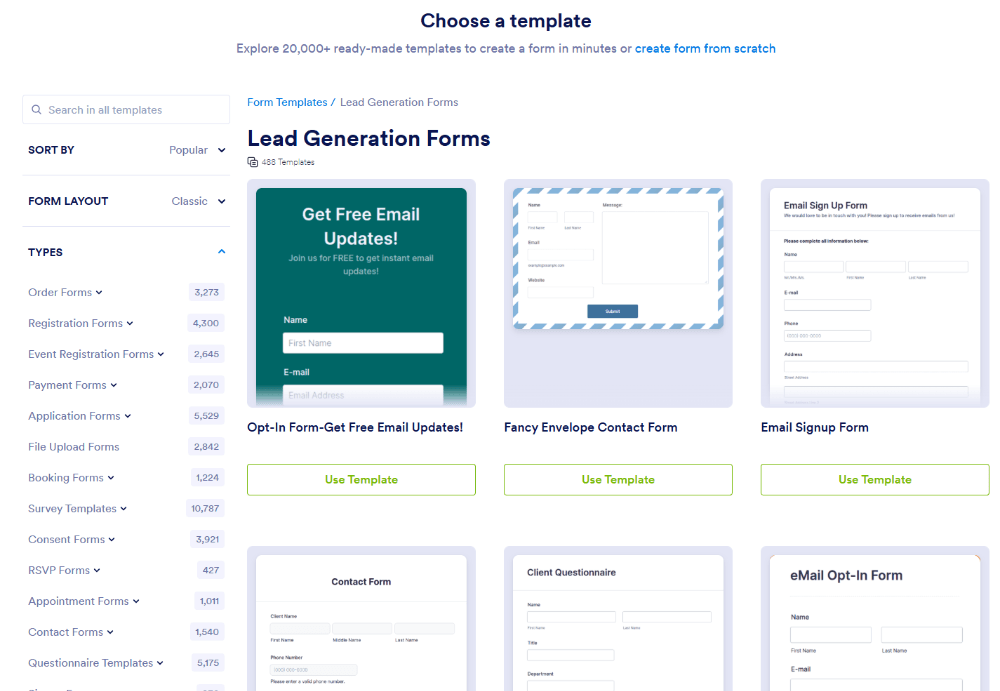
10. Test Your Lead Form Before You Ever Promote It
Before sending real traffic to your form, submit it yourself and walk through the entire chain:
Website → Form → Submission → Notification → Follow-up
Confirm that the submission actually goes through, the email address is captured correctly, you receive the notification, the confirmation message displays properly, the form works cleanly on mobile, and any promised follow-up (an email, a download, a guide) actually happens.
A form that quietly fails at any one of these steps can turn a genuinely interested visitor into a lead you’ll never even know you lost.
A Simple Email Lead Form Example
For a small service business, this doesn’t need to be complicated. A perfectly functional starting point looks like:
Get a Free Quote
- Name
- Email Address
- What do you need help with?
- Project Details
[Get My Free Quote]
That’s genuinely enough to start a real conversation. If you later find you need more information, you can always add it – but starting lean means more people actually finish filling it out in the first place.
Where Should You Actually Put Your Lead Form?
You’re not limited to one location. Depending on your site, a form can live on:
Your homepage – useful if generating leads is one of your central business goals, and you want every visitor to see the opportunity.
Service pages – a visitor already reading about a specific service is showing clear intent, so a relevant inquiry form right there makes natural sense.
Blog posts – if an article solves a real problem and naturally leads toward a service you offer, a relevant form or CTA placed partway through can convert well.
Landing pages – a dedicated page focused entirely on one offer, like a free consultation, a quote, or a downloadable resource, tends to convert noticeably better than a form competing for attention on a busier page.
What Actually Makes a Good Email Lead Form?
Strip away the specifics, and a genuinely good lead form comes down to a handful of basics:
- Clear purpose – visitors should understand exactly why they’re filling it out.
- Relevant fields – only ask for information you’ll actually use.
- Simple design – don’t overwhelm visitors with unnecessary questions.
- Mobile-friendly layout – make it just as easy to complete on a phone as on a laptop.
- A clear CTA – tell visitors what happens the moment they click.
- Reliable notifications – make sure you actually know when a new lead arrives.
- Fast follow-up – don’t let an interested prospect sit and wait longer than necessary.
None of these require advanced design skill or technical knowledge. They just require attention to the small details that most forms quietly skip.
Frequently Asked Questions
Q1. What is the best way to collect email leads from a website?
A simple lead-generation form is one of the most practical options. Ask for the visitor’s email along with only the information you actually need, explain clearly what they’ll receive, and make the submission process easy on both desktop and mobile.
Q2. How many fields should an email lead form have?
There’s no single ideal number for every business. Start with the minimum information you genuinely need – for a basic inquiry, Name, Email, and Message may be enough – and add fields only when they serve a clear, specific purpose.
Q3. Can I collect email leads without coding?
Yes. No-code form builders let you create and publish lead forms without building the backend yourself. Tools like Jotform provide ready-made templates and a visual builder, so you can go from idea to published form without writing anything.
Q4. How do I follow up with email leads?
At minimum, set up an email notification for every new submission and respond promptly. As your volume grows, connecting your form to an email marketing tool, CRM, or other business systems can help keep follow-up consistent instead of relying on memory alone.
Q5. Should I use a contact form or an email signup form?
It depends on your goal. Use a contact or inquiry form when you want to understand a potential customer’s specific needs. Use a dedicated email signup form when your main goal is simply building a list for newsletters, updates, or ongoing communication.
Final Thoughts
Learning how to collect email leads using forms isn’t really about the form itself – it’s about making the process effortless for the visitor and genuinely useful for your business on the other end.
Start with a clear offer, ask only for what you need, make sure it works on mobile, and set up a reliable way to actually receive and follow up on every submission that comes in.
If you don’t want to spend your time building and maintaining the technical side yourself, a no-code form builder like Jotform simplifies nearly all of it.
You can start with a template, customize the fields for your business, set up notifications, and publish a working form in one sitting – no backend code required.
If you’re learning coding, that’s great 👍
But if you actually need a form for your business, use Jotform – it saves hours.
Want to collect leads without building the entire form system yourself?
Try Jotform free and publish your first lead form today →
If your goal is simply to start collecting email leads, building a simple form and testing it with real visitors is a genuinely good place to begin – the rest can always be refined once real submissions start coming in.