In this tutorial, you will learn Bootstrap 4 getting started to install, setup, and start using it on your projects.
But, before getting started with Bootstrap 4, you need to use the best HTML editor of your choice to start writing codes fastly. I recommend Notepad++ editor to write Bootstrap 4 codes on your project.
If you need help on installing Notepad++ and executing Bootstrap 4 codes, you can read our guide on how to write HTML code and execute the program.
Follow the step-by-step guide given below to learn how to install and set up Bootstrap 4.
How to Install and Set Up Bootstrap 4 For Getting Started
Here is the step-by-step process you need to follow:-
Step 1: Create a Basic HTML Template
The first step is to open the HTML editor of your choice and create a new HTML template. Start writing the below-given HTML codes to create a basic template for Bootstrap 4.
|
1 2 3 4 5 6 7 8 9 10 |
<!DOCTYPE html> <html lang="en"> <head> <title>Basic HTML Template</title> <meta charset="utf-8"> </head> <body> <p>Hello world!</p> </body> </html> |
Step 2: Add Bootstrap 4 <meta> Tag Inside <head> Tag
Bootstrap 4 is a mobile-first and designed for mobile devices to scale according to screen sizes. To ensure proper rendering and touch zooming for all devices, you need to add the given below <meta> tag inside the <head> tag.
|
1 |
<meta name="viewport" content="width=device-width, initial-scale=1, shrink-to-fit=no"> |
Step 3: Add Bootstrap CSS and Javascript Files
There are two methods to add Bootstrap CSS and javascript files to your template. The first method is using CDN and the second method is by downloading files locally.
- Using CDN
- By Downloading Bootstrap 4 Library Files Locally
Let’s find out these methods to add Bootstrap 4 library to your starter template.
Method 1: Using CDN
This is the fastest method of adding Bootstrap 4 library files to the basic HTML template. In this method, you need to just add the CDN links on your template to quickly start developing mobile-responsive pages.
Below are the links you can copy and paste to your HTML template:-
1. Copy and Paste Bootstrap 4 CSS CDN Link to <head> Tag
|
1 2 |
<!-- Compiled and Minified Bootstrap 4 CSS CDN --> <link rel="stylesheet" href="https://stackpath.bootstrapcdn.com/bootstrap/4.4.1/css/bootstrap.min.css" crossorigin="anonymous"> |
2. Add Bootstrap 4 JS Script CDN Links Before </body> Tag
|
1 2 3 4 5 6 7 8 |
<!-- jQuery Library CDN--> <script src="https://code.jquery.com/jquery-3.4.1.slim.min.js" crossorigin="anonymous"></script> <!-- Popper JS CDN--> <script src="https://cdn.jsdelivr.net/npm/[email protected]/dist/umd/popper.min.js" crossorigin="anonymous"></script> <!-- Compiled and minified Bootstrap 4 JS CDN --> <script src="https://stackpath.bootstrapcdn.com/bootstrap/4.4.1/js/bootstrap.min.js" crossorigin="anonymous"></script> |
Let’s find out the second method of adding the Bootstrap 4 library files to your project.
Method 2: By Downloading Bootstrap 4 Library Files Locally
In this method, you need to download the Bootstrap compiled and minified library files to your local system.
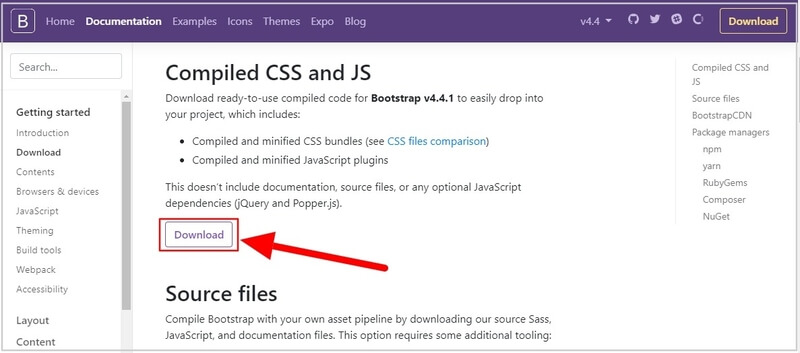
First of all, click this link ➔ open the Bootstrap getting started page and click the ‘Download’ button as indicated below.
After that, store the CSS and JS folder inside the folder name ‘bootstrap’.
In addition to this, you also need to download jQuery library and Popper.js to your JS folder under the ‘bootstrap’ folder. To download, click the below links to open them in the new tab.
Further, go to them and right-click the mouse to select Save as… option to download the jQuery library and Popper.js on your local system. After that, move them to the JS folder inside the ‘bootstrap’ folder.
Now, as a result, your Bootstrap library file links are ready to use on your starter HTML template. You need to copy the links given below and paste them to your starter HTML template.
<head> Tag
|
1 2 |
<!-- Compiled and Minified Bootstrap 4 CSS Locally --> <link rel="stylesheet" href="bootstrap/css/bootstrap.min.css" crossorigin="anonymous"> |
2. Add Bootstrap 4 JS Links Locally Before </body> Tag
|
1 2 3 4 5 6 7 8 |
<!-- jQuery Library Locally --> <script src="bootstrap/js/jquery-3.4.1.slim.min.js" crossorigin="anonymous"></script> <!-- Popper JS Locally --> <script src="bootstrap/js/popper.min.js" crossorigin="anonymous"></script> <!-- Compiled and minified Bootstrap 4 JS Locally --> <script src="bootstrap/js/bootstrap.min.js" crossorigin="anonymous"></script> |
Let’s move further to wrap the content section of the starter template inside the container classes.
Step 4: Wrap Content Inside Container Classes
There are two container classes in Bootstrap 4 given below:-
.container.container-fluid
and you need to wrap your content inside the container class of your choice. The above-started template contains only paragraphs (<p>) as the content part. So, its the only content you have to wrap.
Let’s find out this with the examples given below for them:-
Content Inside the .container class (Fixed width container)
|
1 2 3 |
<div class="container"> <p>Hello world!</p> </div> |
OR
Content Inside the .container-fluid class (Full-width container)
|
1 2 3 |
<div class="container-fluid"> <p>Hello world!</p> </div> |
.container class here to describe the process of setting up Bootstrap 4.Step 5: Combine All Together
|
1 2 3 4 5 6 7 8 9 10 11 12 13 14 15 16 17 18 19 20 21 22 |
<!DOCTYPE html> <html lang="en"> <head> <title>Bootstrap 4 Starter Template</title> <meta charset="utf-8"> <meta name="viewport" content="width=device-width, initial-scale=1, shrink-to-fit=no"> <!-- Compiled and Minified Bootstrap 4 CSS CDN --> <link rel="stylesheet" href="https://stackpath.bootstrapcdn.com/bootstrap/4.4.1/css/bootstrap.min.css" crossorigin="anonymous"> </head> <body> <!-- All content inside Bootstrap 4 Container --> <div class="container"> <p>Hello world!</p> </div> <!-- jQuery Library CDN--> <script src="https://code.jquery.com/jquery-3.4.1.slim.min.js" crossorigin="anonymous"></script> <!-- Popper JS CDN--> <script src="https://cdn.jsdelivr.net/npm/[email protected]/dist/umd/popper.min.js" crossorigin="anonymous"></script> <!-- Compiled and minified Bootstrap 4 JS CDN --> <script src="https://stackpath.bootstrapcdn.com/bootstrap/4.4.1/js/bootstrap.min.js" crossorigin="anonymous"></script> </body> </html> |
As a result, the above template becomes the Bootstrap 4 starter template for you to add to your project. You can now save you file in .html extension to make it Bootstrap 4 HTML document.
After that, double click (or right-click and select browser) on it to open and execute on a web browser to see the output.
Next Chapter ➔ Bootstrap 4 Layout >>