Learn how to create an ajax contact form with an attachment in PHP. You can send emails using the PHP default mail() function or PHPMailer Gmail SMTP using PHP.
The contact form is the most essential part of online business to collect customers’ queries. Adding file attachments to it helps you easily understand customers’ queries visually.
Looking to create contact forms with attachments without coding required? Create beautiful-looking contact forms with JotForm.
You have to define what type of file attachments you want to collect from your users. It can be PDF, DOC, TXT, JPG, PNG, or any other file type you need to easily understand customers’ queries.
To give less load to your server, you also require to limit the upload size on your contact form. You need file validation that restricts users to upload the required file type with the required file size.
In this post, you will learn a step-by-step process on how to create an ajax contact form with file attachment and validation in PHP.
So, let’s get started.
How to Create Ajax Contact Form with Attachment in PHP (Step-by-step)
Here is the step-by-step process on how to create an ajax contact form with an attachment using PHP:-
Step 1: Create a Contact Form Design with File Upload for Attachment
I am going to create a contact form design with a file input field to allow users to upload attachments. We will also use Bootstrap to create a responsive design that is also mobile-friendly. We will use Bootstrap version 5 to easily create a design with fewer CSS class additions.
To start using Bootstrap 5 classes and make them work for your design, you just have to include its style CDN URL as given below. Include it in the <head> section of your contact form design code in HTML.
|
1 |
<link href="https://cdn.jsdelivr.net/npm/[email protected]/dist/css/bootstrap.min.css" rel="stylesheet"> |
We are also going to use font awesome icons and jQuery ajax script for form submission. To make font awesome icons and jQuery form submission script work, you also have to add the Font Awesome CSS and jQuery library CDN URL given below:-
|
1 2 |
<link rel="stylesheet" href="https://cdnjs.cloudflare.com/ajax/libs/font-awesome/4.7.0/css/font-awesome.min.css"> <script src="https://cdnjs.cloudflare.com/ajax/libs/jquery/3.6.3/jquery.js"></script> |
After adding the above CDN URLs in the <head> section of your HTML design, you can start creating a contact form design with font awesome icons and jQuery ajax script. You will get the jQuery ajax script for form submission in the 2nd step.
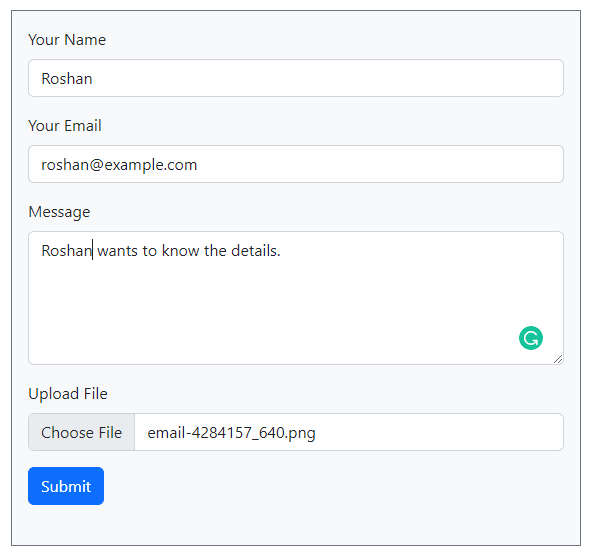
Below is the complete code contact form design with a file input field to allow users to upload attachments. You can use the below code to get the example contact form design shown after the below code.
|
1 2 3 4 5 6 7 8 9 10 11 12 13 14 15 16 17 18 19 20 21 22 23 24 25 26 27 28 29 30 31 32 33 34 35 36 37 38 39 40 41 42 43 44 45 46 47 48 49 50 51 52 53 54 55 56 57 58 59 60 61 62 |
<!doctype html> <html lang="en"> <head> <title>Ajax Contact Form with Attachment in PHP</title> <meta charset="utf-8"> <meta name="viewport" content="width=device-width, initial-scale=1"> <link href="https://cdn.jsdelivr.net/npm/[email protected]/dist/css/bootstrap.min.css" rel="stylesheet"> <link rel="stylesheet" href="https://cdnjs.cloudflare.com/ajax/libs/font-awesome/4.7.0/css/font-awesome.min.css"> <script src="https://cdnjs.cloudflare.com/ajax/libs/jquery/3.6.3/jquery.js"></script> <style> .loader_icon{ background: #0404046b; display: flex; justify-content: center; align-items: center; position: fixed; left: 0; top: 0; width: 100%; height: 100%; } .loader_icon i{ font-size: 24px; color: #fff; } </style> </head> <body> <div class="container"> <div class="row"> <div class="col-md-6 offset-md-3 mt-3 bg-light p-3 border border-secondary"> <!-- Bootstrap main form start --> <form method="POST" id="ajaxform" action="send-email-with-attachment.php" enctype="multipart/form-data"> <div class="mb-3"> <label for="Name" class="form-label">Your Name</label> <input type="text" class="form-control" name="name" placeholder="Enter name" required> </div> <div class="mb-3"> <label for="Email" class="form-label">Your Email</label> <input type="email" class="form-control" name="email" placeholder="Enter email" required> </div> <div class="mb-3"> <label for="message" class="form-label">Message</label> <textarea class="form-control" name="message" placeholder="Enter your message" rows="5" required></textarea> </div> <div class="mb-3"> <label for="File" class="form-label">Upload File</label> <input type="file" class="form-control" name="file" required> </div> <input type="submit" class="btn btn-primary" name="submit" value="Submit"> </form> <!-- Bootstrap main form end --> <br> <div id="form_message"></div> </div> </div> </div> <script src="https://cdn.jsdelivr.net/npm/[email protected]/dist/js/bootstrap.bundle.min.js"></script> <div class="loader_icon" style="display:none;"><i class="fa fa-spinner fa-spin"></i></div> </body> </html> |
The above contact form with the attachment contains all the important input fields useful to make communicate with your audience. The fields are Name, Email, Message, and File upload. All input field contains required attribute to make them required to fill in to be able to submit the form.
Let’s add a jQuery ajax script to submit the form without page refresh. The script also displays the loader icon until the user will get the result of the contact form.
Step 2: jQuery Ajax Contact Form Submission with Loader Icon
jQuery Ajax is useful to submit the form without page refresh. You can also update some parts of a page without refreshing the page.
The below ajax submission script sends contact form data to the PHP file added in the action attribute of the <form> tag above. The PHP file contains the PHP script to validate form data and send an email after all things are ok.
You will have to place the below code just before the </body> close tag to make it work on your contact form.
|
1 2 3 4 5 6 7 8 9 10 11 12 13 14 15 16 17 18 19 20 21 |
<script> $(document).on("submit", "form", function(e){ e.preventDefault(); // avoid executing the actual submission of the form var form = $(this); $(".loader_icon").show(); $.ajax({ url: $(this).attr("action"), type: $(this).attr("method"), data: new FormData(this), processData: false, contentType: false, success: function (data, status){ $('div#form_message').html(data); $(".loader_icon").hide(); }, error: function (xhr, ajaxOptions, thrownError){ alert(thrownError + "\r\n" + xhr.statusText + "\r\n" + xhr.responseText); } }); }); </script> |
You will also get the loader icon on click the submit button using the above jQuery Ajax script. The below image shows the loader icon after clicking the submit button. It also hides the loader icon when getting a successful result from the contact form.
![]()
The loader icon is useful to show users the form is working backend until the users get proper results after form submission.
Step 3: Get Form Data and Validate Email Address, File Size, and Type Using PHP
After you have done with the design part of the contact form, you can collect form data and check if they are valid or not using PHP. There are three things that you need to perform validation on that are email address, file type, and file size.
First of all, get the form data using PHP global variable $_POST. After that, use regex for an email address to match the email address for validation.
After that, collect uploaded file data using PHP that are file name, size, and type. Now, you can specify the file type and size required to collect from users with the PHP code given below.
|
1 2 3 4 5 6 7 8 9 10 11 12 13 14 15 16 17 18 19 20 21 22 23 24 25 26 27 28 29 30 31 32 33 34 35 36 37 38 39 40 41 42 43 44 45 46 47 48 49 50 51 52 53 54 55 56 57 58 59 60 61 62 63 64 65 66 67 68 69 70 71 72 73 74 75 76 77 78 79 80 81 82 83 84 85 |
<?php // Get the submitted form data $email = $_POST['email']; $name = $_POST['name']; $message = $_POST['message']; //validation for email $email_exp = '/^[A-Za-z0-9._%-]+@[A-Za-z0-9.-]+\.[A-Za-z]{2,4}$/'; if (!preg_match($email_exp, $email)) { ?> <div class="alert alert-danger alert-dismissible fade show"> <strong>The Email address you entered is not valid.</strong> <button type="button" class="btn-close" data-bs-dismiss="alert" aria-label="Close"></button> </div> <?php exit; } //Get uploaded file data using $_FILES array $tmp_name = $_FILES['file']['tmp_name']; // get the temporary file name of the file on the server $filename = $_FILES['file']['name']; // get the name of the file $filesize = $_FILES['file']['size']; // get size of the file for size validation $filetype = $_FILES['file']['type']; // get type of the file $fileerror = $_FILES['file']['error']; // get the error (if any) //validate form field for attaching the file if($fileerror > 0) { ?> <div class="alert alert-danger alert-dismissible fade show"> <strong>Upload error or No files uploaded.</strong> <button type="button" class="btn-close" data-bs-dismiss="alert" aria-label="Close"></button> </div> <?php exit; } // Upload attachment file if(!empty($_FILES["file"]["name"])){ // File path config $targetDir = "uploads/"; $fileName = basename($filename); $targetFilePath = $targetDir . $fileName; $fileType = pathinfo($targetFilePath,PATHINFO_EXTENSION); // Allow certain file formats $allowTypes = array('pdf', 'doc', 'docx', 'jpg', 'png', 'jpeg'); if(in_array($fileType, $allowTypes)){ // Check file size if ($filesize > 2000000) { ?> <div class="alert alert-danger alert-dismissible fade show"> <strong>File size should be less than 2MB</strong> <button type="button" class="btn-close" data-dismiss="alert">×</button> </div> <?php exit; }else{ // Upload file to the server if(move_uploaded_file($tmp_name, $targetFilePath)){ $uploadedFile = $targetFilePath; }else{ ?> <div class="alert alert-danger alert-dismissible fade show"> <strong>Sorry, there was an error uploading your file.</strong> <button type="button" class="btn-close" data-dismiss="alert">×</button> </div> <?php exit; } } }else{ ?> <div class="alert alert-danger alert-dismissible fade show"> <strong>Sorry, only PDF, DOC, JPG, JPEG, & PNG files are allowed to upload.</strong> <button type="button" class="btn-close" data-bs-dismiss="alert" aria-label="Close"></button> </div> <?php exit; } } ?> |
The above code restricts users to upload only PDF, Doc, JPG, JPEG, and PNG file formats. It also allows users to upload files with a size maximum of up to 2 MB. Above that size and other file formats, users will get error messages as given in the images below.
Also, create a folder with the name uploads/ in the base location to make the above code work.
I have created the error alert message using Bootstrap to make it look beautiful. You can see these messages below. The cross sign (X) is useful to close the error message.
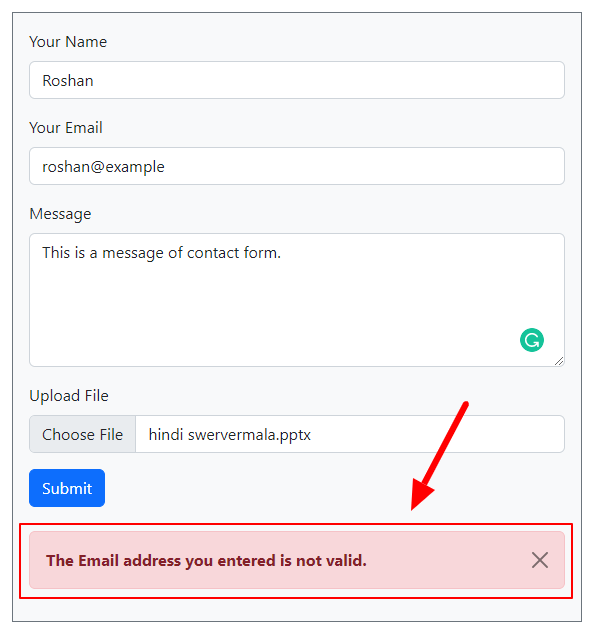
Email Address Validation Error Message
When the users fill out the contact form and enter the wrong email address format, they will get an error message as shown in the image below.
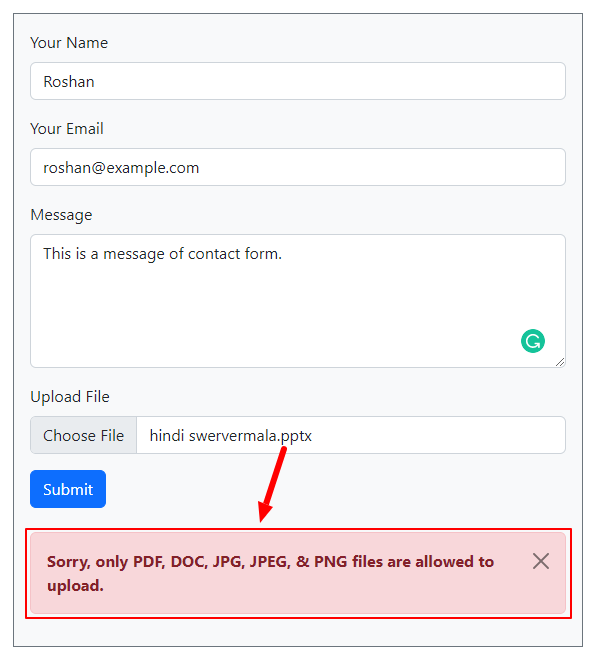
File Type Validation Error Message
The specified file format allowed is PDF, Doc, JPG, JPEG, and PNG file format. When the users upload another file format, they will get an error message as shown in the image below.
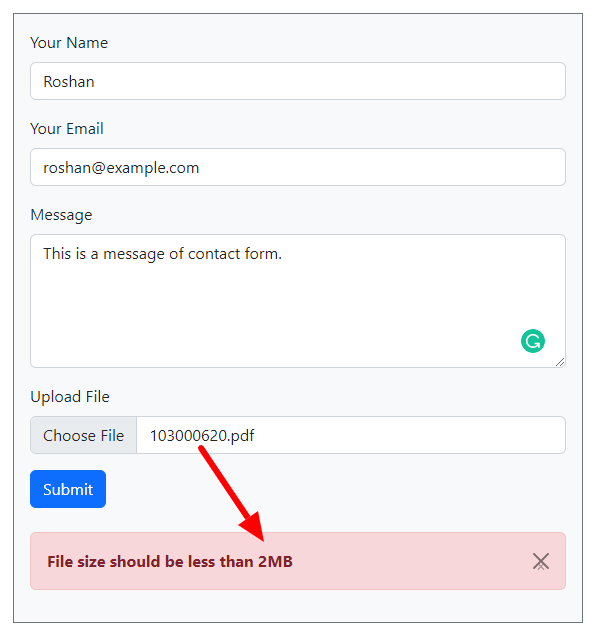
File Size Validation Error Message
When the users upload larger-size files in the contact form, they will give extra load to your server. It can also make your server down. It’s better to restrict upload file size. That is why, in the above PHP code, we have mentioned allowing only files with a maximum size of 2MB.
If the users upload a file with a size of more than 2MB, they will get an error message as shown in the image below.
Step 4: Choose to Send the Attachment Via Mail() or PHPMailer Gmail SMTP in PHP
After collecting the form data and done with validation, you can send emails either by using the mail() or by using PHPMailer Gmail SMTP. Out of them, PHPMailer is the easiest way of sending attachments in PHP.
If your server provides email services to send emails, you can choose the use the mail(). However, if your hosting server does not allow email services, you won’t be able to send emails using mail(). In that condition, you can prefer PHPMailer to send emails through Gmail SMTP.
That’s why I have included both mail() and PHPMailer method below. So, let’s move ahead to learn them.
Method 1: Send Email with Attachment Using Default mail() Function of PHP
The PHP mail() to send attachments is a little bit difficult to use as it requires more coding to make it work.
Firstly, define the recipient’s email address, sender data, and message data. After that, define the email address and reply to the email address. The other code is self-explained with the comments given in the code below. You can see the below code to learn the method.
|
1 2 3 4 5 6 7 8 9 10 11 12 13 14 15 16 17 18 19 20 21 22 23 24 25 26 27 28 29 30 31 32 33 34 35 36 37 38 39 40 41 42 43 44 45 46 47 48 49 50 51 52 53 54 55 56 57 58 59 60 61 62 63 64 65 66 67 68 69 70 71 72 73 74 75 76 77 78 79 80 81 82 |
<?php //If everything above is ok then move further // Recipient Email, write your email here // Sender Data $from = $email; $fromName = $name; // Subject $emailSubject = 'Contact Form Submitted by '.$name; // Message $htmlContent = '<p><b>Customer contact details:-</b></p> <p><b>Name:</b> '.$name.'</p> <p><b>Email:</b> '.$email.'</p> <p><b>Message:</b> '.$message.'</p>'; // Header for sender info $headers = "From:". $fromName." <".$from.">"; if(!empty($uploadedFile) && file_exists($uploadedFile)){ // Boundary $semi_rand = md5(time()); $mime_boundary = "==Multipart_Boundary_x{$semi_rand}x"; // Headers for attachment $headers .= "\nMIME-Version: 1.0\n" . "Content-Type: multipart/mixed;\n" . " boundary=\"{$mime_boundary}\""; // Multipart boundary $message = "--{$mime_boundary}\n" . "Content-Type: text/html; charset=\"UTF-8\"\n" . "Content-Transfer-Encoding: 7bit\n\n" . $htmlContent . "\n\n"; // Preparing attachment if(is_file($uploadedFile)){ $message .= "--{$mime_boundary}\n"; $fp = @fopen($uploadedFile,"rb"); $data = @fread($fp,filesize($uploadedFile)); @fclose($fp); $data = chunk_split(base64_encode($data)); $message .= "Content-Type: application/octet-stream; name=\"".basename($uploadedFile)."\"\n" . "Content-Description: ".basename($uploadedFile)."\n" . "Content-Disposition: attachment;\n" . " filename=\"".basename($uploadedFile)."\"; size=".filesize($uploadedFile).";\n" . "Content-Transfer-Encoding: base64\n\n" . $data . "\n\n"; } $message .= "--{$mime_boundary}--"; $returnpath = "-f" . $email; // Send email $mail = mail($toEmail, $emailSubject, $message, $headers, $returnpath); // Delete attachment file from the server @unlink($uploadedFile); }else{ // Set content-type header for sending HTML email $headers .= "\r\n". "MIME-Version: 1.0"; $headers .= "\r\n". "Content-type:text/html;charset=UTF-8"; // Send email $sendmail = mail($toEmail, $emailSubject, $htmlContent, $headers); } // If mail sent if($sendmail == true){ ?> <div class="alert alert-success alert-dismissible fade show"> <strong>Message has been sent successfully.</strong> <button type="button" class="btn-close" data-bs-dismiss="alert" aria-label="Close"></button> </div> <?php }else { ?> <div class="alert alert-danger alert-dismissible fade show"> <strong>Message could not be sent. Please try again.</strong> <button type="button" class="btn-close" data-bs-dismiss="alert" aria-label="Close"></button> </div> <?php } ?> |
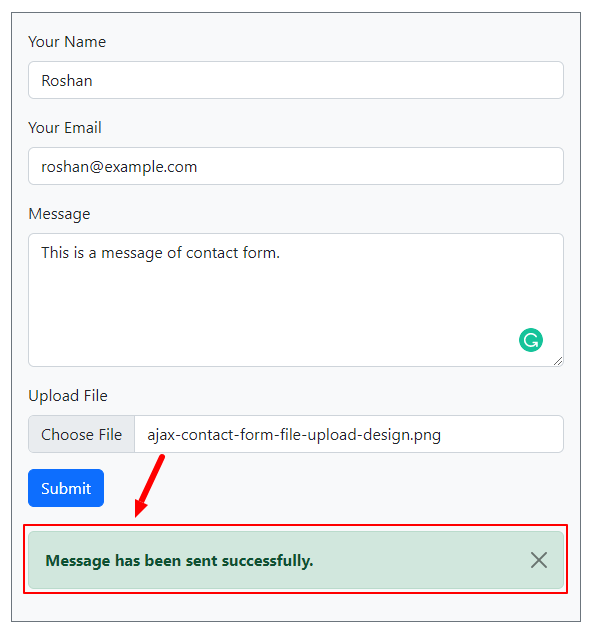
After submission of the form, you will get an email to send a success message as shown at the end of the code below.
Method 2: Send Email with the Attachment Using PHPMailer Gmail SMTP in PHP
You can also choose to send the collected contact form data using PHPMailer Gmail SMTP. It is a simple way that needs less code to send attachments in PHP. The codes given below are self-explained using the comments in them. So, you can easily understand the below code with comments.
It requires you to use the PHPMailer which you can download with the button given below. You can download and extract it in the base location where you have placed your main PHP index.php file.
|
1 2 3 4 5 6 7 8 9 10 11 12 13 14 15 16 17 18 19 20 21 22 23 24 25 26 27 28 29 30 31 32 33 34 35 36 37 38 39 40 41 42 43 44 45 46 47 48 49 50 51 52 53 54 55 56 57 58 59 60 61 |
<?php //If everything above is ok then move further //Use PHPmailer require "phpmailer/PHPMailerAutoload.php"; $mail = new PHPMailer; //Mailbody to send in email $mailbody = '<p><b>Customer contact details:-</b></p> <p><b>Name:</b> '.$name.'</p> <p><b>Email:</b> '.$email.'</p> <p><b>Message:</b> '.$message.'</p>'; //Sender email address $mail->isSMTP(); // Set mailer to use SMTP $mail->SMTPDebug = 0; //See errors, change it to 4 $mail->Host = 'smtp.gmail.com'; // Specify main and backup SMTP servers $mail->SMTPAuth = true; // Enable SMTP authentication $mail->Username = $sender; // SMTP username $mail->Password = 'yourgmailpassword';// Gmail SMTP password $mail->SMTPSecure = 'tls'; // Enable TLS encryption, `SSL` also accepted $mail->Port = 587; // TCP port to connect to $mail->setFrom($email, $name); //$mail->addAddress('[email protected]'); //add more recipient (optional) $mail->addReplyTo($email, $name); //$mail->addCC('[email protected]'); //$mail->addBCC('[email protected]'); //Add attachment if(is_array($_FILES)) { $mail->AddAttachment($uploadedFile, $fileName, 'base64', 'mime/type'); } $mail->isHTML(true); // Set email format to HTML $mail->Subject = 'Contact Form Submitted by '.$name; $mail->Body = $mailbody; //$mail->AltBody = 'This is the body in plain text for non-HTML mail clients'; //Email your contact form data with an attachment using Gmail SMTP with PHPMailer if(!$mail->send()){ ?> <div class="alert alert-danger alert-dismissible fade show"> <strong>Message could not be sent. Please try again.</strong> <button type="button" class="btn-close" data-bs-dismiss="alert" aria-label="Close"></button> </div> <?php echo 'Mailer Error: ' . $mail->ErrorInfo; }else{ ?> <div class="alert alert-success alert-dismissible fade show"> <strong>Message has been sent successfully.</strong> <button type="button" class="btn-close" data-bs-dismiss="alert" aria-label="Close"></button> </div> <?php @unlink($uploadedFile); } ?> |
When you submit the form, if everything is ok then you will get the success message as shown in the image below.
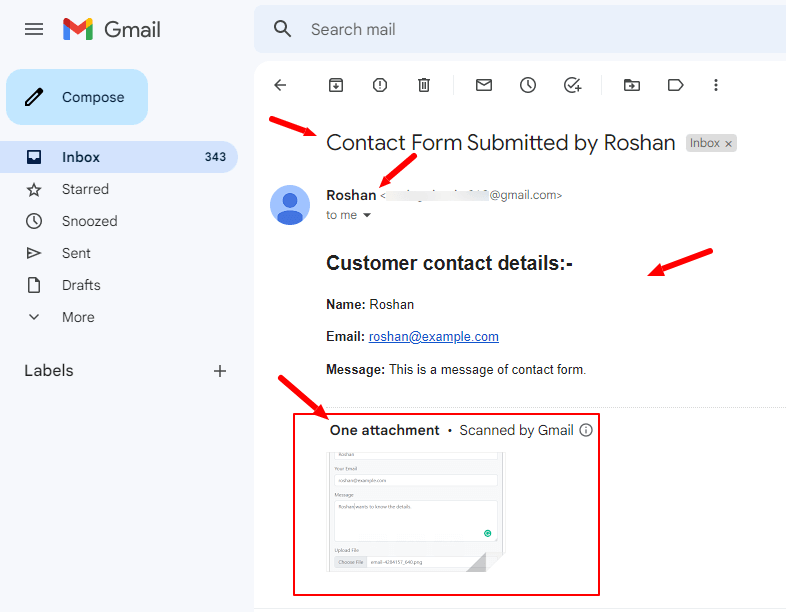
The email format the recipient will receive in their email inbox is as shown in the image below. The email contains the subject of the sent email, the sender name who submit the form, the email text content with sender data, and the image file attachment.
It is my Gmail inbox where I received the email after filling out and submitting the contact form. You can change the contact form email format as per your requirements.
You May Also Like to Read
- How to Create Contact Form Using PHP and MySQL
- PHP Ajax Contact Form with Captcha and Validation
- How to Create a Dynamic Contact Form in PHP with MySQL
I hope this tutorial helped you to create a contact form to send attachments in emails. If you have any queries, please comment below. I will reply to solve your queries.