In this post, learn how to create a contact form using PHP and MySQL to insert data into a database. After that, you can display records on your website page with the code given here.
A contact form allows your users to communicate with you on your website. Your customers can ask queries related to your products and services.

Looking to create contact forms without coding? Create beautiful looking contact forms with JotForm.
You can send emails from your contact forms. But, storing the data in the database helps you keep records of entries for a longer time. The user who want to contact you are willing to buy your services and products. It is useful for your business to keep records of them.
Connecting to the database and storing records require PHP coding and SQL queries given here in this post. I have broken the process into small steps to help you easily understand the process.
So, let’s get started.
How to Create Contact Form Using PHP and MySQL
Here is the step-by-step process to create a contact form using PHP and MySQL to store data in the database:-
Step 1: Create HTML Contact Form
In this step, we will create a contact form using HTML only. The form should contain fields that allow the website owner to contact the users. It also contains a field to allow the user to send complete queries.
So, keeping these things in mind, the following fields are required to add to the contact form:-
- Name (To know the user for personal communication)
- Email (To help the website owner contact the user by sending emails)
- Message (Allow users to add all queries to get an answer from the website owner)
No, let’s add HTML code to the HTML form to add the above fields to the contact form.
|
1 2 3 4 5 6 7 8 9 10 11 12 13 14 15 16 |
<div class="main-contact-form"> <form action="#" method="POST"> <label for="Name">Your Name</label> <input type="text" name="name" class="name" placeholder="Enter name" required> <label for="Email">Your Email</label> <input type="email" name="email" class="email" placeholder="Enter email" required> <label for="message">Message</label> <textarea name="message" class="message" placeholder="Enter your message" rows="5" required></textarea> <input name="submit" type="submit" value="Submit"> </form> </div> |
When you see the output of the above code, it gives a simple form without any styling. The design of the form is also an important part of your website. If your form design is not better, the user will find it unprofessional that can lose trust.
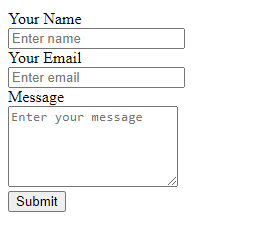
So, let’s add some styling to make it beautiful in the next step.
Step 2: Add CSS for Styling of Contact Form
The above simple HTML contact form is not enough to add to your website. You should consider adding some CSS code to make styling of your contact form. To make it look better and more beautiful, You can add some CSS given below.
|
1 2 3 4 5 6 7 8 9 10 11 12 13 14 15 16 17 18 19 20 21 22 23 24 25 26 27 28 29 |
<style> input[type='text'],input[type='email'], textarea{ width: 100%; padding: 10px; border-radius: 3px; border: 1px solid #ccc; margin-top: 10px; margin-bottom: 20px; } input[type='text']:focus,input[type='email']:focus, textarea:focus{ border: 1px solid #5db6db; box-shadow: 0 0 10px #b9eaff; outline: none !important; } input[type='submit']{ background: rgb(39,160,210); color: #fff; border: none; padding: 10px 20px; cursor: pointer; } .main-contact-form{ max-width: 400px; margin: 0 auto; background: #e9e9e9; padding: 20px 45px 20px 25px; border-radius: 5px; } </style> |
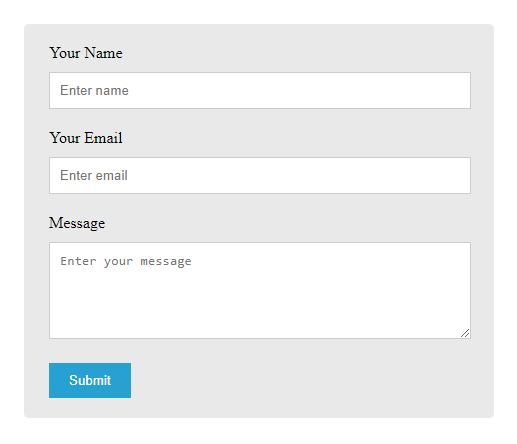
After you add the above CSS to your contact form, your form will appear like the image given below. It is much better and it will also look professional when you add the contact form to your website page.
Let’s add some PHP code to insert the record into the MySQL database. For this, you also have to create a database with a table to insert records. So, let’s do this in the next step.
Step 3: Create Database to Store Records
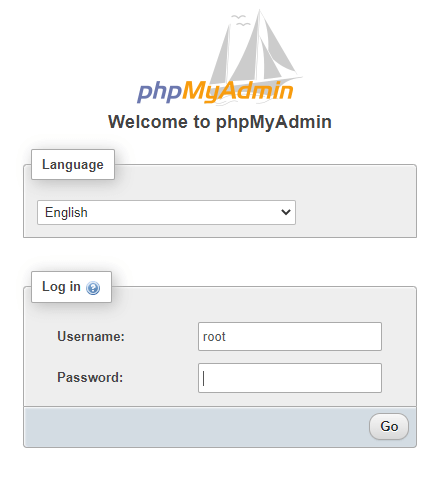
To create a database for your contact form, you have to log in to PHPMyAdmin.
login to PHPMyAdmin
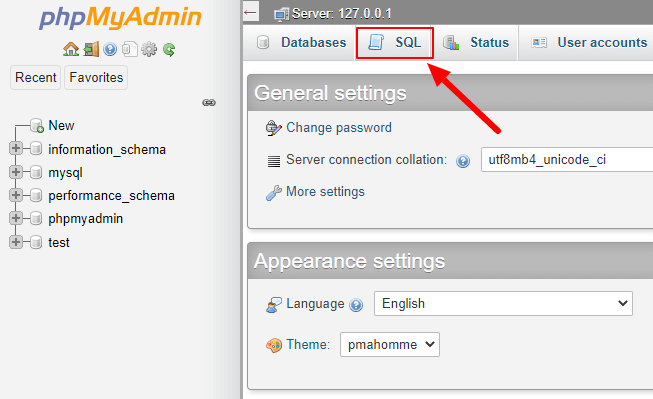
After PHPMyAdmin login, you will be taken to the dashboard. We will have to execute some SQL code to create the database. To do this, you have to open the ‘SQL’ tab in the dashboard.
Open the ‘SQL’ tab of PHPMyAdmin
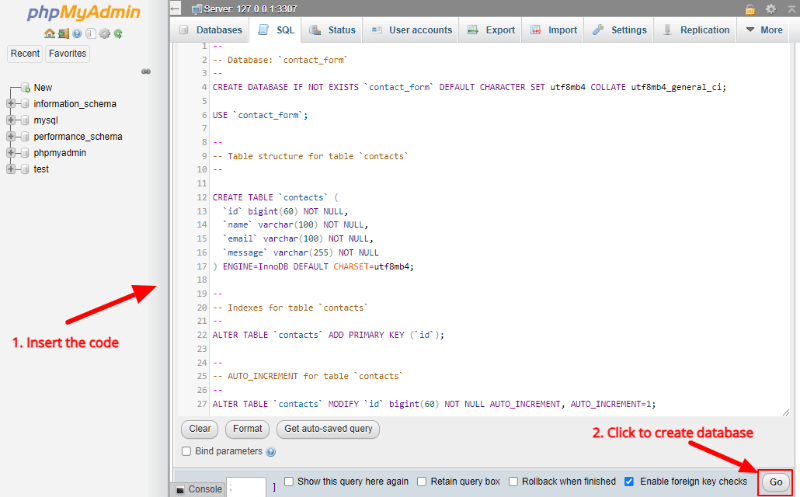
In the SQL tab, you will get a text area where you have to add the code given below. The code first creates the database with the name ‘contact_form’. After that, it uses this database to create a table on it with the form fields name, email, and message to insert records on this table.
Add the below code and click the ‘Go’ button to insert the database with tables.
|
1 2 3 4 5 6 7 8 9 10 11 12 13 14 15 16 17 18 19 20 21 22 23 24 25 26 27 |
-- -- Database: `contact_form` -- CREATE DATABASE IF NOT EXISTS `contact_form` DEFAULT CHARACTER SET utf8mb4 COLLATE utf8mb4_general_ci; USE `contact_form`; -- -- Table structure for table `contacts` -- CREATE TABLE `contacts` ( `id` bigint(60) NOT NULL, `name` varchar(100) NOT NULL, `email` varchar(100) NOT NULL, `message` varchar(255) NOT NULL ) ENGINE=InnoDB DEFAULT CHARSET=utf8mb4; -- -- Indexes for table `contacts` -- ALTER TABLE `contacts` ADD PRIMARY KEY (`id`); -- -- AUTO_INCREMENT for table `contacts` -- ALTER TABLE `contacts` MODIFY `id` bigint(60) NOT NULL AUTO_INCREMENT, AUTO_INCREMENT=1; |
The below image shows the added code given above. After that, click the ‘Go’ button to execute the SQL code and insert the database ‘contact_form’ with table ‘contacts’ that contains the form fields to store records.
The next step is to make a connection with the database and insert data. Let’s start with making a database connection.
Step 4: Make Database Connection Using PHP
To make a database connection, you have to use PHP mysqli_connect() function with four parameters server name, the username of the database, the password of the database, and the database name. You can copy the below code and add it just below the contact form.
|
1 2 3 4 5 6 7 8 9 10 11 12 13 14 15 16 |
<?php //Make database connection $servername = "localhost"; $username = "root"; $password = ""; $dbname = "contact_form"; // Create a connection $conn = mysqli_connect($servername, $username, $password, $dbname); // Check the connection if (!$conn) { die("Connection failed: " . mysqli_connect_error()); }else{ echo "connected successfully"; } ?> |
Step 5: Insert Contact Form Data Into Database Using PHP
Now, you have successfully made a connection with the database. You can now insert the data of your users who fill out the form into the database.
|
1 2 3 4 5 6 7 8 9 10 11 12 13 14 15 16 17 18 19 20 21 22 23 24 25 |
<?php if(isset($_POST['submit'])){ //Get form data $name = $_POST['name']; $email = $_POST['email']; $message = $_POST['message']; $email_exp = '/^[A-Za-z0-9._%-]+@[A-Za-z0-9.-]+\.[A-Za-z]{2,4}$/'; if (!preg_match($email_exp, $email)) { echo '<br><span style="color:red;">The Email address you entered is not valid.</span>'; exit; } $sql = "INSERT INTO contacts (name, email, message) VALUES ('$name', '$email', '$message')"; if (mysqli_query($conn, $sql)) { echo "New contact added successfully"; } else { echo "Error: " . $sql . "<br>" . mysqli_error($conn); } mysqli_close($conn); } ?> |
The above code first gets the user input name, email, and message using PHP $_POST super global variable. After that, it uses the insert query of SQL and uses PHP mysqli_query() function to execute the query and insert the data in the database.
Now, each time your user fills out the form on your website and clicks the submit button, the data gets inserted into the database.
Step 6: Display Inserted Data to a Page Using PHP
You can display the inserted data in your website backend. It can help you easily find the records of your users when you want to make communication with them.
It requires a few PHP codes to display in HTML table rows. The below PHP code first uses the select statement of SQL to select the table ‘contacts’. After that, execute the query using the PHP mysqli_query() function.
The PHP mysqli_num_rows() function checks whether there is some record present in the database table ‘contacts’ or not. If the record is present in the database table ‘contacts’, it uses the while loop to display all the records in HTML table rows.
|
1 2 3 4 5 6 7 8 9 10 11 12 13 14 15 16 17 18 19 20 21 22 23 24 25 26 27 28 29 30 |
<?php $sql = "SELECT * FROM contacts"; $result = mysqli_query($conn, $sql); $i = 1; if (mysqli_num_rows($result) > 0) { ?> <table class="table table-bordered table-hover table-striped"> <tr> <th>Sr. No.</th> <th>Name</th> <th>Email</th> <th>Message</th> </tr> <?php while ($row = mysqli_fetch_assoc($result)) { ?> <tr> <td><?php echo $i; ?></td> <td><?php echo $row['name']; ?></td> <td><?php echo $row['email']; ?></td> <td><?php echo $row['message']; ?></td> </tr> <?php $i++; } ?> </table> <?php } ?> |
If you want to style the above table of contact form user’s records, you can add the styling CSS given below.
|
1 2 3 4 5 6 7 8 |
table{ border-collapse: collapse; margin: 20px auto; } table, td, th { border: 1px solid #ccc; padding: 10px; } |
If you have any queries regarding the above tutorial, please comment below. I will solve your problem and give you solutions.
You May Also Like to Read