This is a step-by-step guide to create multi step form for your WordPress website. Multi step forms are the high converting forms that gives you more conversions without boring your audience.
It’s not a long form that scares your audience to get user inputs. Well, many companies needs a long size forms to get the required data from users. But, long size forms is too boring and can scare your audience to fill the detail.
The best solution for a long form is to convert them into a multi step form that looks beautiful and well organized. The multi step forms should be beautifully designed and eye-catching to attract your audience in a single appearance.

A progress bar can also be added to the multi step forms that guides the users about the various stages in a form to easily understand the needs in just one look.
In this post, you will get step-by-step process that helps you easily create your multi step form in WordPress. So, let’s get started.
Reasons Behind Using Multi Step Forms
Before you dive into the steps to setup a multi step form for your website. I will descibe the top reasons to use the multi step forms for your website:
- Convert Long Form into Stages: Long forms looks too ugly to users that they want to leave the page when they see the form. You can convert the long forms to multi step forms that convert them into stages that is well organized to use. People can easily understand the purpose of stages to fill the exact requirement of the forms
- Get More Conversions: Multi step forms gives you more conversions when you convert your long form into a mult step form. Users are more likely to enter details without scare of the size of the form. You can convert your signup forms to multi step forms to generate more leads for your business.
- Make Form More Engaging: By converting your large size form into multi step form, you can make your form more engaging.
- Easy to Get User Inputs: The stages in multi step forms makes it easy for users to find the requirements of the form in just a single view. After getting the purpose of the form stages, you can help users to easily provide inputs according to purpose.
- Make Your Form More Attractive: If you are using the right plugin for your website to create multi step forms, you can easily create a beautiful design for it. You can also add an eye-grabbing progress bar that describes the progress and completion of the form to the users.
Affiliate Disclosure: At Tutorialdeep, we believe in transparency for our users. In this blog, there are some referral links. If you signup with these links we will earn some commission at no extra cost to you. We recommend these links because these are our trusted brands.
So, let’s start the easy steps for creating an eye-catching multi step forms for your WordPress website.
How to Create Multi Step Forms with Progress Bar in WordPress
To create a multi step form for your WordPress website, I recommend you to use the Formidable Forms plugin. It is the form builder plugin that helps you easily create an eye-catching multi step form.
Formidable Forms is the most advanced WordPress plugins to build user friendly complex forms in minutes with the steps given below:
Step 1: Sign up with Formidable Forms to Create An Account
First of all, open the Formidable Forms website to start creating an account with it. You can also use the button given below to visit the Formidable Forms website.
➜Visit Formidable Forms website (Get 50% discount with this link)
The homepage of the website contains a button with text ‘Get Formidable Forms Now’ that you have to click as indicated below to go to the Formidable Forms pricing page.

Here, there are 4 plans out of which you can select any plan to get the features of creating multi step forms for your website. The very lowest price plan ‘Basic’ also provides the feature of multi step form to create for your website.
However, I recommend you to select ‘Business Plan’ to build any type of forms you want for your website.

After you have decided the plan, you have to click the ‘GET STARTED’ button given under the plan to select it for your account.
All Formidable Forms plugin plans comes with a satisfaction guarantee to get the plugin features with confidence. The founder of the plugin gives you 100% no-risk money-back double guarantee.
If you are not satisfied with the plugin features over the next 14-days, they will happily refund full money back with no questions asked.

After you have selected the plan on the pricing page above, a checkout page will open where you have to provide your Account information and payment information details to complete the purchase.
You have to enter your email, phone, and name in the Account Information section. After that, you have to select a payment method to make a payment for the plugin. When you have done with all the details, click the ‘Complete Checkout’ button complete creating an account with Formidable Forms.

It also require to verify your email id that you have provided in the account information form above. To verify the email id, log in to your email account and open the email from Formidable Forms to click the verification link. You will get a verification success message after link click that completes your account creation.
Step 2: Install Formidable Forms Plugin and Connect with Business Account
When you have done with creating your Formidable Forms account, you can log in to your WordPress website admin and visit the dashboard menu option Plugins >> Add New.
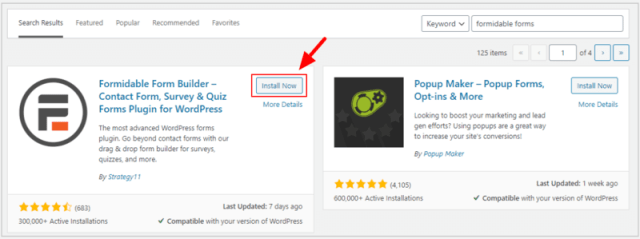
A page will open where you have to enter the keyword ‘Formidable Forms’ and press enter button of your keyboard to search for the plugin as showing in the image below. After you found the plugin, click on the ‘Install Now’ button with the plugin to install and activate it on your WordPress website.
After you have completed installing the plugin, you need to connect your WordPress website with the Formidable Forms account created above using the Formidable Forms plugin.
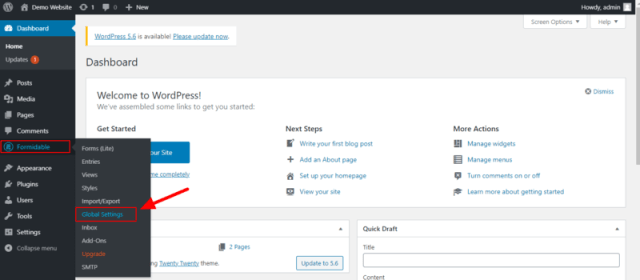
To start connecting your Formidable Forms account with your WordPress website, visit WordPress dashboard menu option Formidable >> Global Settings as indicated below.
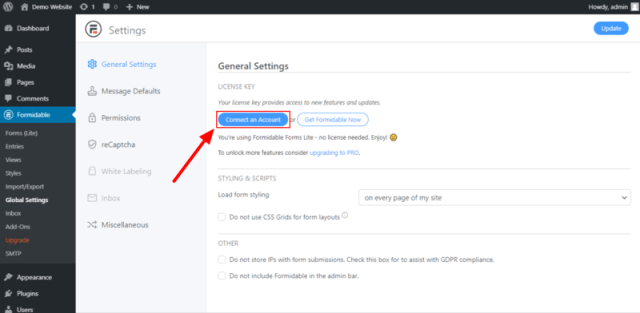
The settings page contains a button ‘Connect an Account’ that you have to click. A popup will open that contains the Formidable Forms login page. Here, you have to provide Formidable Forms account details to log in and connect your WordPress website with Formidable Forms.
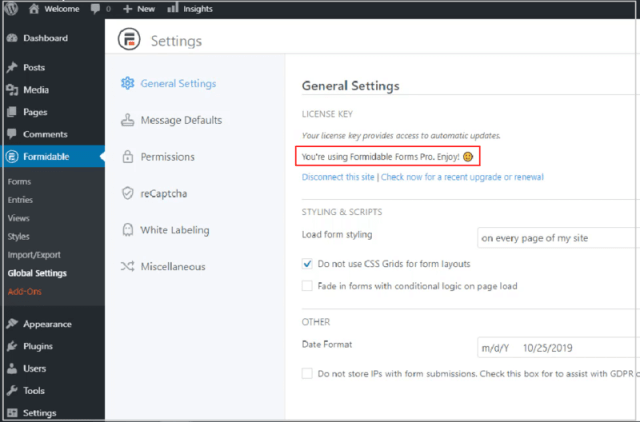
When the connection of your WordPress website is done with your Formidable Forms account, you will get a text ‘you’re using Formidable Forms Pro, Enjoy’ in the ‘General Settings’ page that shows that your account is connected successfully.
Now, let’s start creating a form and adding a page break field to convert it to a multi step form for your website.
Step 3: Create Any Form For Your Website
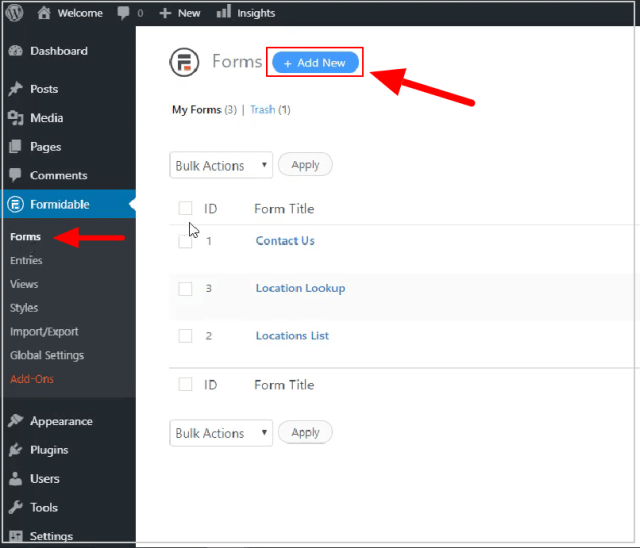
To create a form for your WordPress website, visit WordPress dashboard menu option Formidable >> Forms. A page will open where you have to click the ‘Add New’ button to start creating a new form using Formidable Forms as indicated in the image below.
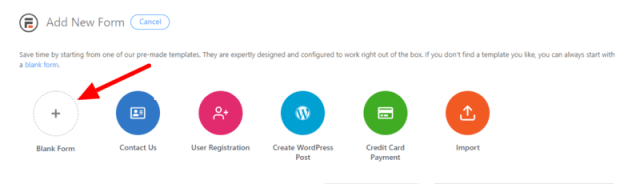
Here, you have to select the form template to start creating a form for your website. You can select any of the template for your form and convert it to multi step form. I am selecting ‘Blank Form’ template to add form fields and create multi step form.
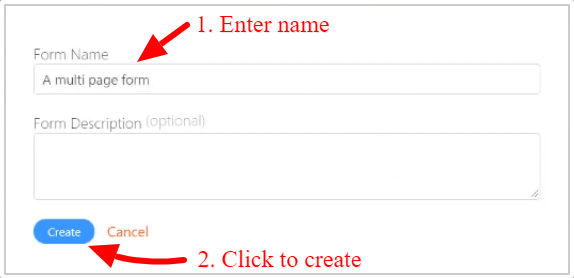
Enter the name for the form you are going to create for your website. After you enter the name, click the ‘Create’ button to create a form.
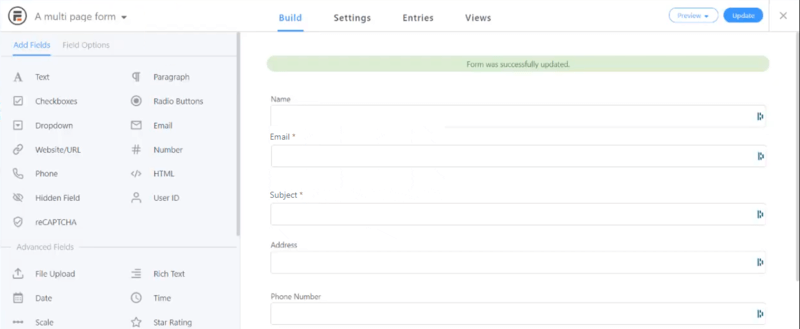
A blank form contains no form fields as showing the image below. Left hand side of the screen showing the form fields and right hand side showing the blank form.

You can add as many form fields as you want to add to your form to convert it to multi step form. I have added so many form fields and the form is showing as in the image below. I have added as much fields to the form to make it long and convert to multi step form.
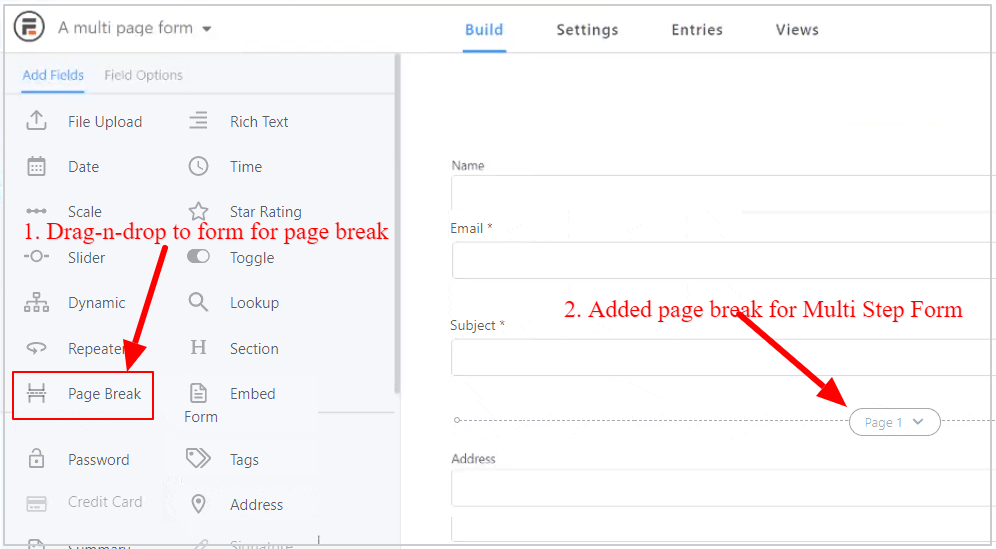
Step 4: Add a Page Break Field to Split up Your Form
To make the form a multi step form, you have to add the ‘Page Break’ field in the location of the form where you want to convert them into pages. You can add as many page break field to the form as you want to create multi pages.
Step 5: Add Progress Bar to Your Form
Now, you can add a progress bar to your form to make it beatiful to grab attention of your users.
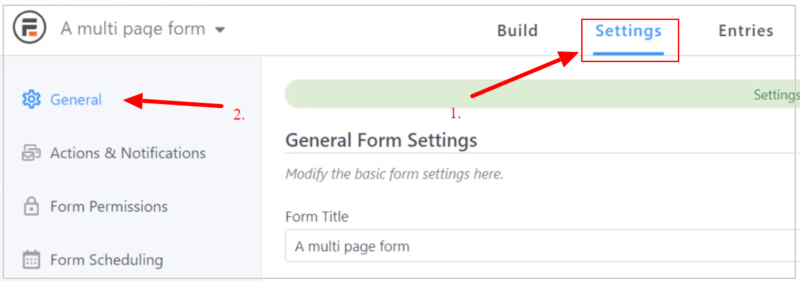
To add a progress bar, click the form ‘Settings’ tab as showing in the image below to get the form setting options.
This is the general settings of the form where you have to scroll down the screen to get the ‘PAGINATION’ section. Here, you have to click the dropdown and select the option ‘Show progress bar’. You can also set the title for all the steps of your form. This helps users of your website to guide them about each section of the form to easily understand the need and fill the form.

After you set progress bar for the form, you can click the ‘Update’ button to save your changes.
Step 6: Design Progress Bar
Now, you have set a progress bar for your form. You can design it as per your requirements to make it more attractive to users.
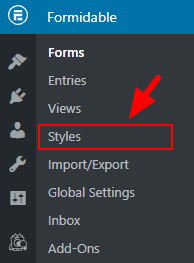
To design your progress bar, go to WordPress dashboard menu option ‘Formidable >> Styles’.
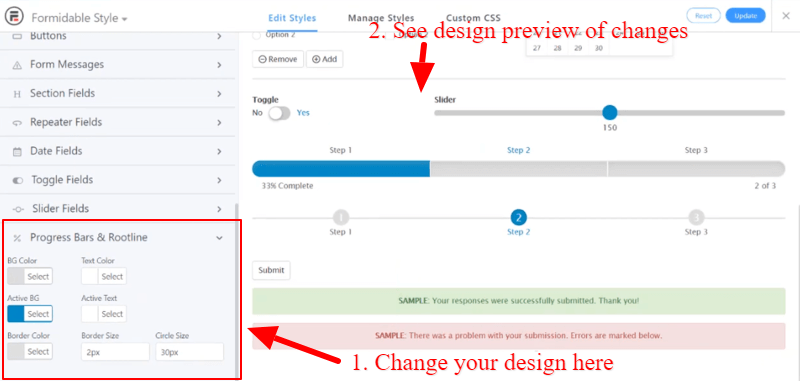
Scroll down the page to get the ‘Progress Bars & Rootline’ option as showing in the image below. Here, you can change the design of the form as per your requirements and check the preview of the progress bar in the right side of the screen. The below image indicated the variaous design options and the design preview to the right side of the screen.
Now, you have done with the form and added a progress bar to it. You can now configure your form to properly make it ready for your website.
Step 7: Configure Form Settings
The configuration settings for the form is required to set the form general details, actions, and notifications on form submission. This helps users to get the required results from form that is useful for both the readers and the website owners.
To start configuration settings for your form, you have to click the ‘Settings’ option as showing in the image below. When you visit the tab, you will get various setting options to properly configure your form for users.
Let’s start with making the general setting for your form.
General Settings
To make the general settings for your form, you have to click the settings tab ‘General’ that gives you all the general form setting options as showing in the image below. Here, you can set the Form Title, Form Description, and message on form submission.
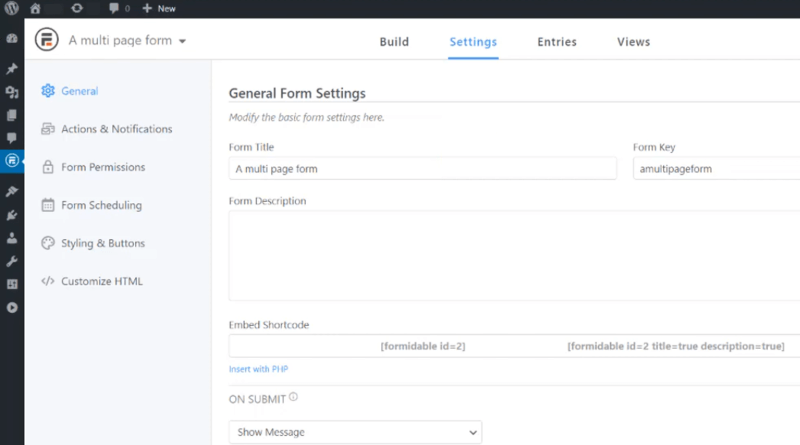
It is also useful to enable ajax form submission that allows to submit the form without any page refresh. You can also validate your form with Javascript to check all the valid entries from users.

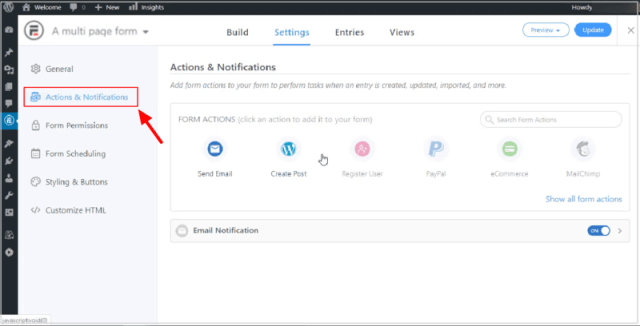
Actions and Notifications Settings
To make the Actions and Notifications settings, you have to click the settings tab ‘Actions and Notifications’. This is useful when you want to set the actions on form submission and send notifications to them. You can set the various actions like send emails, create posts, and many more.
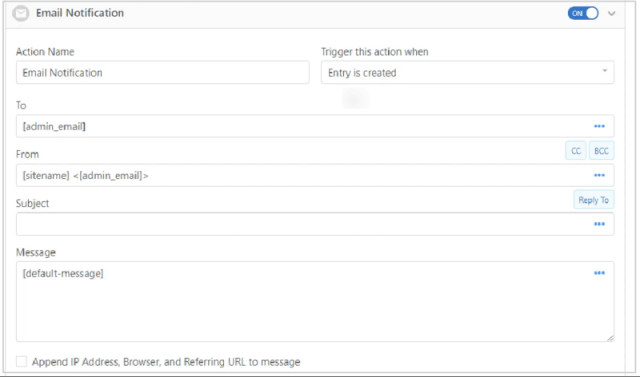
It can also be used to set the email to send as a notification to users.
You can also set the email notifications for the form like sender email, To, From, Subject, and Message.
Step 8: Embed Multi Step Form Using Shortcode
Once you have done with all the above form creation and configuration setup, you can embed the multi step form to your posts and pages using a shortcode. The shortcode is the simplest method to add your form anywhere on your website.
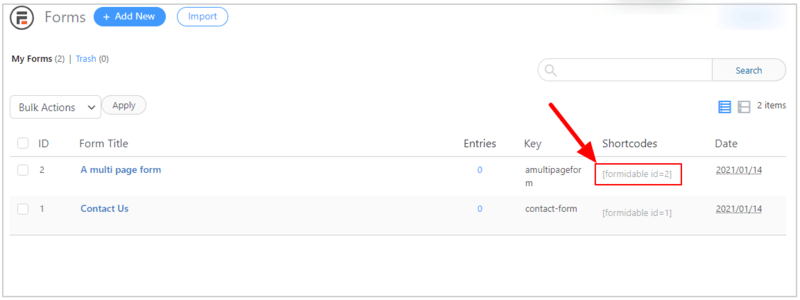
To get the shortcode for your form, go to the WordPress dashboard menu option Formidable >> Forms.

You will get a page where there is a list of forms you have created using the Formidable Forms plugin. Check the multi step form you have created using the above steps to copy the shortcode given with the form name. You need to paste shortcode to the location of your website where you want to display the form.
After you have completed adding the shortcode to your website posts and pages, your multi step form will be live in the frontend. You can check the form by opening your website posts and pages.
Congratulations! you have successfully created the multi step form for your WordPress website.
Conclusion
If you are using WordPress, Formidable Forms plugin is the best choice that helps you easily and quickly create any type of multi step form for your website. You can convert any size form to multi step form with progress bar to make the form more attractive to get the users input without scaring them.
Formidable Forms plugin comes with many pre-defined form templates like Contact Form, Registration Form, Payment Collection Form, Price Calculator, Percentage Calculator, Mortgage Calculator, and many more to quick start immediately in just a single click. You need to select one template for your WordPress website to get started anytime.
➜Download Formidable Forms Plugin Now
You May Also Like to Read
- Formidable Forms Review
- 5+ Top Contact Form Plugins For WordPress
- How to Make a Calculator for Your WordPress Website
I hope this post helps you to easily find the plugin that helps you create a multi step form for your WordPress website. If you have any queries regarding the tutorial given above, please comment below.
Also tell me, what other forms you have created for your website using Formidable Forms on your WordPress website? do comment below.
Thanks for sharing information. is very helpful and informative.