Contact form PHP source code can be used in your websites to connect with your audience. It also contains the MySQL code to keep a record of your users who want to communicate with you via the form.
It contains the code for HTML structure and design with PHP code to collect users entered data. After that, you can also display the inserted contact form entered data using PHP with MySQL.
Looking to create contact forms without coding? Create beautiful-looking contact forms with JotForm.
A contact form is the most essential part of websites running an online business. Without a contact form, your audience can’t contact you to get your product. It can help you gain more customers and revenue
In this post, you will get contact form HTML code, design code, and PHP source code to send emails. It also contains the PHP code to insert and display the contact form entries.
So, let’s get started.
Contact Form HTML Structure Source Code
To create the main structure of the contact form, you have to use the HTML source code given below. It contains the HTML <form> tag, <input> tag, and <textarea> tag. The input types are text for the Name field, email for the email field, and submit for form submission.
|
1 2 3 4 5 6 7 8 9 10 11 12 13 14 15 16 |
<div class="main-contact-form"> <form action="#" method="POST"> <label for="Name" class="required">Your Name</label> <input type="text" name="name" class="name" placeholder="Enter name" required> <label for="Email" class="required">Your Email</label> <input type="email" name="email" class="email" placeholder="Enter email" required> <label for="message" class="required">Message</label> <textarea name="message" class="message" placeholder="Enter your message" rows="5" required></textarea> <input name="submit" type="submit" value="Submit"> </form> </div> |
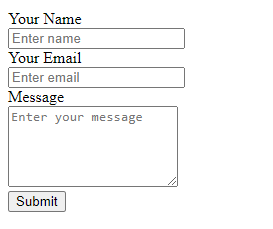
After you create the HTML structure, you will get the very basic design of the contact form as given below.
Add Style to Contact Form with CSS Source Code
To make your contact form design looks beautiful, you have to use the CSS source code given below. The CSS source code beautifies the input fields, textarea field, and submit button. You can modify the CSS code to match the contact form with your brand.
The CSS source code also contains the asterisk mark to display with the label for the input fields that are required for users to fill. It is useful to help your audience and customers know the required fields in a contact form.
|
1 2 3 4 5 6 7 8 9 10 11 12 13 14 15 16 17 18 19 20 21 22 23 24 25 26 27 28 29 30 31 32 33 |
<style> input[type='text'],input[type='email'], textarea{ width: 100%; padding: 10px; border-radius: 3px; border: 1px solid #ccc; margin-top: 10px; margin-bottom: 20px; } input[type='text']:focus,input[type='email']:focus, textarea:focus{ border: 1px solid #5db6db; box-shadow: 0 0 10px #b9eaff; outline: none !important; } input[type='submit']{ background: rgb(39,160,210); color: #fff; border: none; padding: 10px 20px; cursor: pointer; } .main-contact-form{ max-width: 400px; margin: 0 auto; background: #e9e9e9; padding: 20px 45px 20px 25px; border-radius: 5px; } .required:after { content:" *"; color: red; } </style> |
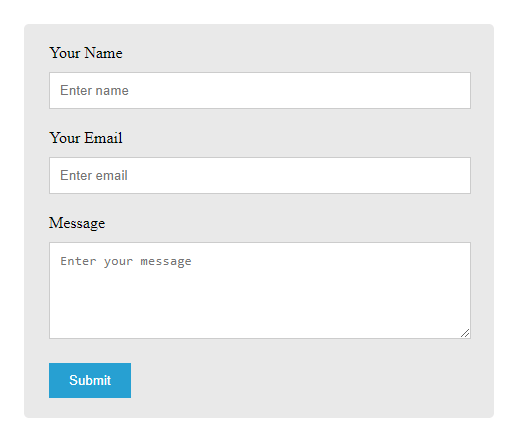
After you add the CSS source code, your contact form design becomes beautiful as shown in the image below. It is now ready to display on your website.
Let’s add PHP source code to send emails and insert the user’s submitted data into the database. After that, you can display the records on your website.
Contact Form PHP Source Code (For Validation and Send Emails)
This PHP source code first collects all the form input data using the $_POST global variable. After that, it validates the format of the email address. There is no need to manually make fields required as we have already added the required attribute to all input fields.
When the validation of the email address finds it valid, it sends the email using the simple mail() function of PHP. If you want to use the PHPMail SMTP to send emails, you can read our tutorial post on Contact Form Using PHPMailer Gmail SMTP to Send Emails.
|
1 2 3 4 5 6 7 8 9 10 11 12 13 14 15 16 17 18 19 20 21 22 23 24 25 26 27 28 29 30 |
<?php if(isset($_POST['submit'])){ //Get form data $name = $_POST['name']; $email = $_POST['email']; $message = $_POST['message']; $email_exp = '/^[A-Za-z0-9._%-]+@[A-Za-z0-9.-]+\.[A-Za-z]{2,4}$/'; if (!preg_match($email_exp, $email)) { echo '<br><span style="color:red;">The Email address you entered is not valid.</span>'; exit; } $subject = "Contact Form"; //Subject of the email //Message content to send in an email $message = "Name: ".$name."<br>Email: ".$email."<br> Message".$message; //Email headers $headers = "From:".$email."\r\n"; $headers .= "Reply-To:".$email."\r\n"; $headers .= "X-Mailer: PHP/".phpversion(); //Send email mail($to, $subject, $message, $headers); } ?> |
The PHP mail() function takes four variables to send emails. These variables are explained below:-
$to: it is the email address of the recipient who wants to receive the user’s entered data via email.$subject: The main subject of the email.$message: It is the content of the email that can be the user’s data entered in the contact form.$headers: The headers required to send the emails.From: It can be the email address of the users who fills out the contact form.CC: The other email address that also wants to receive the emails same as the admin or recipient.Reply-To: The email address of the users who fills out the contact form.X-Mailer:: Set the version of the PHP.
Insert and Display Contact Form Data Using PHP and MySQL
Now, to display records on your website, you have to first insert them into your MySQL database using PHP.
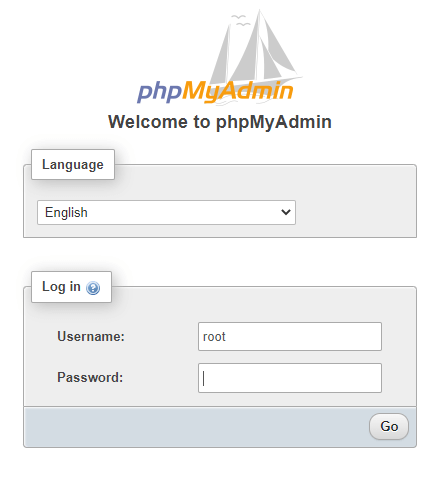
First, log in to your PHPMyAdmin to create a database where you can store your contact form users entered data.
login to PHPMyAdmin
Open PHPMyAdmin and enter your username and password.
Open the ‘SQL’ tab of PHPMyAdmin
After PHPMyAdmin login, click the ‘SQL’ tab as shown in the image below.
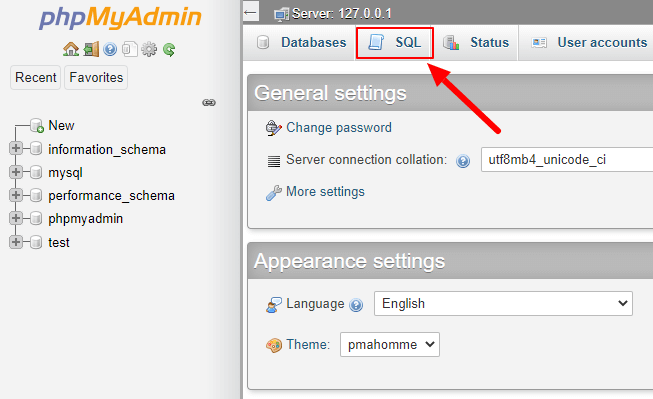
Create a database to insert PHP contact form data
Now, enter the queries given below to create a database for your contact form to store records. It is the create query of MySQL that you can read more about in the tutorial post on SQL CREATE DATABASE
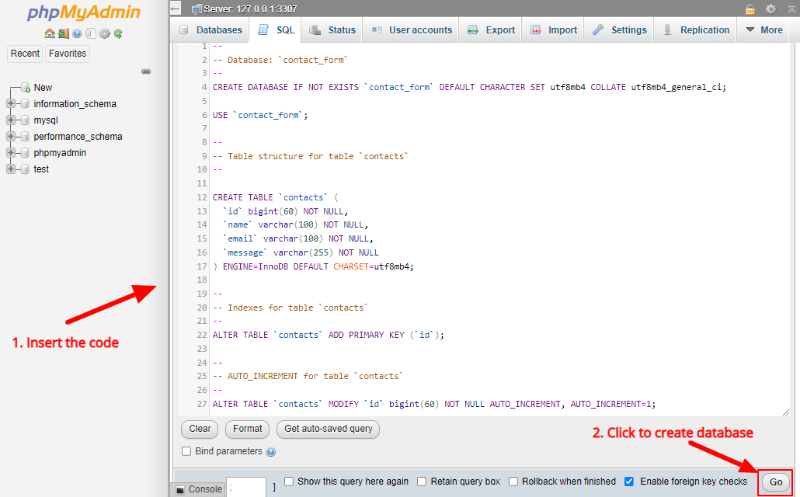
Copy and paste the below code under the ‘SQL’ tab textarea and click the ‘Go’ button as shown in the image above to execute the queries.
|
1 2 3 4 5 6 7 8 9 10 11 12 13 14 15 16 17 18 19 20 21 22 23 24 25 26 27 |
-- -- Database: `contact_form` -- CREATE DATABASE IF NOT EXISTS `contact_form` DEFAULT CHARACTER SET utf8mb4 COLLATE utf8mb4_general_ci; USE `contact_form`; -- -- Table structure for table `contacts` -- CREATE TABLE `contacts` ( `id` bigint(60) NOT NULL, `name` varchar(100) NOT NULL, `email` varchar(100) NOT NULL, `message` varchar(255) NOT NULL ) ENGINE=InnoDB DEFAULT CHARSET=utf8mb4; -- -- Indexes for table `contacts` -- ALTER TABLE `contacts` ADD PRIMARY KEY (`id`); -- -- AUTO_INCREMENT for table `contacts` -- ALTER TABLE `contacts` MODIFY `id` bigint(60) NOT NULL AUTO_INCREMENT; |
Connect to Your Database Using PHP
After creating the database, make a connection with your MySQL database using the PHP source code as given in the image below. Also, change the username and password of your MySQL database to make a proper connection.
|
1 2 3 4 5 6 7 8 9 10 11 12 13 14 15 16 |
<?php //Make database connection $servername = "localhost"; $username = "root"; $password = ""; $dbname = "contact_form"; // Create a connection $conn = mysqli_connect($servername, $username, $password, $dbname); // Check the connection if (!$conn) { die("Connection failed: " . mysqli_connect_error()); }else{ echo "connected successfully"; } ?> |
Insert Contact Form Data Into the Database
To insert the contact form data into a database, you have to execute the MySQL queries using the PHP code given below. ‘contacts’ is the table name in the database containing three columns that are name, email, and message. It uses the SQL insert statement in the MYSQL database.
|
1 2 3 4 5 6 7 8 9 10 11 12 13 14 15 |
<?php if(isset($_POST['submit'])){ $sql = "INSERT INTO contacts (name, email, message) VALUES ('$name', '$email', '$message')"; if (mysqli_query($conn, $sql)) { echo "New contact added successfully"; } else { echo "Error: " . $sql . "<br>" . mysqli_error($conn); } mysqli_close($conn); } ?> |
Display Inserted Data into a Table Using PHP
After insertion of the contact form data into the database, you can display the inserted records using the PHP and MySQL source code as given below. It uses the SQL select statement in the MySQL database.
|
1 2 3 4 5 6 7 8 9 10 11 12 13 14 15 16 17 18 19 20 21 22 23 24 25 26 27 28 29 |
<?php $sql = "SELECT * FROM contacts"; $result = mysqli_query($conn, $sql); $i = 1; if (mysqli_num_rows($result) > 0) { ?> <table class="table table-bordered table-hover table-striped"> <tr> <th>Sr. No.</th> <th>Name</th> <th>Email</th> <th>Message</th> </tr> <?php while ($row = mysqli_fetch_assoc($result)) { ?> <tr> <td><?php echo $i; ?></td> <td><?php echo $row['name']; ?></td> <td><?php echo $row['email']; ?></td> <td><?php echo $row['message']; ?></td> </tr> <?php } ?> </table> <?php } ?> |
|
1 2 3 4 5 6 7 8 9 10 |
<style> table{ border-collapse: collapse; margin: 20px auto; } table, td, th { border: 1px solid #ccc; padding: 10px; } </style> |
Your inserted records will get displayed as shown in the image below.

You May Also Like to Read
