In this tutorial, learn to create a PHP contact form with a file upload field to collect uploads from your audience. Forms that collect files can help you know the exact queries of your audience visually.
When you are running a business online giving services or products to your customers. Quality and support would be the top priority of your business to build a strong customer base.

Looking to create contact forms with file upload without coding required? Create beautiful-looking contact forms with JotForm.
Customers can contact you through a contact form on your website. Contact forms collect text data normally when you see them on websites. However, sometimes it is not enough to collect only text data from your users. Image files are required to get screenshots of your customer’s exact problems.
Visually understanding the problems of your customers helps you know the exact location of the problems. It can also help you solve the problems of your software and improve its quality of it. So, files are an important way of getting users’ queries.
In this post, you will learn a step-by-step process on how to create a contact form with a file upload field. So, let’s get started.
How to Create Contact Form with File Upload in PHP
Here is the step-by-step process for creating a contact form with a file upload field:-
Step 1: Create HTML Structure of the Contact Form
First of all, create the HTML structure of the contact form in HTML. It should collect enough data from customers to know the exact query and make one-to-one communication with them. Name, Email, Files, and Message fields are enough to collect customers’ exact queries.
Below is the simple HTML contact form code with all the required fields. You can make these fields compulsory using the required attribute. Add this attribute at the end of the element to make them required to fill.
|
1 2 3 4 5 6 7 8 9 10 11 12 13 14 15 16 17 18 19 |
<div class="main-contact-form"> <form method="POST" id="ajaxform" action="" enctype="multipart/form-data"> <label for="Name">Your Name</label> <input type="text" name="name" placeholder="Enter name" required> <label for="Email">Your Email</label> <input type="email" name="email" placeholder="Enter email" required> <label for="message">Message</label> <textarea name="message" placeholder="Enter your message" rows="5" required></textarea> <label for="File">Upload File</label><br> <input type="file" name="file"><br><br> <input type="submit" class="btn btn-primary" name="submit" value="Submit"> </form> </div> |
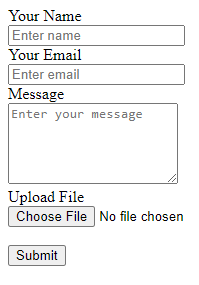
Your simple contact form will appear like the image shown below. It contains the form field you have added in the code above. The contact form is still not ready to add to your website as it will look attractive to your users.
Step 2: Add CSS to Make it Beautiful
To make it beautiful on your website, you must consider adding some CSS to your above HTML code. The CSS should make Name, Email, Files, and Message Fields beautiful to attract users fill.
If your contact form is not looking better than the above image, your customer will find it unprofessional to fill. Below is some CSS code that you can add to the above HTML code to make your contact form look better.
|
1 2 3 4 5 6 7 8 9 10 11 12 13 14 15 16 17 18 19 20 21 22 23 24 25 26 27 28 29 30 31 32 33 34 35 36 37 38 39 40 41 42 43 44 45 46 47 48 49 |
<style> input[type='text'],input[type='email'], textarea{ width: 100%; padding: 10px; border-radius: 3px; border: 1px solid #ccc; margin-top: 10px; margin-bottom: 20px; } input[type='text']:focus,input[type='email']:focus, textarea:focus{ border: 1px solid #5db6db; box-shadow: 0 0 10px #b9eaff; outline: none !important; } input[type='submit']{ background: rgb(39,160,210); color: #fff; border: none; padding: 10px 20px; cursor: pointer; } .main-contact-form{ max-width: 400px; margin: 0 auto; background: #e9e9e9; padding: 20px 45px 20px 25px; border-radius: 5px; } input[type=file] { width: 100%; padding: 5px; background: #fff; border-radius: 10px; border: 1px solid #ccc; } input[type=file]::file-selector-button { border: none; background: #084cdf; padding: 10px 20px; border-radius: 10px; color: #fff; cursor: pointer; transition: background .2s ease-in-out; } input[type=file]::file-selector-button:hover { background: #0d45a5; } </style> |
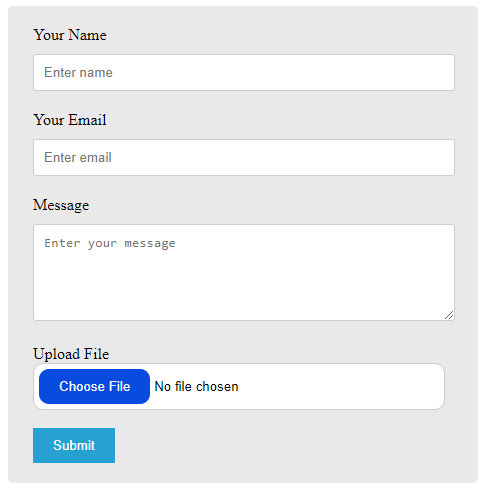
After you add the CSS, it will change the appearance of your contact form as shown in the image below. It looks better and more beautiful as compared to the previous step design.
Now, let’s add some PHP code to send emails with contact form data including the uploaded file.
Step 3: Get Contact Form Data with Email and File Upload Validation Using PHP
You need to first collect contact form data including the file upload field. Name and message fields are not required to validate as a user can enter the text as well as the numbers on it. The only fields that required validation are the Email and File upload field.
Validate the exact format of the email address to collect from your users. Getting the wrong email address won’t help you make communication with them as communication is important to convert them into customers.
Similarly, the file upload field is also important and requires validation on:-
- Upload file size should not exceed the limit (2MB in the code)
- The file should be of the required file type (‘pdf’, ‘doc’, ‘docx’, ‘jpg’, ‘png’, ‘jpeg’ are allowed in the code)
See the code below for email and file validation using PHP.
|
1 2 3 4 5 6 7 8 9 10 11 12 13 14 15 16 17 18 19 20 21 22 23 24 25 26 27 28 29 30 31 32 33 34 35 36 37 38 39 40 41 42 43 44 45 46 47 48 49 50 51 52 53 54 55 56 57 58 59 60 61 |
<?php if(isset($_POST['submit'])){ // Get the submitted form data $email = $_POST['email']; $name = $_POST['name']; $message = $_POST['message']; //validation for email $email_exp = '/^[A-Za-z0-9._%-]+@[A-Za-z0-9.-]+\.[A-Za-z]{2,4}$/'; if (!preg_match($email_exp, $email)) { echo "The Email address you entered is not valid."; exit; } //Get uploaded file data using $_FILES array $tmp_name = $_FILES['file']['tmp_name']; // get the temporary file name of the file on the server $filename = $_FILES['file']['name']; // get the name of the file $filesize = $_FILES['file']['size']; // get size of the file for size validation $filetype = $_FILES['file']['type']; // get type of the file $fileerror = $_FILES['file']['error']; // get the error (if any) //validate form field for attaching the file if($fileerror > 0) { echo "Upload error or No files uploaded."; exit; } // Upload attachment file if(!empty($_FILES["file"]["name"])){ // File path config $targetDir = "uploads/"; $fileName = basename($filename); $targetFilePath = $targetDir . $fileName; $fileType = pathinfo($targetFilePath,PATHINFO_EXTENSION); // Allow certain file formats $allowTypes = array('pdf', 'doc', 'docx', 'jpg', 'png', 'jpeg'); if(in_array($fileType, $allowTypes)){ // Check file size if ($filesize > 2000000) { echo "File size should be less than 2MB"; exit; }else{ // Upload file to the server if(move_uploaded_file($tmp_name, $targetFilePath)){ $uploadedFile = $targetFilePath; }else{ echo "Sorry, there was an error uploading your file."; exit; } } }else{ echo "Sorry, only PDF, DOC, JPG, JPEG, & PNG files are allowed to upload."; exit; } } } ?> |
After the validation of the email address and upload is completed, you can not move further to send the data via email to the recipient.
Step 4: PHP Code to Send Contact Form Data Via Email with Uploaded File
To send emails in PHP with file upload, the PHP Mailer method is the easiest method that requires less coding as given below. The below code is self-explained as it contains comments that can help you know each line of code.
You have to first download the PHP Mailer by clicking on the button below. Save it in the base location of your main files and extract the folder.
Now, copy the below code and paste it after the validation code of PHP. You have to change the below things in the code:-
- Change ‘[email protected]’ with your Gmail id
- Change ‘yourgmailpassword’ with the app password of your Gmail id. You can read the guide Sign in with app password in Gmail to create your app password on Gmail.
- Change ‘[email protected]’ with the recipient’s email address. Also, change the ‘recipientname’ with your name to appear on the emails.
|
1 2 3 4 5 6 7 8 9 10 11 12 13 14 15 16 17 18 19 20 21 22 23 24 25 26 27 28 29 30 31 32 33 34 35 36 37 38 39 40 41 42 43 44 45 46 47 48 49 50 51 52 53 |
<?php if(isset($_POST['submit'])){ //If everything above is ok then move further //Use PHPmailer require "phpmailer/PHPMailerAutoload.php"; $mail = new PHPMailer; //Mailbody to send in an email $mailbody = '<p><b>Customer contact details:-</b></p> <p><b>Name:</b> '.$name.'</p> <p><b>Email:</b> '.$email.'</p> <p><b>Message:</b> '.$message.'</p>'; //Sender email address $mail->isSMTP(); // Set mailer to use SMTP $mail->SMTPDebug = 0; //See errors, change it to 4 $mail->Host = 'smtp.gmail.com'; // Specify main and backup SMTP servers $mail->SMTPAuth = true; // Enable SMTP authentication $mail->Username = $sender; // SMTP username $mail->Password = 'yourgmailpassword';// Gmail SMTP password $mail->SMTPSecure = 'tls'; // Enable TLS encryption, `SSL` also accepted $mail->Port = 587; // TCP port to connect to $mail->setFrom($email, $name); //$mail->addAddress('[email protected]'); //add more recipient (optional) $mail->addReplyTo($email, $name); //$mail->addCC('[email protected]'); //$mail->addBCC('[email protected]'); //Add attachment if(is_array($_FILES)) { $mail->AddAttachment($uploadedFile, $fileName, 'base64', 'mime/type'); } $mail->isHTML(true); // Set email format to HTML $mail->Subject = 'Contact Form Submitted by '.$name; $mail->Body = $mailbody; //$mail->AltBody = 'This is the body in plain text for non-HTML mail clients'; //Email your contact form data with an attachment using Gmail SMTP with PHPMailer if(!$mail->send()){ echo "Message could not be sent. Please try again."; echo 'Mailer Error: ' . $mail->ErrorInfo; }else{ echo "Message has been sent successfully."; @unlink($uploadedFile); } } ?> |
After you have done with the above code, you can test your form to see the emails received. If you want to send emails without a page refresh, you can read our tutorial on Ajax Contact Form with Attachment in PHP (Using Mail() or PHP Mailer).
If you have any problem sending an email or need any help, you can comment below.
You May Also Like to Read