Learn how to add Google reCaptcha V3 to HTML form with PHP. It is the latest version that makes your forms secure from spam and bot attacks.
The previous version of Google reCaptcha is V2 which uses the checkbox to identify humans and bots. However, this system was replaced with the invisible captcha in the latest version V3.
The latest version V3 does not require users’ interaction with the captcha to confirm that they are not robots. It returns the score of the users based on their interaction with your website. After that, you check the score to make your form secure from spam and attacks.
In this post, you will learn a step-by-step process on how to integrate Google reCaptcha V3 into your forms. You will also learn to send emails after getting success response from reCaptcha.
So, let’s get started.
How to Add Google reCaptcha v3 to HTML Form with PHP
Here are the step-by-step process on how to add Google reCaptcha V3 to HTML form with PHP:-
Step 1: Generate Google reCaptcha V3 API Keys
You have to first generate the Google reCaptcha V3 API keys to make the captcha work on your website forms. To get the API keys, visit the Google reCaptcha admin panel and log in to your Google account.
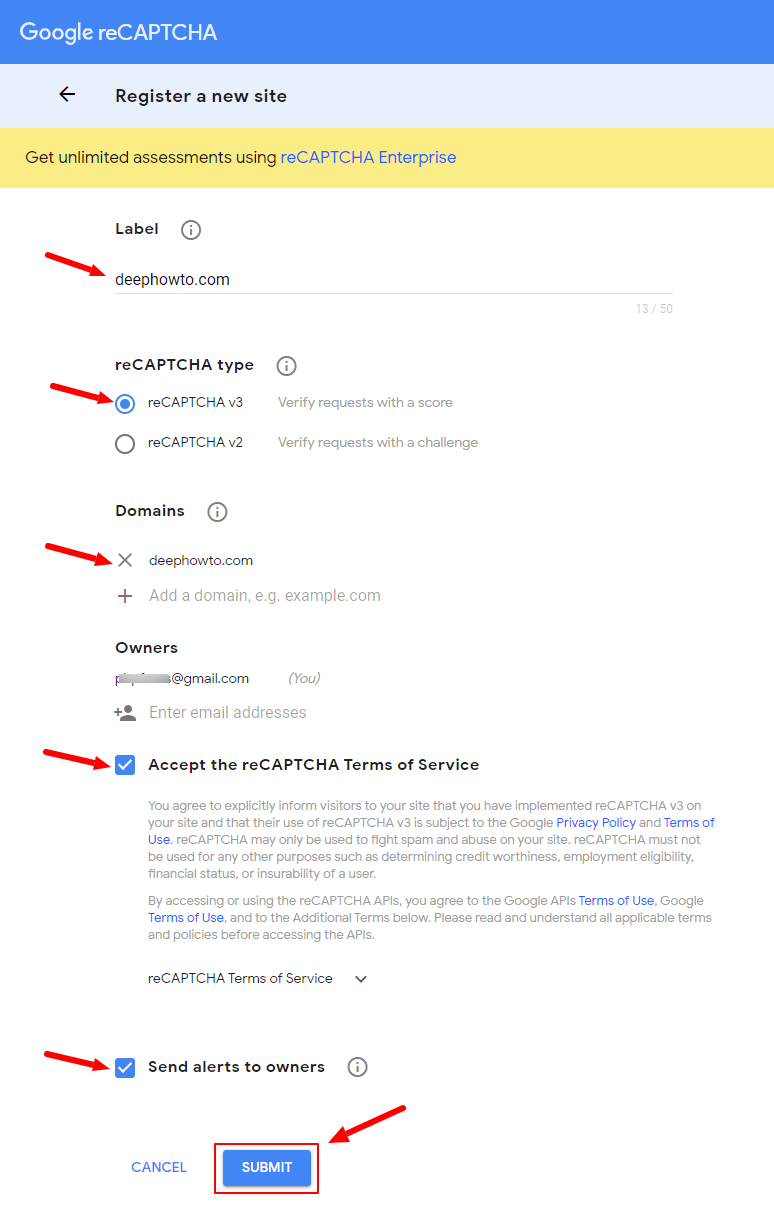
After that, you will get a settings page where you have to make the Captcha settings as given below:
- Label: Enter a label for the Captcha. Use a different label for each captcha to easily identify them.
- reCaptcha type: Select version 3 (reCaptcha v3)as we have to use the Google reCaptcha V3.
- Domains: Enter a domain name here without https and press enter to make it selected. This should be the domain where you want to use Google reCaptcha.
- Owners: Your Google email address already showing selected here.
After that, click all the checkboxes to agree that you accept reCaptcha terms of service and get an alert as an owner. Now, click the ‘Submit’ button to save your settings.
You will get your Google reCaptcha API Site key and Secret key as shown in the image below.
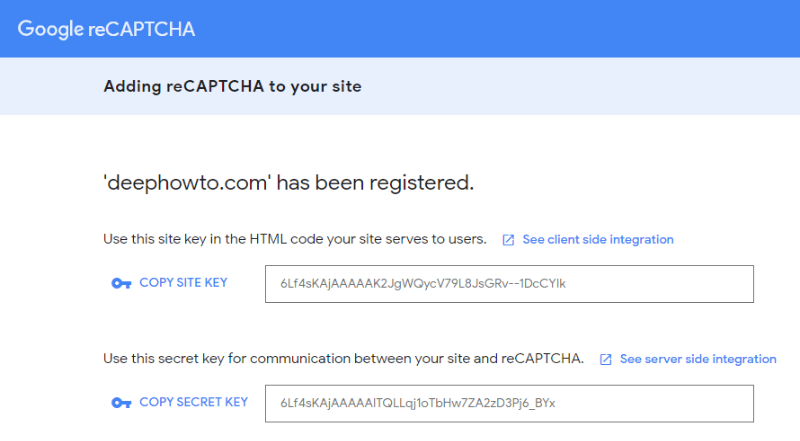
Now, let’s move further to use these keys and add the Google reCaptcha to your website HTML forms.
Step 2: Bind Google reCapcha V3 to Your HTML Form Button
Binding reCaptcha to your form button is the easiest way to add the Google reCaptcha widget to your forms. You have to just add the javascript API and a callback function to the <head> section of your page.
The Javascript library API is given below.
|
1 |
<script src="https://www.google.com/recaptcha/api.js" async defer></script> |
The function is required to handle the reCaptcha token submission.
|
1 2 3 4 5 |
<script> function onSubmit(token) { document.getElementById("mycontactform").submit(); } </script> |
Now, to bind the Google reCaptcha widget to your form button, you just have to add some data attributes to it as given below. You just have to add your site key in the data-sitekey attribute of the button.
|
1 2 3 4 |
<button class="g-recaptcha" data-sitekey="your_reCaptcha_site_key" data-callback='onSubmit' data-action='submit'>Submit</button> |
The Google reCaptcha widget will display at the bottom right corner of the screen where you have the form on your website.
Let’s create an HTML structure of the form in the next step and add the above button to the form.
Step 3: Create HTML Form Structure with reCaptcha Submit Button
To add Google reCaptcha version 3, you have to create an HTML form structure of the form. Let’s take a simple example of a contact form that requires a few important fields like Name, Email, and Message. You can read our post on the simple HTML contact form. However, you just need to change the button with the previous step button of Google reCaptcha.
Below is the simple HTML form code with a button element that contains useful attributes required to display Google reCaptcha widget.
Also, change the attribute data-sitekey with your obtained Google reCaptcha API keys in the 1st step above. The site key should be placed in the <button> element.
|
1 2 3 4 5 6 7 8 9 10 11 12 13 14 15 16 17 18 19 20 |
<div class="main-contact-form"> <form method="POST" id="mycontactform"> <label for="Name">Your Name</label> <input type="text" name="name" class="name" placeholder="Enter name" required> <label for="Email">Your Email</label> <input type="email" name="email" class="email" placeholder="Enter email" required> <label for="message">Message</label> <textarea name="message" class="message" placeholder="Enter your message" rows="5" required></textarea> <input type="hidden" name="submit_frm" value="1"> <!-- Submit button with reCAPTCHA trigger --> <button class="g-recaptcha" data-sitekey="your_reCaptcha_site_key" data-callback='onSubmit' data-action='submit'>Submit</button> </form><br> </div> |
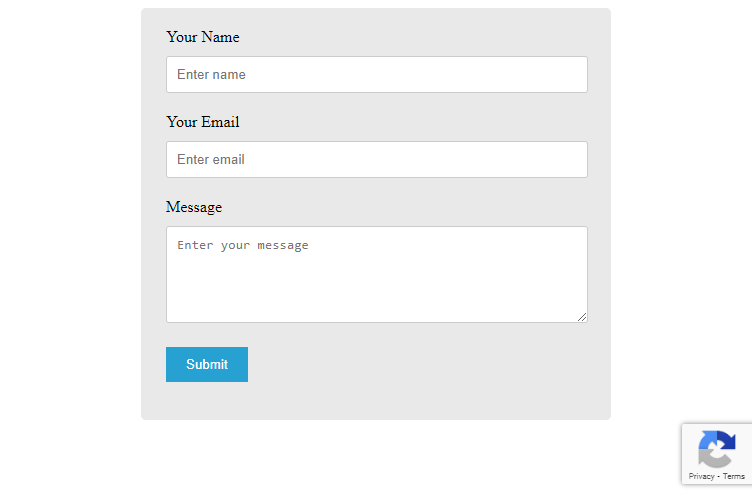
If you want to make your design looks better to your website, you have to add some CSS code as shown in the below code. It can change the appearance of your form as shown in the image below.
|
1 2 3 4 5 6 7 8 9 10 11 12 13 14 15 16 17 18 19 20 21 22 23 24 25 26 27 28 29 30 31 32 33 34 35 36 37 38 39 |
<style> input[type='text'],input[type='email'], textarea{ width: 100%; padding: 10px; border-radius: 3px; border: 1px solid #ccc; margin-top: 10px; margin-bottom: 20px; } input[type='text']:focus,input[type='email']:focus, textarea:focus{ border: 1px solid #5db6db; box-shadow: 0 0 10px #b9eaff; outline: none !important; } button{ background: rgb(39,160,210); color: #fff; border: none; padding: 10px 20px; cursor: pointer; } .main-contact-form{ max-width: 400px; margin: 0 auto; background: #e9e9e9; padding: 20px 45px 20px 25px; border-radius: 5px; } .error_message{ color: red; border:1px solid red; padding: 5px; } .success_message{ color: green; border:1px solid green; padding: 5px; } </style> |
You will get the first lookup at the form as shown in the image below. It also displays the Google reCaptcha widget at the bottom right corner of the screen.
Let’s add some PHP code to verify the response of the Google reCaptcha and send emails.
Step 4: Add PHP Code to Verify reCaptcha and Send Emails
To verify Google reCaptcha, you have to first store its secret key in a PHP variable, After that, get all the users entered data using the global variable $_POST.
Now, to validate the email address, you can use the regular expression and preg_match() to match the user’s entered email address.
You also have to use the $_POST global variable to get the Google reCaptcha responsive with g-recaptcha-response and g-recaptcha-response. After the response is validated, you have to use the curl request to check and verify the response is valid.
When the curl response is a success, your form will get submitted and you can use the PHPMailer to send the form data via email. See the PHP code given below to learn the method.
|
1 2 3 4 5 6 7 8 9 10 11 12 13 14 15 16 17 18 19 20 21 22 23 24 25 26 27 28 29 30 31 32 33 34 35 36 37 38 39 40 41 42 43 44 45 46 47 48 49 50 51 52 53 54 55 56 57 58 59 60 61 62 63 64 65 66 67 68 69 70 71 72 73 74 75 76 77 78 79 80 81 82 83 84 85 86 87 88 89 90 91 92 93 94 95 96 97 98 99 100 101 102 103 |
<?php // Google reCAPTCHA API key configuration $secret_key = 'your_reCaptcha_secret_key'; if(isset($_POST['submit_frm'])){ // Get the submitted form data $email = $_POST['email']; $name = $_POST['name']; $message = $_POST['message']; if(($name == '') && ($email == '') && ($message == '')){ echo "<p class='error_message'>Please fill all fields.</p>"; exit; } //validation for email $email_exp = '/^[A-Za-z0-9._%-]+@[A-Za-z0-9.-]+\.[A-Za-z]{2,4}$/'; if (!preg_match($email_exp, $email)) { echo "<p class='error_message'>The email address you entered is not valid.</p>"; exit; } //Check response of Google reCaptcha if(isset($_POST['g-recaptcha-response']) && !empty($_POST['g-recaptcha-response'])){ // Google reCAPTCHA verification API Request $api_url = 'https://www.google.com/recaptcha/api/siteverify'; $resq_data = array( 'secret' => $secret_key, 'response' => $_POST['g-recaptcha-response'], 'remoteip' => $_SERVER['REMOTE_ADDR'] ); $curlConfig = array( CURLOPT_URL => $api_url, CURLOPT_POST => true, CURLOPT_RETURNTRANSFER => true, CURLOPT_POSTFIELDS => $resq_data ); $ch = curl_init(); curl_setopt_array($ch, $curlConfig); $response = curl_exec($ch); curl_close($ch); // Decode JSON data of API response in the array $responseData = json_decode($response); // If the reCAPTCHA API response is valid execute the code to send emails if($responseData->success){ //If everything above is ok then move further to send emails using PHPMailer //Use PHPmailer require "phpmailer/PHPMailerAutoload.php"; $mail = new PHPMailer; //Mailbody to send in an email $mailbody = '<h4>Customer contact details:-</h4> <p><b>Name:</b> '.$name.'</p> <p><b>Email:</b> '.$email.'</p> <p><b>Message:</b> '.$message.'</p>'; //Sender email address $mail->isSMTP(); // Set mailer to use SMTP $mail->SMTPDebug = 0; //See errors, change it to 4 $mail->Host = 'smtp.gmail.com'; // Specify main and backup SMTP servers $mail->SMTPAuth = true; // Enable SMTP authentication $mail->Username = $sender; // SMTP username $mail->Password = 'yourgmailpassword';// Gmail SMTP password $mail->SMTPSecure = 'tls'; // Enable TLS encryption, `ssl` also accepted $mail->Port = 587; // TCP port to connect to $mail->setFrom($email, $name); //$mail->addAddress('[email protected]'); //add more recipient (optional) $mail->addReplyTo($email, $name); //$mail->addCC('[email protected]'); //$mail->addBCC('[email protected]'); $mail->isHTML(true); // Set email format to HTML $mail->Subject = 'Contact Form Submitted by '.$name; $mail->Body = $mailbody; //$mail->AltBody = 'This is the body in plain text for non-HTML mail clients'; //Email your contact form data using Gmail SMTP with PHPMailer if(!$mail->send()){ echo "<p class='error_message'>Message could not be sent. Please try again.</p>"; echo 'Mailer Error: ' . $mail->ErrorInfo; }else{ echo "<p class='success_message'>Message has been sent successfully.</p>"; } }else{ echo "<p class='error_message'>The reCAPTCHA verification failed, please try again.</p>"; } }else{ echo "<p class='error_message'>Something went wrong, please try again.</p>"; } } ?> |
Google reCaptcha is the most useful API to make your forms secure from bot attacks without the need to interact with them. The old version V2 require you to click the checkbox to identify human and bots. However, the latest version V3 does not require clicking any checkbox or any other interaction with the widget.
You May Also Like to Read
Thanks! This is definately the most clear tutorial and simple one to use reCaptcha v3! Great job!