To delete selected rows in Excel, you can use a keyboard shortcut without the need to use a mouse. You can use your keyboard with a few key presses to delete the entire row.
Let’s find out with the different processes given below.
How to Delete Single Row in Excel Using Keyboard
First of all, use your keyboard’s left-right arrow to go to the cell of the row that you want to delete. After that follow the steps given below.
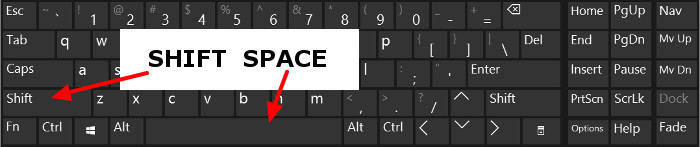
Step 1: Select the Entire Row Using “SHIFT SPACE”
Press the keyboard shortcut “SHIFT SPACE” to the cell the entire row. You will get the single rows highlighted and selected after you press this shortcut.
See the image below showing the buttons to press in combination.
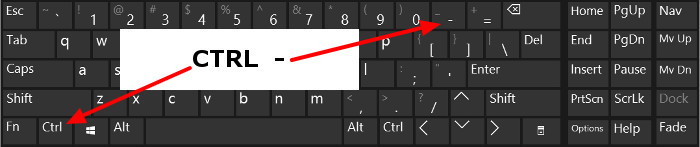
Step 2: Final Step: Delete Selected Rows Using “CTRL -“
Finally, use your keyboard again and press a new shortcut key “CTRL -“. This will immediately remove the selected row by pressing the required keys.
If you have any doubts about the keys, you can check the below-given image showing the keys to press together.

How to Remove Multiple Rows using Keyboard Shortcut in Excel
You can also delete the multiple numbers of rows quickly using the step given below.
Step 1: Select the Entire Row Using “SHIFT SPACE”
follow the same key shortcut “SHIFT SPACE” as you have used above. This will select the single row at the start of using this method.
Now, if you want to select the multiple rows of the Excel sheet. You have to check step 2 given below.

Step 2: Press “SHIFT LEFT arrow” or “SHIFT RIGHT arrow” to Select Multiple Rows
After you select a single row using the above step. You have to press the “SHIFT LEFT arrow” or “SHIFT RIGHT arrow” to select multiple rows.
The shortcut key “SHIFT LEFT arrow” selects multiple rows to the left side. However, the other method selects multiple rows to the right of the selected row.
![]()
Step 3: Final Step: Delete Selected Rows Using “CTRL -“
Now, you have to only press “CTRL -” and it immediately removes multiple selected rows. You can remove more rows as per your requirement.

Other Option to Delete Selected Rows in Excel
In addition to the above methods, you can also use the below step-by-step process to remove rows.
Step 1: Go to the Required Row Cell to Delete
You have to first go to the row cell which you have to delete. If you think of using the mouse to perform this task, Don’t do this. You can use the keyboard’s left-right arrow to visit the required cell.
Now, follow the below steps.
Step 2: Press “CTRL -” to Open Window Options
After the above step, you have to press the shortcut key “CTRL -“. This will open a new window in which there are 4 options.
Step 3: Select “Entire Row” Option
Out of the 4 options given in the window, you have to select “Entire Row” option. You can use the arrow keys top and bottom.
You can also select the option by pressing the keyboard button “r”.
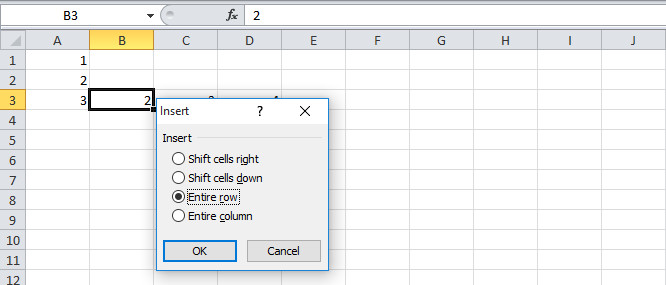
Step 4: Final Step: Press “Enter”
This is the final step in which, you have to just press the “Enter” key on your keyboard.
You may also like to read