A simple HTML contact form should contain form fields like Name, Email, and Message. You can also add a phone field to collect the phone number of your users.
To make proper communication with your audience, you need to add a contact form to your website. You need a simple HTML contact form design to make it simple for users to fill it out.

Add a simple HTML structure and some CSS to make it look beautiful to your audience. So, let’s create one for your website with the step-by-step process below.
How to Create Simple HTML Form (Step-by-step)
Here is the step-by-step process for creating a simple HTML contact form:-
Step 1: Create HTML Structure of the Contact Form
To create a simple form structure, you need to wrap every form element inside the <form> tag. There are different input type elements you have to use for the Name, Email, and Message fields. Let’s learn each field and the input type required to create the correct form.
Add Name Field Using <input type="text">
It is the most common field in Forms to create a field that takes text. However, you can also enter numbers and symbols in this field.
|
1 |
<input type="text" name="name" class="name" placeholder="Enter name" required> |
Add Email Field Using <input type="email">
To take valid emails from your users, you can use this input type.The default HTML input type for email data can also validate the email address format. Always use this field in forms when you want to collect the email address of your audience.
|
1 |
<input type="email" name="email" class="email" placeholder="Enter email" required> |
Add Message Field Using <textarea rows="5"email"><textarea> Multiline Field
If you want to collect longer text contact from your users, you can use this field. You can specify the rows and columns to increase the textarea size. It is multiple fields that take any size of text content in forms.
|
1 |
<textarea name="message" class="message" placeholder="Enter your message" rows="5" required></textarea> |
Add CTA Button Field Using <input type="submit">
To allow users to enter data and submit the form, you will have to add CTA(Click to add) button. It should be of this type required for the submission of the form. Add this field to the end of the form before the </form> closing tag.
|
1 |
<input name="submit" type="submit" value="Submit"> |
Final HTML Structure of Contact Form
Now, the final structure of your contact form is given below. It is the combination of all the above fields and the <label> included to specify the labels of these fields. See the code below to get the idea of using form fields in the structure.
|
1 2 3 4 5 6 7 8 9 10 11 12 13 14 15 16 |
<div class="main-contact-form"> <form action="#" method="POST"> <label for="Name">Your Name</label> <input type="text" name="name" class="name" placeholder="Enter name" required> <label for="Email">Your Email</label> <input type="email" name="email" class="email" placeholder="Enter email" required> <label for="message">Message</label> <textarea name="message" class="message" placeholder="Enter your message" rows="5" required></textarea> <input name="submit" type="submit" value="Submit"> </form> </div> |
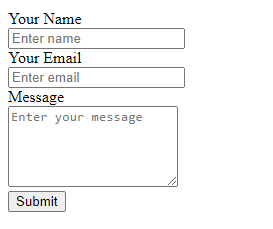
When you run the above code on your browser, you will get the first look at the form as shown in the image below. It looks very simple and is not attractive to add to your website. No spacing, no color, and no look-n-feel in the result.

This is because you have not added CSS yet. Let’s move further to add some CSS and make your form beautiful to attract users to your website.
Step 2: Add CSS to Beautify Simple HTML Contact Form
below is the simple CSS code which changes the appearance of input type text, email, and submits button. It also changes the appearance of the textarea. You can change the color of your button according to to match your brand color.
|
1 2 3 4 5 6 7 8 9 10 11 12 13 14 15 16 17 18 19 20 21 22 23 24 25 26 27 28 29 |
<style> input[type='text'],input[type='email'], textarea{ width: 100%; padding: 10px; border-radius: 3px; border: 1px solid #ccc; margin-top: 10px; margin-bottom: 20px; } input[type='text']:focus,input[type='email']:focus, textarea:focus{ border: 1px solid #5db6db; box-shadow: 0 0 10px #b9eaff; outline: none !important; } input[type='submit']{ background: rgb(39,160,210); color: #fff; border: none; padding: 10px 20px; cursor: pointer; } .main-contact-form{ max-width: 400px; margin: 0 auto; background: #e9e9e9; padding: 20px 45px 20px 25px; border-radius: 5px; } </style> |
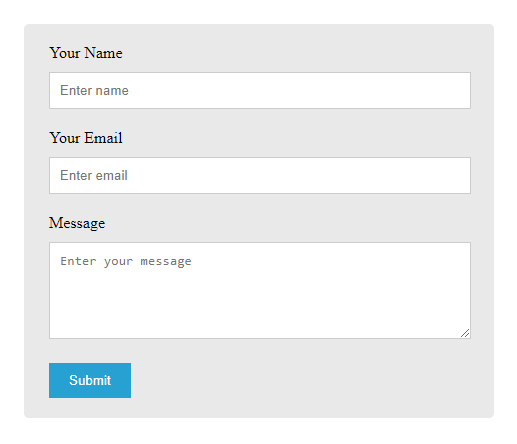
After you include the above CSS code in your simple HTML contact form, the appearance will change as shown in the image below. It contains accurate spacing among the form elements. Give some background to the form to show the covered area on a web page.

I have added a blue-like color to the button. However, you can change it to your color by modifying the above CSS code.
Step 3: Complete Code
Below is the complete code of the simple HTML contact form. I have added CSS code inside the <head> tag just before its closing tag. Added the structure code of the form inside the <body> tag. You can add the below code to your website contact us page.
|
1 2 3 4 5 6 7 8 9 10 11 12 13 14 15 16 17 18 19 20 21 22 23 24 25 26 27 28 29 30 31 32 33 34 35 36 37 38 39 40 41 42 43 44 45 46 47 48 49 50 51 52 53 54 55 56 57 |
<!DOCTYPE html> <html lang="en"> <head> <title>Contact Form in HTML and CSS</title> <meta charset="utf-8"> <meta name="viewport" content="width=device-width, initial-scale=1"> <style> input[type='text'],input[type='email'], textarea{ width: 100%; padding: 10px; border-radius: 3px; border: 1px solid #ccc; margin-top: 10px; margin-bottom: 20px; } input[type='text']:focus,input[type='email']:focus, textarea:focus{ border: 1px solid #5db6db; box-shadow: 0 0 10px #b9eaff; outline: none !important; } input[type='submit']{ background: rgb(39,160,210); color: #fff; border: none; padding: 10px 20px; cursor: pointer; } .main-contact-form{ max-width: 400px; margin: 0 auto; background: #e9e9e9; padding: 20px 45px 20px 25px; border-radius: 5px; } </style> </head> <body> <div class="main-contact-form"> <form action="#" method="POST"> <label for="Name">Your Name</label> <input type="text" name="name" class="name" placeholder="Enter name" required> <label for="Email">Your Email</label> <input type="email" name="email" class="email" placeholder="Enter email" required> <label for="message">Message</label> <textarea name="message" class="message" placeholder="Enter your message" rows="5" required></textarea> <input name="submit" type="submit" value="Submit"> </form> </div> </body> </html> |
Furthermore, if you want to send emails using the above form or insert its submission data into the database. You can read the post whose link is given below.
- PHP Contact Form (Send emails and insert them into the database)
However, if you want to create the above form without the requirement of coding, you can read the post given below.
