In this post, learn how to create a contact form using PHPMailer with Gmail SMTP to send emails. When your default mail function is working, you can use SMTP to send your form data via email.
It can possible that your hosting server does not provide email services to send emails. In that case, you will be able to send emails from your contact using the default mail function of PHP.

Looking to create contact forms and send emails without coding? Create beautiful-looking contact forms with JotForm.
PHPMailer can help you send emails using an SMTP from a trusted platform like Gmail. Yes, you can use Gmail SMTP to send emails when your hosting provider does not provide email services.
Let’s find out how you can use PHPMailer to send emails from your contact form with the step-by-step guide given below.
how to Create Contact Form Using PHPMailer SMTP to Send Emails
Here is the step-by-step process on how to create a contact form using PHPMailer Gmail SMTP:-
Step 1: Create HTML Contact Form Structure
In this step, you have to first create a contact form design for your website that users can fill out and submit. The structure of the form should contain enough form fields to collect users’ data. The form data should be complete enough to help you make communication and answer their queries.
I am going to add the Name, Email, and Message fields to the contact form using HTML. If you want to learn them in detail, you can read my guide simple HTML contact form. After that, you can read the further code given here.
|
1 2 3 4 5 6 7 8 9 10 11 12 13 14 15 16 17 18 19 20 21 22 23 24 25 26 27 28 29 |
<!DOCTYPE html> <html lang="en"> <head> <title>Simple Contact Form in HTML and CSS</title> <meta charset="utf-8"> <meta name="viewport" content="width=device-width,initial-scale=1"> </head> <body> <div class="main-contact-form"> <form action="#" method="POST"> <label for="Name">Your Name</label> <input type="text" name="name" class="name" placeholder="Enter name" required> <label for="Email">Your Email</label> <input type="email" name="email" class="email" placeholder="Enter email" required> <label for="message">Message</label> <textarea name="message" class="message" placeholder="Enter your message" rows="5" required></textarea> <input name="submit" type="submit" value="Submit"> </form><br> <!-- Place all PHP code here --> </div> </body> </html> |
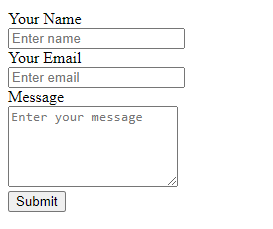
When you execute the above code, you will get a very simple design that is not enough to add to your website contact us page. You will get the design as shown in the image below.

Step 2: Add CSS to Make it Beautiful
If you want to make your contact form beautiful, you will have to just add a small CSS code given below. It can make the Name, Email, and Message fields beautiful. I have added a blue-like color to the button but you can change it as per your requirements.
|
1 2 3 4 5 6 7 8 9 10 11 12 13 14 15 16 17 18 19 20 21 22 23 24 25 26 27 28 29 30 31 32 33 34 35 36 37 38 39 |
<style> input[type='text'],input[type='email'], textarea{ width: 100%; padding: 10px; border-radius: 3px; border: 1px solid #ccc; margin-top: 10px; margin-bottom: 20px; } input[type='text']:focus,input[type='email']:focus, textarea:focus{ border: 1px solid #5db6db; box-shadow: 0 0 10px #b9eaff; outline: none !important; } input[type='submit']{ background: rgb(39,160,210); color: #fff; border: none; padding: 10px 20px; cursor: pointer; } .main-contact-form{ max-width: 400px; margin: 0 auto; background: #e9e9e9; padding: 20px 45px 20px 25px; border-radius: 5px; } .error_message{ color: red; border:1px solid red; padding: 5px; } .success_message{ color: green; border:1px solid green; padding: 5px; } </style> |
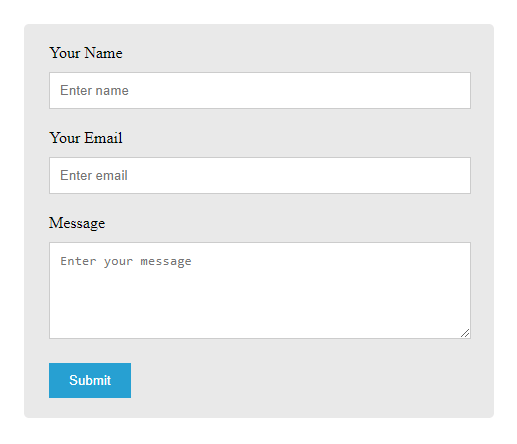
Add the above CSS code inside the <head> section of your page. You will get the form design as shown in the image below after adding the CSS code.

Now, your design is ready to add to your website. But, the contact form will not work for you without PHP code to collect users’ submitted form data. So, let’s move further to the next section to add PHP code.
Step 3: Send Contact Form Data Via Email Using PHPMailer Gmail SMTP
Here, I am going to show you how to send emails using PHPMailer. Gmail SMTP is the most trusted SMTP to send emails quickly.
To use the PHPMailer, you need to first download the PHPMailer zip file whose link is given below. Extract it to the base location of the file containing the HTML and PHP code.
Now, you just have to copy the below code and paste it just below the </form> tag in the HTML code specified above. You have to change the below things in the PHP code:-
- Change ‘[email protected]’ with your Gmail id
- Change ‘yourgmailpassword’ with the app password of your Gmail id. You can read the guide Sign in with app password in Gmail to create your app password on Gmail.
- Change ‘[email protected]’ with the recipient’s email address. Also, change the ‘recipientname’ with your name to appear on the emails.
|
1 2 3 4 5 6 7 8 9 10 11 12 13 14 15 16 17 18 19 20 21 22 23 24 25 26 27 28 29 30 31 32 33 34 35 36 37 38 39 40 41 42 43 44 45 46 47 48 49 50 51 52 53 54 55 56 57 58 59 60 61 |
<?php if(isset($_POST['submit'])){ // Get the submitted form data $email = $_POST['email']; $name = $_POST['name']; $message = $_POST['message']; //validation for email $email_exp = '/^[A-Za-z0-9._%-]+@[A-Za-z0-9.-]+\.[A-Za-z]{2,4}$/'; if (!preg_match($email_exp, $email)) { echo "<p class='error_message'>The email address you entered is not valid.</p>"; exit; } //If everything above is ok then move further to send emails using PHPMailer //Use PHPmailer require "phpmailer/PHPMailerAutoload.php"; $mail = new PHPMailer; //Mailbody to send in an email $mailbody = '<h2>Customer contact details:-</h2> <p><b>Name:</b> '.$name.'</p> <p><b>Email:</b> '.$email.'</p> <p><b>Message:</b> '.$message.'</p>'; //Sender email address $mail->isSMTP(); // Set mailer to use SMTP $mail->SMTPDebug = 0; //See errors, change it to 4 $mail->Host = 'smtp.gmail.com'; // Specify main and backup SMTP servers $mail->SMTPAuth = true; // Enable SMTP authentication $mail->Username = $sender; // SMTP username $mail->Password = 'yourgmailpassword';// Gmail SMTP password $mail->SMTPSecure = 'tls'; // Enable TLS encryption, `ssl` also accepted $mail->Port = 587; // TCP port to connect to $mail->setFrom($email, $name); //$mail->addAddress('[email protected]'); //add more recipient (optional) $mail->addReplyTo($email, $name); //$mail->addCC('[email protected]'); //$mail->addBCC('[email protected]'); $mail->isHTML(true); // Set email format to HTML $mail->Subject = 'Contact Form Submitted by '.$name; $mail->Body = $mailbody; //$mail->AltBody = 'This is the body in plain text for non-HTML mail clients'; //Email your contact form data using Gmail SMTP with PHPMailer if(!$mail->send()){ echo "Message could not be sent. Please try again."; echo 'Mailer Error: ' . $mail->ErrorInfo; }else{ echo "<p class='success_message'>Message has been sent successfully.</p>"; } } ?> |
When you have completed the above code, you are now ready to check your contact form on the browser to see if you received emails.
If you want to use the attachment with PHPMailer, you can read our post on Ajax Contact Form with Attachment in PHP (Using Mail() or PHP Mailer)
If you have any queries regarding the above tutorial, please comment below. I will solve your problem and give you solutions.
You May Also Like to Read
