Are you looking to create email subscription form on your WordPress website? Do you want to build an email list of subscribers for your business?
Increasing traffic is a tough task for many website owners to gain more customers for your business. You should consider creating an email list of subscribers to grow your customers online.
Email list helps you gain more traffic and build a great relationship with your customers. For building an email list, you just need an email subscription form connected with an email marketing platform on your WordPress website.
After creating an email list of subscribers, you can start sending one-to-one personal communication emails directly to your customers. You can send offers, discounts, and more to your email list to easily convert them into regular customers.
In this post, you will learn how to create an email subscription form and connect it with an email marketing platform on your WordPress website. So, let’s get started.
What is the Email Subscription Form
Email subscription form helps you easily grow your email list of subscribers for your business. After you sign up with Sendblue, you can easily create an email subscription form for your website to allow users to subscribe to your newsletter.
Affiliate Disclosure: At Tutorialdeep, we believe in transparency for our users. In this blog, there are some referral links. If you signup with these links we will earn some commission at no extra cost to you. We recommend these links because they are our trusted brands.
Once a user fills the email subscription form, the user will get a confirmation email to the email address that they enter in the form. The confirmation email contains a double-opt-in link that users have to click to confirm their subscription. After that, the user will get the welcome email and the user email address gets added to the email list.
You can easily capture interested peoples who engaged with your content and products and easily be converted them into regular customers. After they signed up for your email subscription form, you can start sending regular updates, offers, and discounts to increase your customers.
Why You Should Create an Email Subscription Form in WordPress?
There are many reasons behind creating an email subscription form for your WordPress website. A few top reasons are given below:
- Capture Emails of your Customers: If you want to grow your audience, you should start capturing emails of your visitors from the first day of launching your website. It ensures that you will not lose any customers for your online shop.
- Generate More Sales: After you capture emails, you can send offers and discounts to them to convert them into sales. This is a great chance as these people are interested in your products. They are the targeted people who are easy to convert into customers.
- Gain Regular Customers: The email subscription form helps you gain regular customers for your online store. You can create more similar products that people like more to keep getting regular customers.
- Grow Your Subscribers: Subscribers are the main audience of a business that helps to generate regular traffic lifetime. This helps businesses to be successful online with long-term revenue and a business stream.
- Build Relationship with Personalization: After creating an email list, you can send personal emails to them to build a great relationship with your customers. You can easily understand the nature of your audience to easily build products that fulfill their requirements. This brings more income to your business.
- Make Branding Online: You can improve your branding by gaining regular customers through an email subscription form. It helps you build a brand online for your business.
How to Create and Add Email Subscription Form in WordPress
Follow the step-by-step process given below to create your email subscription form and add it to your WordPress website. So, let’s get started.
Step 1: Signup with Sendinblue Email Marketing Platform
First of all, you have to go to the Sendinblue homepage and click the ‘Sign up free’ button given at the top right corner of the screen.

It will take you to the Sendinblue account creation form where you have to enter your signup details like Company name, Email address, and Password. When you have done filling in these details, you have to click the ‘Get Started’ button to proceed further.
If you have a Gmail id, you can click the ‘Sign up with Google’ to create a Sendinblue account with your Gmail account.

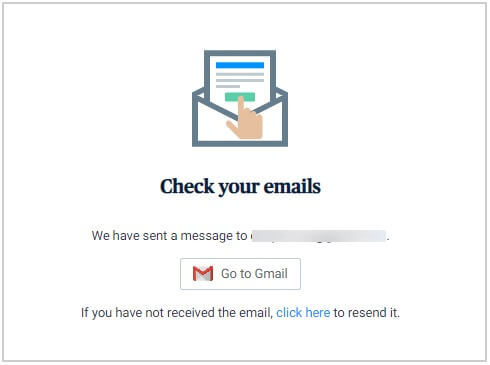
Now, log in to your email id account that you have provided above. You will get an email from Sendinblue that you have to check. It contains a link that you have to click to confirm that you are the real person.
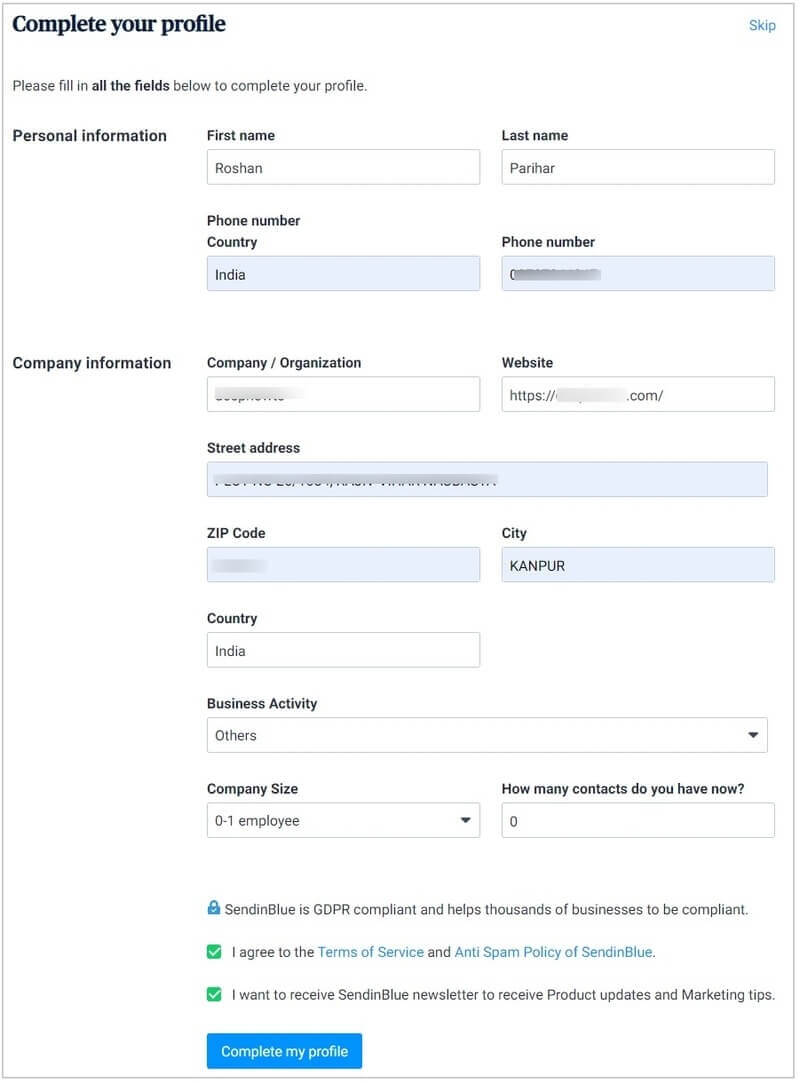
After that, you have to fill out the complete profile form that requires your Personal and Company Information. In the personal information section, you have to enter your details like your Name, Phone number, and Country.
In the company information, you have to fill your information like company, website, full address, business activity, company size, and a number of contacts you have. After that, click the checkboxes that you agree with their terms of services and receive regular updates.
Click the ‘Complete my profile’ button to proceed further.
Furthermore, you will get four different plans out of which you have to select the plan for your account. I recommend you to select the ‘Premium’ plan that comes with all the essential features in one single pack.

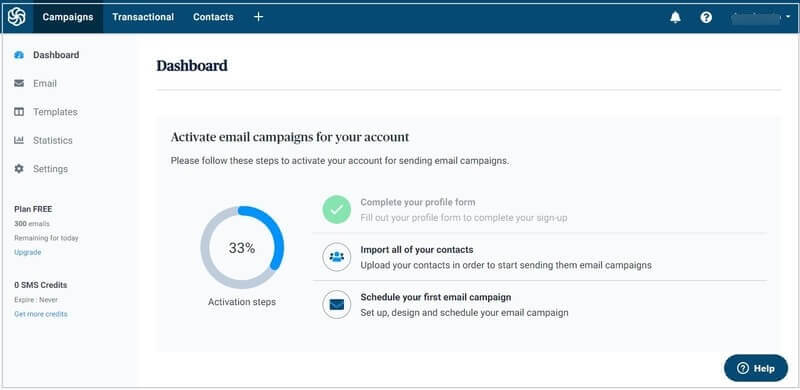
When you have completed the above signup process, you will be taken to the Sendinblue dashboard. The first lookup of the dashboard is as given below.
Now to connect your WordPress website with your Sendinblue account, you have to install the Sendinblue plugin on your website. So, let’s install the plugin on your WordPress website.
Step 2: Install Sendinblue Plugin on Your WordPress Website
To create an email subscription form on your WordPress website, you will have to install the Sendinblue WordPress plugin.
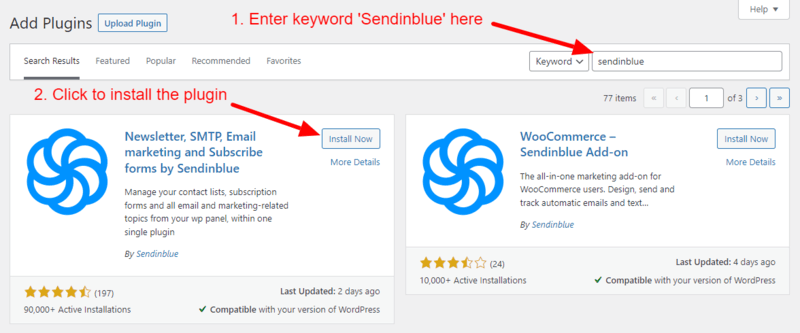
Login to your WordPress admin and go to your WordPress dashboard menu option Plugins >> Add New.

You will get a page where you have to search for the Sendinblue plugin. Enter the search term ‘Sendinblue’ and click outside of the input box. This will search the plugin and show you the ‘Sendinblue’ plugin as shown in the image below. You have to click the ‘Install Now’ to install and activate the plugin.
This plugin helps you connect your WordPress website with a Sendinblue account. After you made the connection, the leads generated from the email subscription form on your WordPress website will be saved on your Sendinblue account.
So, let’s find out how to connect your WordPress website with your above created Sendinblue account.
Step 3: Connect Your Website with Sendinblue Account
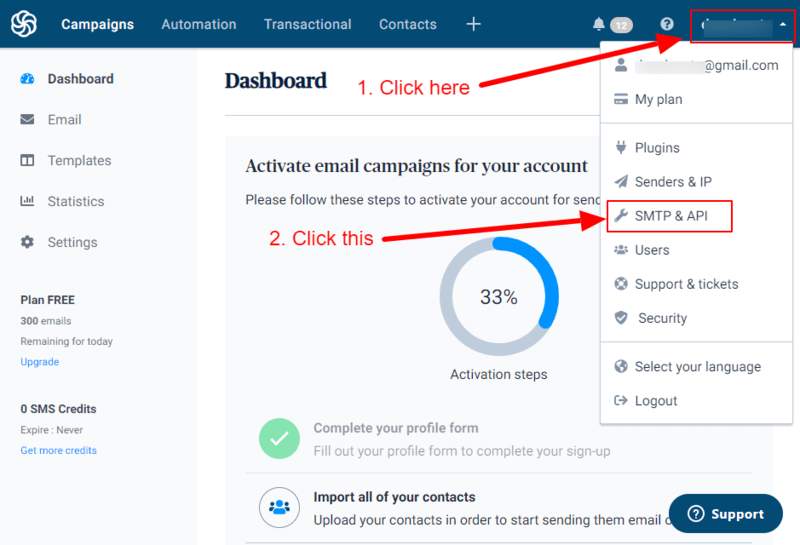
For connecting your WordPress website with your Sendinblue account, you need to generate a Sendinblue API key. To create the key, you have to open your Sendinblue account dashboard.
On the Sendinblue dashboard, you have to click the top right corner of the dashboard as indicated in the image below. You will get different menu options from which you have to click the option ‘SMTP & API’ to get the key.
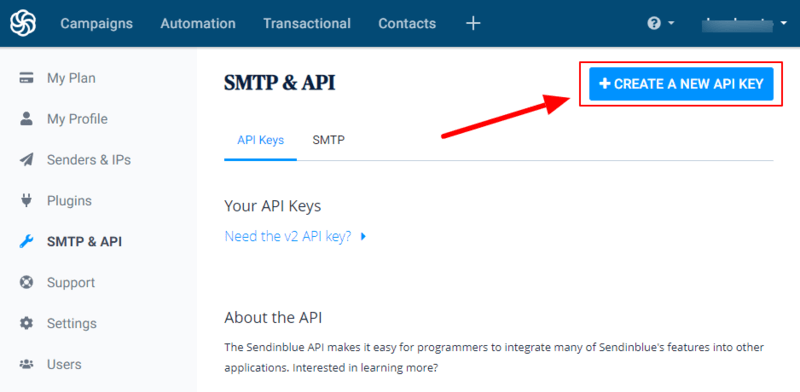
You will get a page where you have to click the ‘CREATE A NEW API KEY’ button as shown in the image below.
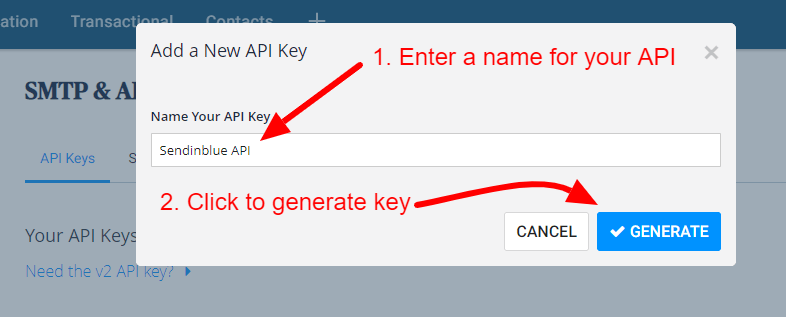
It will open a popup where you have to enter a name for your API key. After that, click the ‘GENERATE’ button to generate the API key.
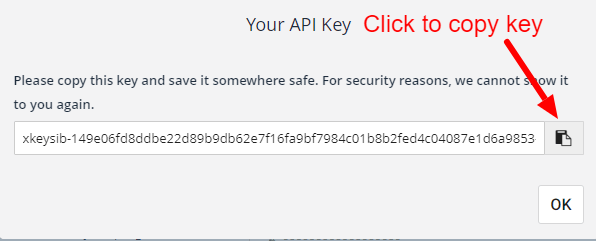
An API key will be generated for you to use for your WordPress website and your Sendinblue account connection. To copy the generated API key, you have to click the copy button as indicated in the image below. It will copy the generated key to paste.
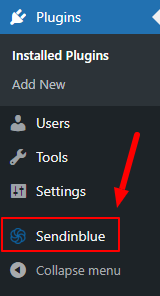
Now, login to your WordPress admin to open the dashboard and click the ‘Sendinblue’ menu option as shown in the image below.
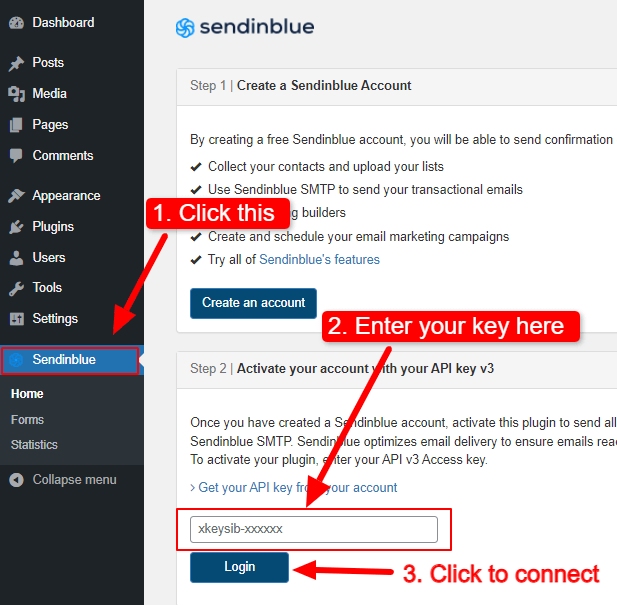
You will get a Sendinblue page where you paste the above generate key. As you have copied the key above, you need to paste the key in the input box as shown in the image below.
After that, click the ‘Login’ button to finally connect your WordPress website with your above created Sendinblue account.
Now, you have successfully connected your Sendinblue account with your WordPress website. Let’s create an email subscription form and add it to your website posts and pages to generate leads from your website.
Step 4: Set to Use Sendinblue SMTP to Send Emails
Sending emails from your website server requires cron jobs and may reduce your website speed. You can start using Sendinblue SMTP to send emails through it to resolve this problem.
To enable Sendinblue SMTP, you have to set ‘Yes’ in the section ‘Transactional email’ as shown in the image below.
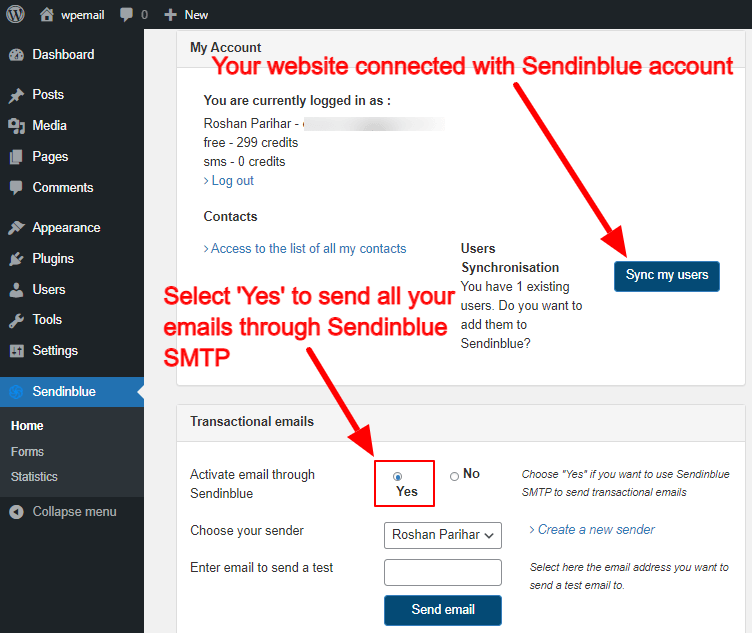
After you activate the Sendinblue SMTP, all your emails for subscription will start sending through the SMTP of Sendinblue.
Let’s create an email subscription form for your WordPress website.
Step 5: Create Email Subscription Form on Your WordPress Website
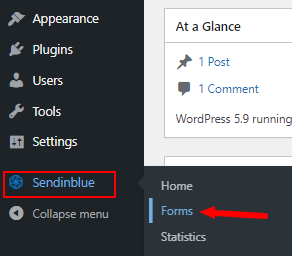
To create an email subscription form for your WordPress website, you have to go to your WordPress dashboard and visit the menu option Sendinblue >> Forms. The below image shows the menu option that you have to visit.
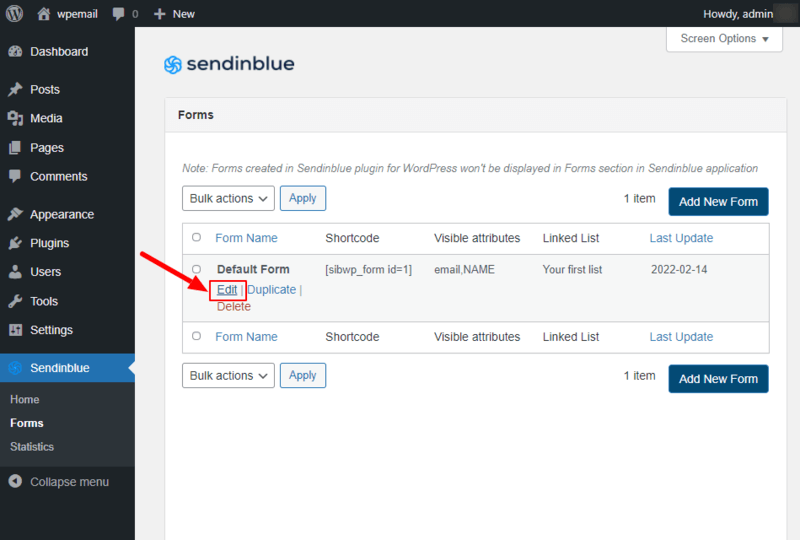
You will be taken to a page where you will get a pre-created email subscription form. Take your mouse to the form and click the ‘Edit’ button as shown in the image below. This will open a subscription form that you can edit according to your requirements.
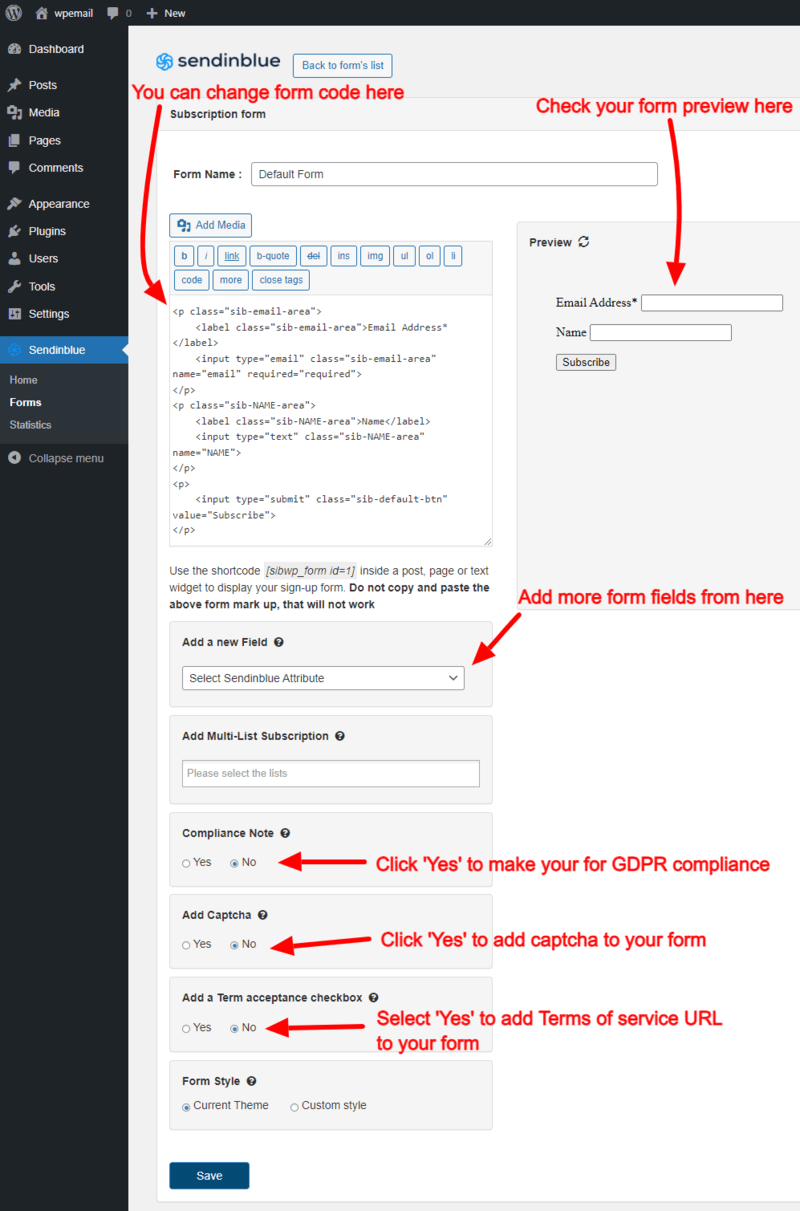
It will take you to the subscription form page where you will get different form settings to make your form work. The below image shows the subscription form code to the left-hand side and its preview to the right-hand side.
You can check the subscription form code to change and modify it to match it with your website design. After you change the design, you can see the preview to the right-hand side of the screen.
Below the subscription form, you can also add a new field, compliance note, Captcha, add term acceptance checkbox, and change the form style according to your website or set a custom style.
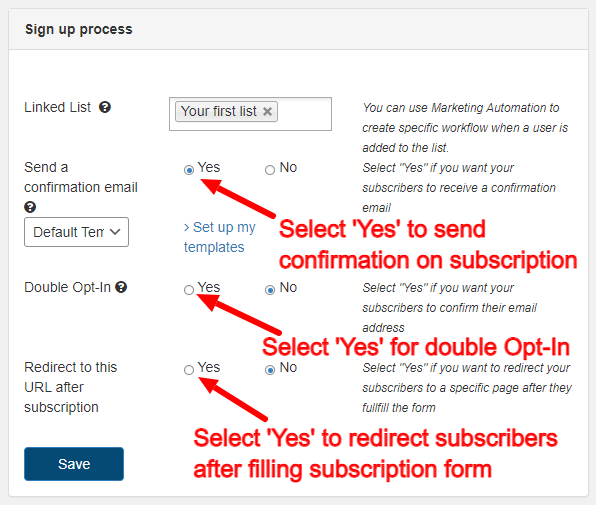
The next section in this form subscription page is the signup process. You can set up an email list to save the emails of your leads. Setup the system if you want to send subscription confirmation email or double opt-in to confirm emails of leads. You can also set up a link to redirect your subscribers after submitting the form.
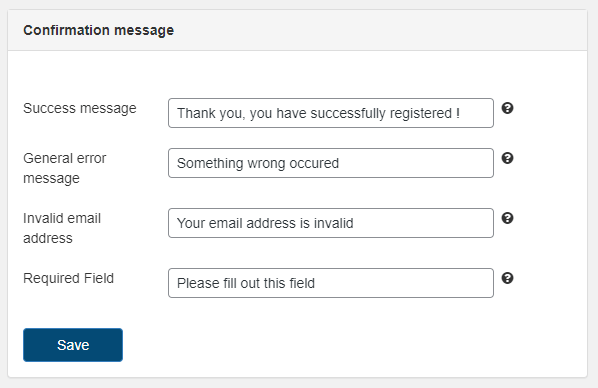
The confirmation message section is useful to set the messages to display on form submission. You can set up success messages, error messages, invalid email address messages, and required field to tell users that the fields is compulsory to fill.
Now, you have completed creating your email subscription form, it’s time to add it to your website posts and pages. So, go ahead and add the form.
Step 5: Add Email Subscription Form to Your Website Posts and Pages
Once you have done the above steps, you can go ahead to add your form to your website. To add your subscription form to your website posts and pages, you have to visit your WordPress website dashboard menu option Sendinblue >> Forms. The below images shows the menu that you have to open.
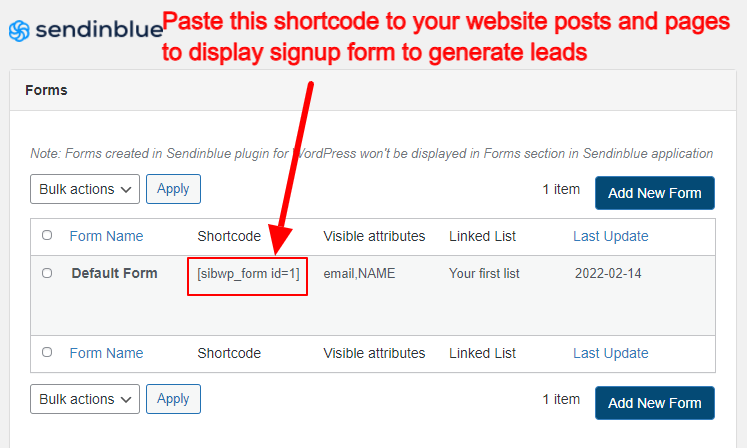
You will be taken to a page where you will get a list of subscription forms you have created to add to your website posts and pages. The form you have created above shows a shortcode as shown in the image below. You need to just copy that shortcode to paste it anywhere on your website where you want to display it.
After you have completed adding your subscription form to your websites posts and pages, you can open your post and pages to see the form. Now, each time users fill in their details and click the submit button, the details are saved to your above created Sendinblue account.
Tip to Generate More Subscribers from your WordPress Website
There are many methods to generate subscribers and the top methods are given below:-
1. Add Exit Popups to Display to Visitors Leaving Your Website
The exit-Intent popup is the popup that displays at the time when the visitors try to leave your website. It immediately displays a popup that grabs the attention of visitors. You can easily capture the emails of your visitors to convert them from visitors into subscribers.
It can also help eCommerce websites to capture emails of their customers at the time when they try to abandon their cart. You can capture the emails of your customers. After that, you can send discounts, offers, and promotions to easily convert into customers.
Suggested Readings:-
- How to Get Crazy Conversions with Exit Intent Popups
- How to Quickly Create Exit Popups for WooCommerce
2. Place a Top Hello Bar to Capture Emails
The top hello bar is a fixed bar at the top position of your website. It may contain an email subscription form or a button that redirects to a landing page that contains an email subscription form. You can easily attract your website visitors with a hello bar and capture their emails.
If you want to announce sales, offers, free downloads, the hello bar is the most useful option to generate more subscribers for your business. To create a hello bar, you can use OptinMonster which is the top platform to easily convert website visitors into subscribers.
3. Insert Inline Call-to-action Button to Your Website Content
You can update your old posts and add a button that attracts visitors with free downloads. A free download works as a bonus for your visitors that feel them gifted with free downloads. You can create the best eBook related to your website content and offer it as a free download.
To generate subscribers with this method, you can place a button and add text to display the benefits of the PDF you are offering as a free download. When your visitors click the button, they should visit a landing page that contains a signup form.
After the users fill out the form, they will get an email that contains the PDF download link. It’s that simple for you, isn’t it? You can use the best landing page builders.
4. Content Locking with Emails Subscription Form
It is one of the easiest ways where you can lock your most popular content with a button placed at the end. When your website visitors want to read that content, they have to click the button and fill out the form to get the content. This way you can capture the emails of your website visitors.
In the same way, you can create much useful contents on your website and offer it to your visitors that easily convert them into subscribers. Your website visitors always try to read the most popular content of your website. They need to subscribe to make the content visible
Suggested Readings:-