Do you want to create landing page using Unbounce that gives more conversions?
Landing pages help you easily convert visitors into leads and sales. A killer landing page can give more conversions to generate more revenue for your business. You can easily grow your business online and bring more customers using landing pages.
You can easily create your professional-looking landing pages using the best landing page builders. After you publish a landing page, you can easily share it with your audience to drive traffic and generate more leads.
If you have one landing page that brings more than 100 leads a day. You can create 10 to 20 more landing pages that can bring more than 2,000 leads a day. That’s around 60,000 leads per month for your business. This can be a huge result that can bring more customers and sales to increase revenue.
In this post, you will learn the step-by-step process of how to create a landing page that converts. So, let’s get started.
Affiliate Disclosure: At Tutorialdeep, we believe in transparency for our users. In this blog, there are some referral links. If you signup with these links we will earn some commission at no extra cost to you. We recommend these links because they are our trusted brands.
What is Landing Page?
A landing page is a web page that you create for your users to land convert them into leads and customers. The traffic mainly comes from your emails, Google Ads, Social Media Sites, and other locations.
Marketers create landing pages to collect emails and other information from customers in exchange for downloads or other valuable things.
Landing pages are mainly designed with a goal to target the audience and encourage them to click the CTA(Call-to-Action) button. With one click of the buttons, they are converted into leads or directly into a sale.
You need to make your landing page clear with the goal that whether you want to generate leads or want to generate sales. If you want to generate leads, you have to add a CTA button that captures email in exchange for an eBook or other valuable things. However, if you want to generate sales, you need to add product details and a CTA (Call-to-Action) button to buy the products.
Reasons Behind Using Landing Pages
There are many reason behind using landing pages and a few top of them are given below:-
- Generate More Leads: Landing pages are specifically designed to generate leads in exchange for something digital downloads. It is a surefire way of converting visitors into subscribers to your website.
- Directly Convert Into Sales: You can easily optimize your landing page for a single product to easily generate sales. It requires adding a CTA (Click-to-action) button to encourage customers to click and buy products.
- Grow Your Business Online: When you start using landing pages for your business, you can easily see a significant increase in getting conversions 70% more. It helps you easily get more audience for your business that can be your regular customers.
Why Unbounce to Create Landing Pages?
Ok, so why Unbounce
If you are a SAAS, eCommerce, Agencies, and providing professional services to your audience, Unbounce can be the better choice for you. You can use Unbounce for a bunch of reasons.
Here are the top features of Unbounce that are helpful to create landing pages:
- A/B Testing: To can easily create different versions of your landing page to test which work which one is not working. You can easily improve the performance of your landing pages with its A/B testing.
- Drag-n-drop Form Builder: This feature of Unbounce makes it easier to fastly create any type of landing page you want. You can easily add new blocks and edit previously added blocks to make them suitable for your business.
- 100+ Ready-to-use Templates: Unbounce comes with pre-made beautiful designed templates for almost every category. With these templates, you can easily build any type of landing page you want quickly. You just need to select a template of your choice to quickstart.
- Real-time Editing: You can build landing pages and see the changes live with its classic landing page editor. Real-time editing is useful to get the change quickly applied.
- Popups and Sticky Bars: Popups and sticky bars make your landing page easier to display call-to-action buttons to your customers. You can easily optimize your landing pages to generate more leads from them.
- All Plans Included Unlimited Landing Pages, Popups, and Sticky Bars: Every plan of Unbounce comes with unlimited landing pages, popups, and sticky bars options that beat almost every other landing page builder.
- Award-Winning Support on Phone, Email, and Chat: When it comes to customer support, many landing page builder lacks this service. However, Unbounce provides an expert team with award-winning support to help you in every stage of your marketing. You can easily build a successful business online using Unbounce.
With Unbounce, there really is no risk
Unbounce comes with a 14-days free trial to test all its features before you purchase. After trying its features and interface, if you are fully satisfied with Unbounce, you can consider an upgrade to its premium features.
However, if you are not satisfied with the features, you can cancel your subscription and you won’t be charged within a 14-days free trial. So, there is no risk with Unbounce to try and stick with it only when you are satisfied.
How to Create Landing Page in Unbounce that Converts
Follow the steps given below to create a landing page in Unbounce that can give more conversions:-
Step 1: Signup with Unbounce
First of all, open the Unbounce homepage and click the button ‘Start My Free Trial’. See the image below showing the homepage of Unbounce and the button that you have to click.
Get 14-days Free Unbounce Trial Here
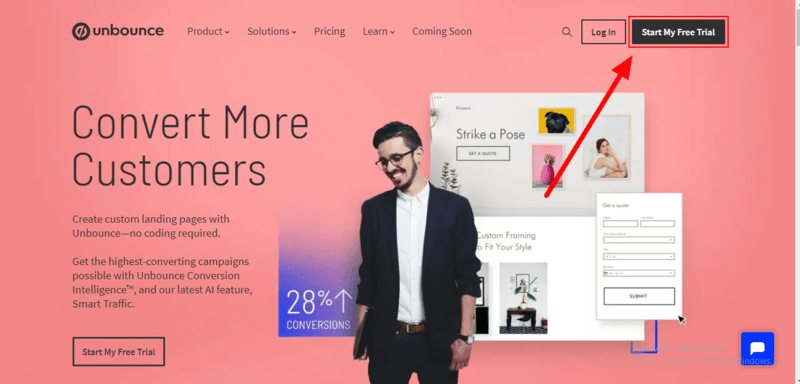
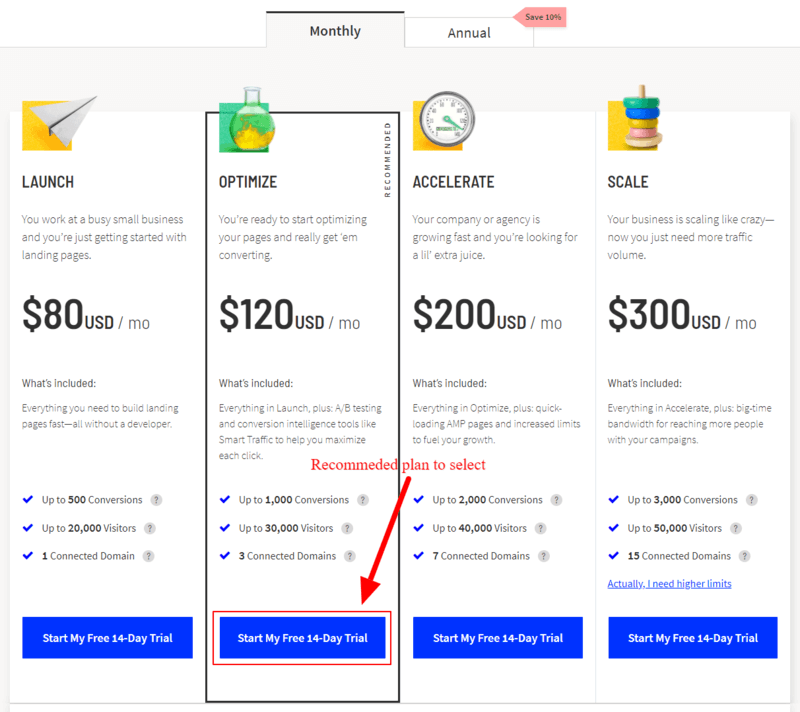
It will take you to the Unbounce pricing page where you will get different pricing options. You need to select a plan to create an Unbounce account and start creating a landing page.
There are four pricing options and you have to choose one. You can choose the lowest plan ‘Launch’ to start creating your landing pages for 1 connected domain.
However, I recommend you choose the ‘OPTIMIZE’ plan that comes with all the essential features with 3 connected domains. If you want to grow your business to more than one domain. The ‘OPTIMIZE’ plan can help you connect with more domains.
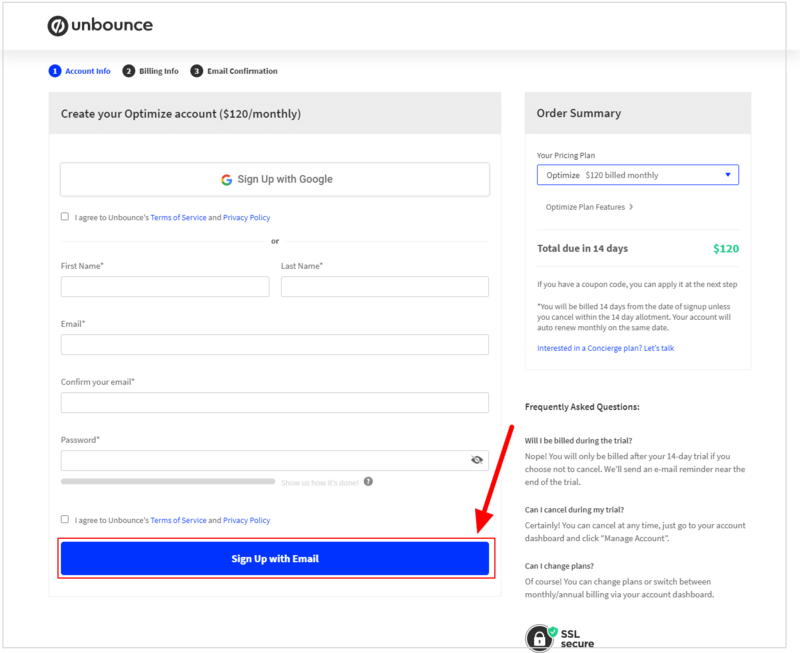
After you choose a page, you will be taken to the checkout page where you have to enter your account info, billing info, and confirm your email that you are the real person.
In the account info, enter your name, email, and password. The below image showing the account info fields that you have to fill for your Unbounce account. After that, click the ‘Sign Up with Email’ to proceed further.
It will take you to the billing info page where you have to fill in your billing info name, company (optional field), phone number, and full address.
After that, choose your payment option and enter payment details. When you have done will all the details, click the ‘Start My Free 14 Day Trial’ to complete the purchase.
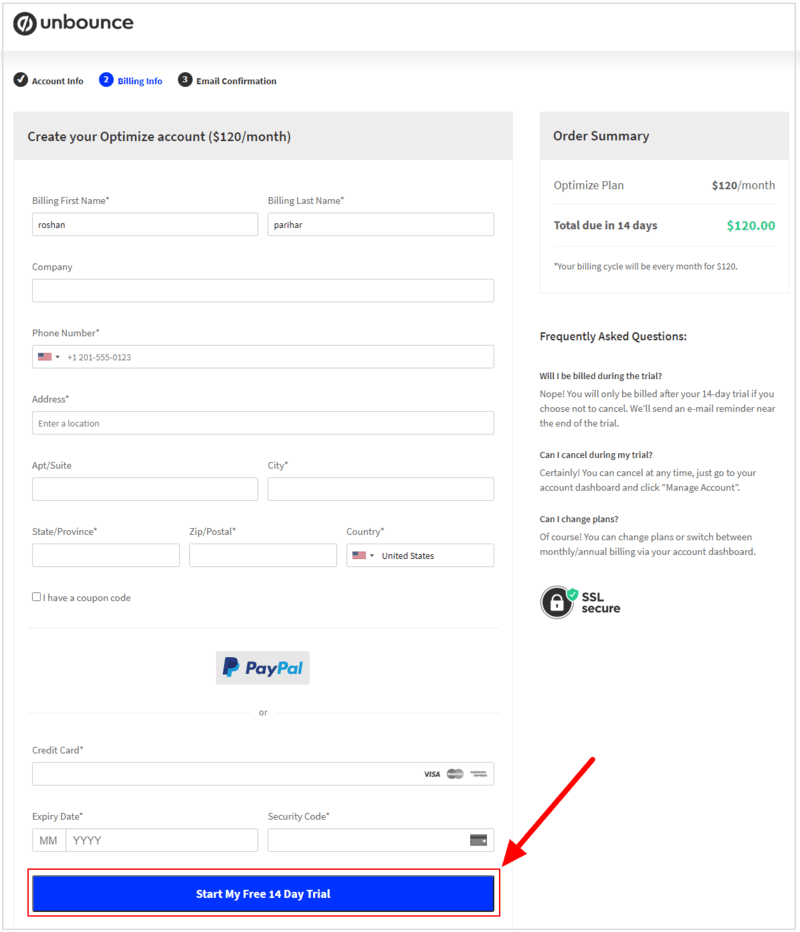
Also, confirm your email account that is required to complete creating an account with Unbounce. To confirm your email account, open your email id account and check the email from Unbounce. You will get a link on the email that you have to click to verify that you are the real person.
Now, you have completed creating your Unbounce account, you can now start creating your landing page for your business. So, let’s start doing this.
Step 2: Open Unbounce Dashboard and Select ‘Create New’
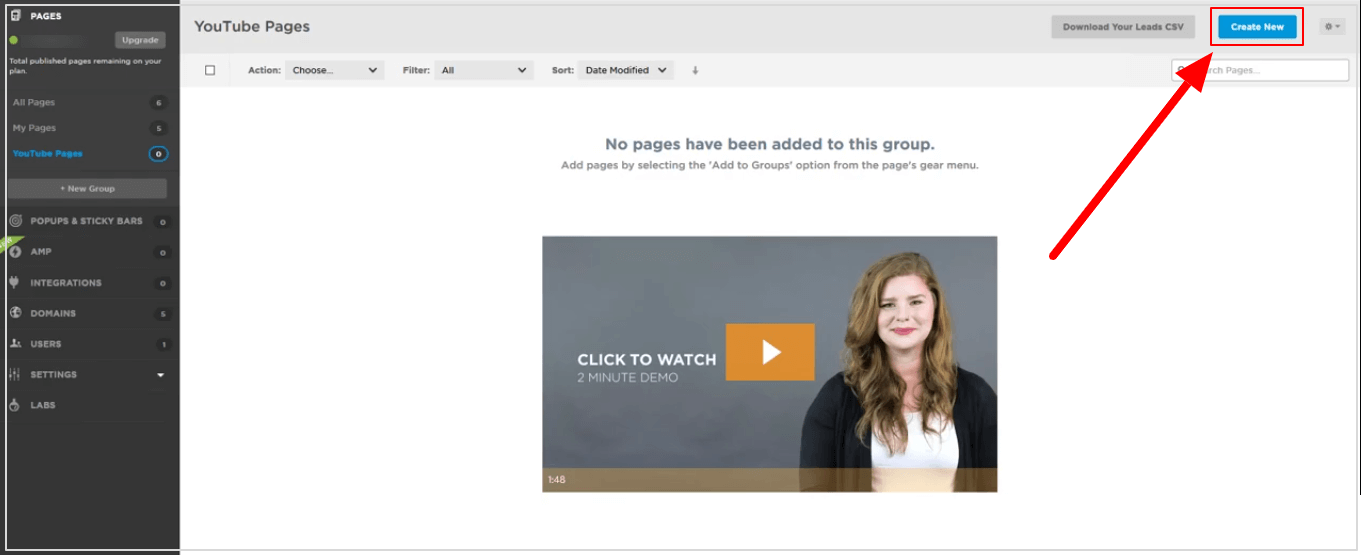
After you have completed creating your Unbounce account, you will be taken to the Unbounce dashboard. Here, you have to click the ‘Create New’ button to create a landing page in Unbounce to grow your business.
Step 3: Choose a Template to Quick Start
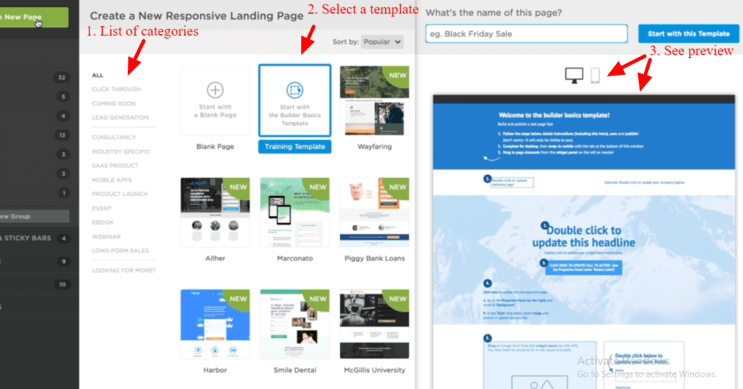
You will be taken to a page where you have to select a template for your landing page.
On the template select page, there are 100+ beautiful designed templates available in every type of category. You need to select a category to get templates on that. After selecting a template, you can see its preview to the right-hand side as showing in the image below.
You can also click the mobile () icon to get the mobile responsive preview of the template. The below image shows the mobile responsive view of a template. It contains a signup form that is beautifully showing in the selected template.
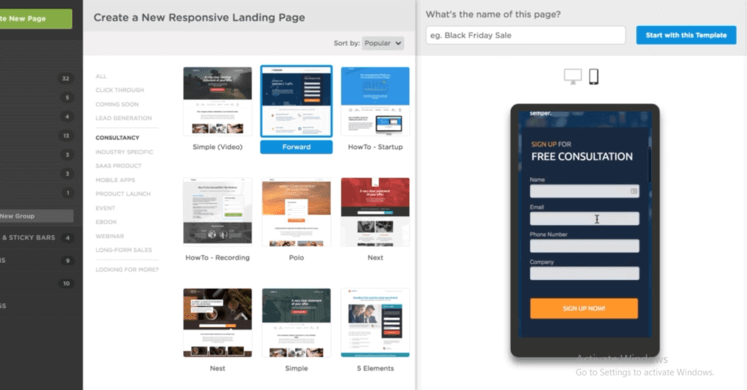
Select a template for your landing page. After you have selected a template for the landing page, you have to enter a name for your landing page. Enter a name to the place indicated in the image below. After that, click the ‘Start with this Template’ to proceed with the template.
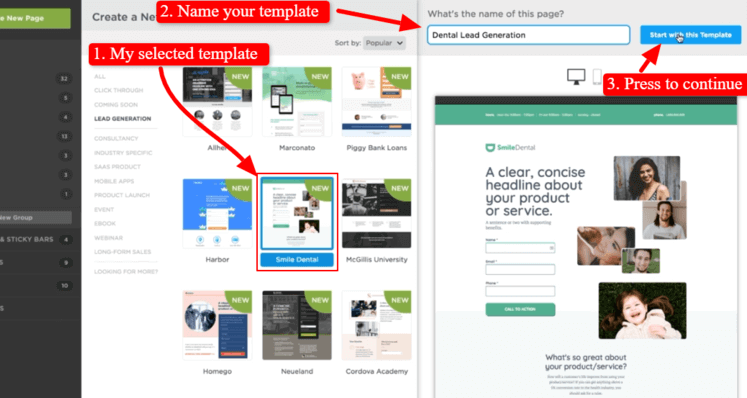
Let’s edit the template as per your requirements and match it with your website.
Step 4: Edit Template Using Drag-n-drop Editor
After you have selected a template of your choice, you will be taken to a page where you can edit the template. This is the Unbounce drag-n-drop editor that you can use to easily modify any template as per your requirements.
Let’s understand each part of the editor to use for editing.
- The left-hand side part of the editor is the widget panel that contains various blocks. You can drag these blocks and drop them into your template to create a new section, add text, buttons, and more.
- The top part of the template is the toolbar that you can use to do certain tasks like copy, paste, duplicate, delete, and many more.
- The right-hand side part of the editor showing the properties, page properties, and goals. You can change the selected item of the template and edit it in the properties part. The page properties are useful to make settings for your landing page that you will learn in this post below. The goals are the tasks you can define to get with the landing page.
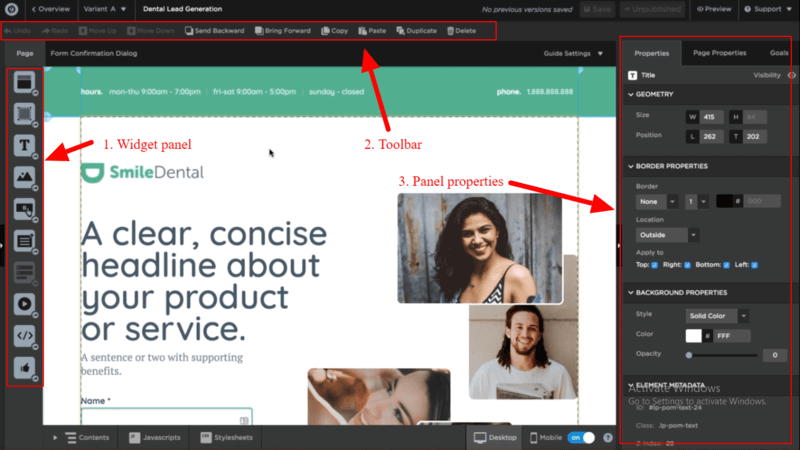
After understanding each part of the Unbounce drag-n-drop editor, let’s start with the form section of the template to edit.
Edit Form section
You have to click the form section part to get its properties to the right-hand side of the screen as showing below. The properties of the form contain the form edit field button, geometry, form confirmations, label attributes, and more.
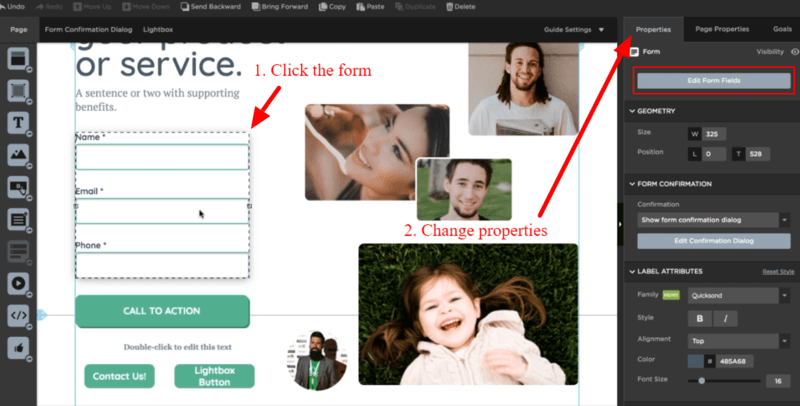
The form confirmation section is useful to decide what to show as a confirmation on form submission. The label attributes are useful to set the labels font family, style, alignment, and others.
When you click the ‘Edit Form Fields’ button as indicated above, you will get the design of the form with form fields as showing below.
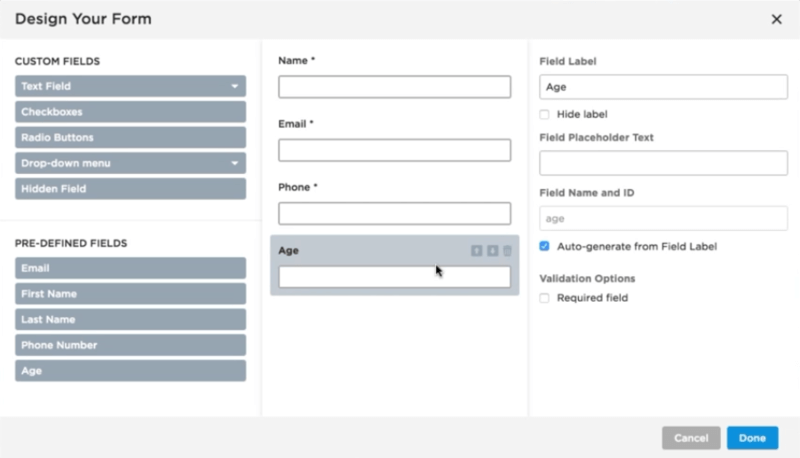
You can click the form fields to get its edit option. After you click the form fields, you will get the options to change the field label, placeholder text, name, id, and a checkbox to decide whether you want to make it required or not.
The design also contains other custom form fields that you can drag-n-drop to your form. You can also move the positions of the fields and remove the fields when you don’t want them in the form.
Add widget or section
The widgets are useful to add more sections to your landing pages like box, text, images, button, lightbox button, form, video embed, custom HTML, and social widget. The below shows the process of drag-n-drop to add these widgets.
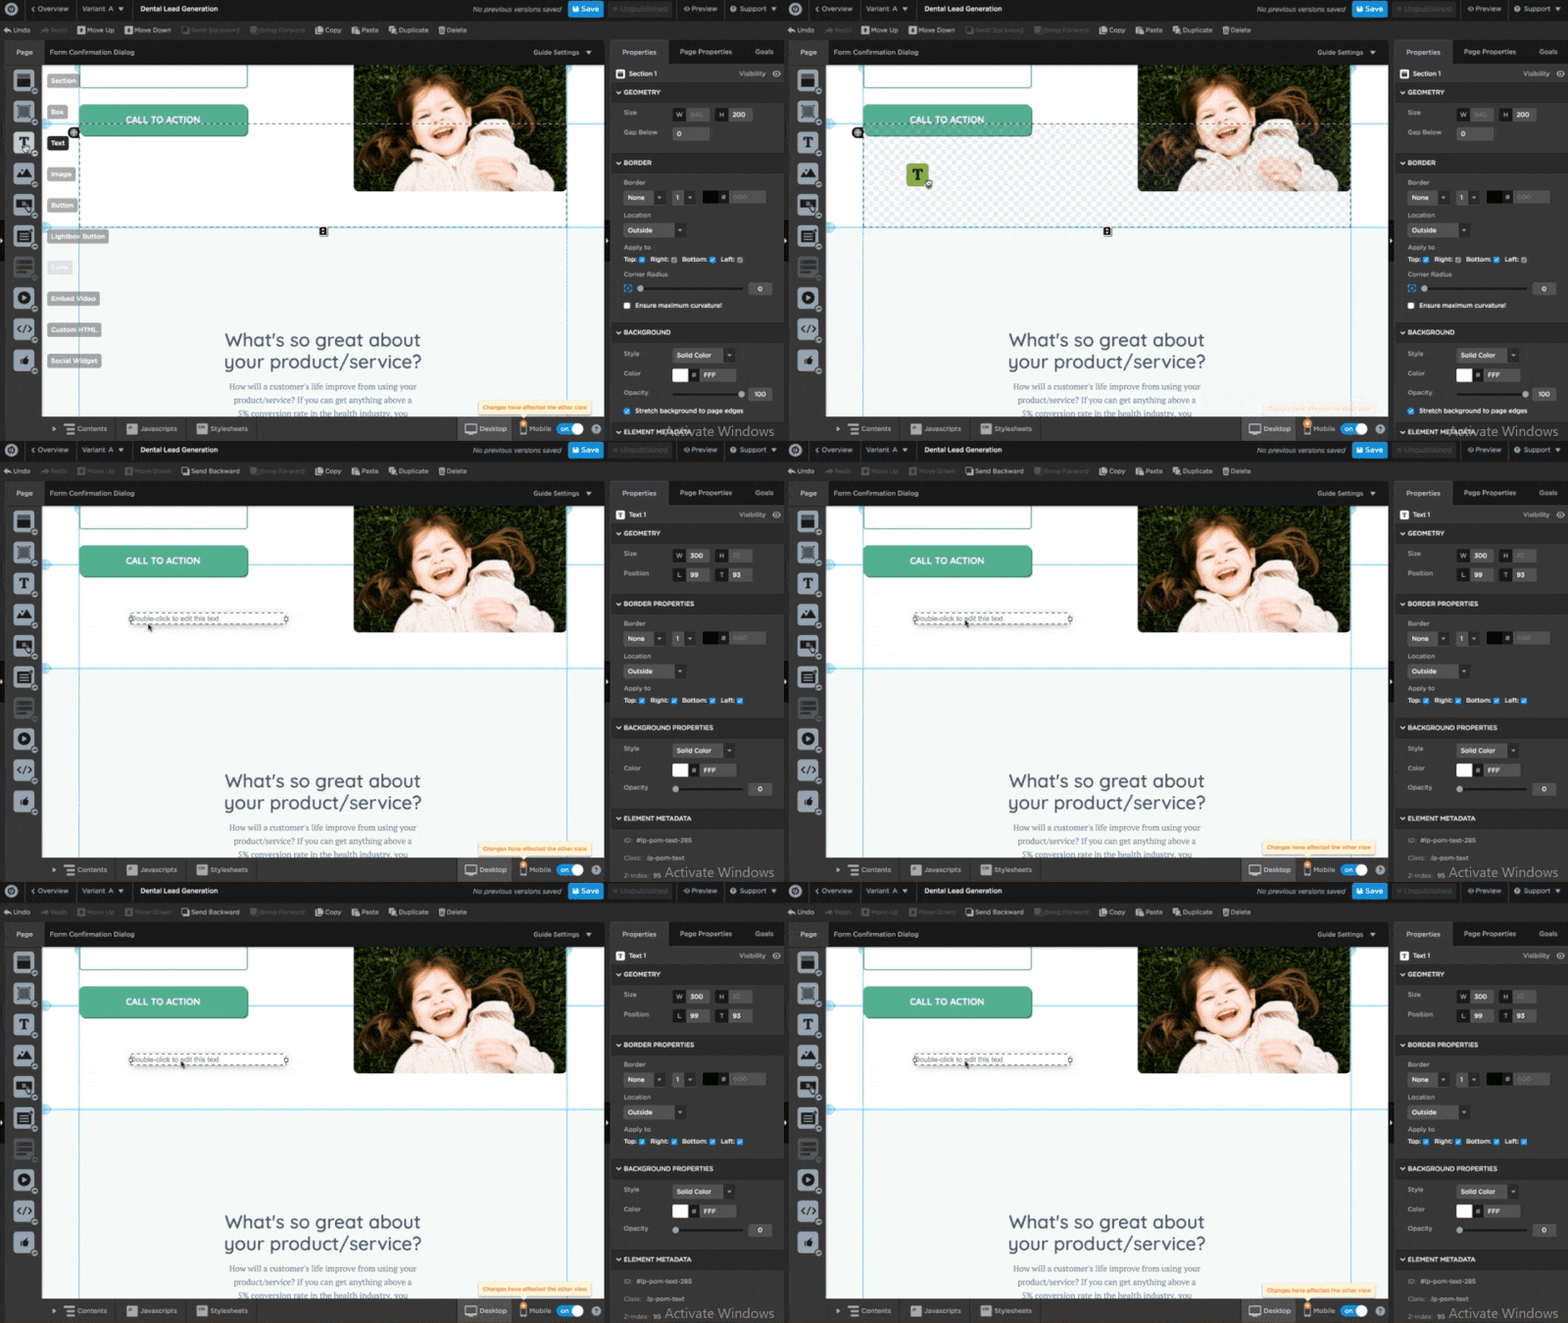
When you want to add more content to your landing pages, you can use this widget. To add them to your landing page, you have to drag-n-drop to the required location of the landing page.
After adding widgets, you can make settings using the properties you will get to the right-hand side of the screen.
Edit Text Font, Size, Color, Style, and Alignment
To edit the text content of the landing page, you have to click the text content to get the various option of editing the text.
After you click the text content, You will get various editing options like font, color, style, and the alignment direction of paragraphs.
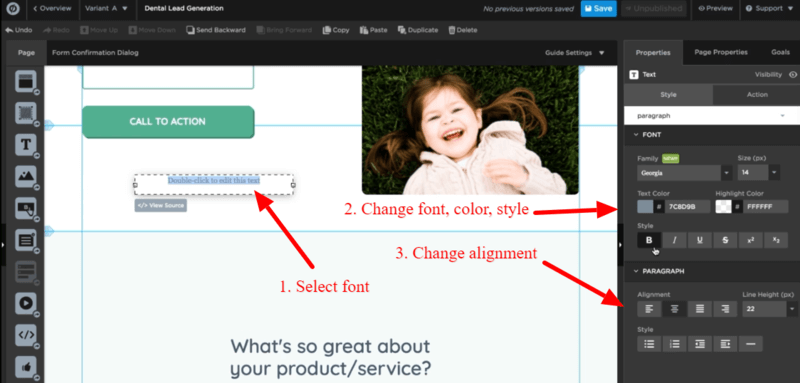
The above images show the clicked text content and the different properties options to the right-hand side of the screen.
Change Image, Size, Position, and Add URL to Image
If you want to change the image, its size, position, and the URL to redirect. You have to click the image that you want to edit.
When you click the image, you will get a different properties option to the right-hand side of the screen.
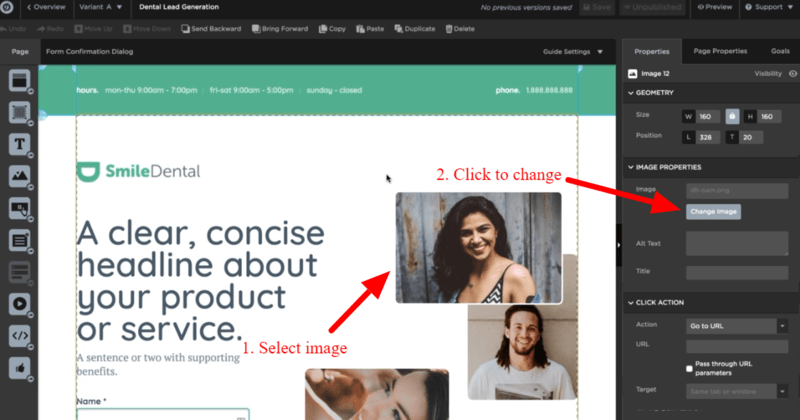
To change the image, you have to click the ‘Change Image’ button as in the image above. You will get a popup where you need to choose an image or upload a new one from your computer system to replace it with the old one.
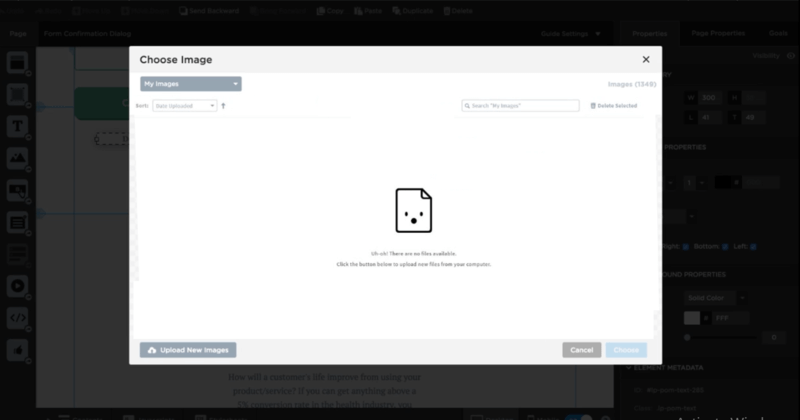
The properties contain the options like geometry, image properties, click action, and more. The geometry option is useful to change the size of the image according to your requirements. The image properties section is useful to change image and alt text to display when the image is not available.
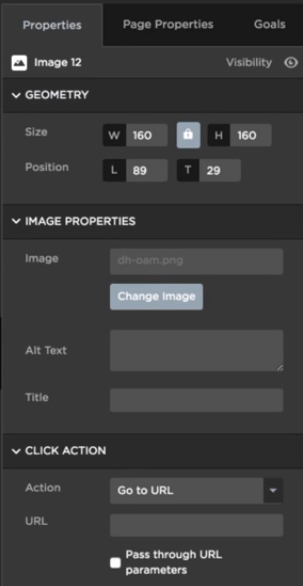
The click action part is useful to set an action when the users click the image. You can add a URL to redirect users to other locations when the users click the image.
Step 5: Preview your Template and Make it Ready to Go Live
Once you have done creating a design for your landing page, you can see the preview of it on your mobile phone. This is required to see your landing page is also ready for users when they open on a mobile phone.
However, you don’t need to worry about the responsiveness of your landing pages. Unbounce assures you that every template and every design of your landing page will be mobile responsive. They are created to easily resize themselves according to any size device. So, you need not worry about responsiveness.
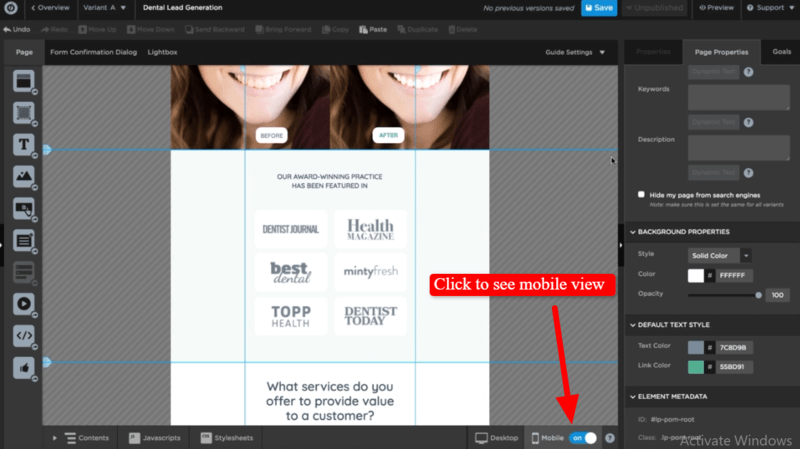
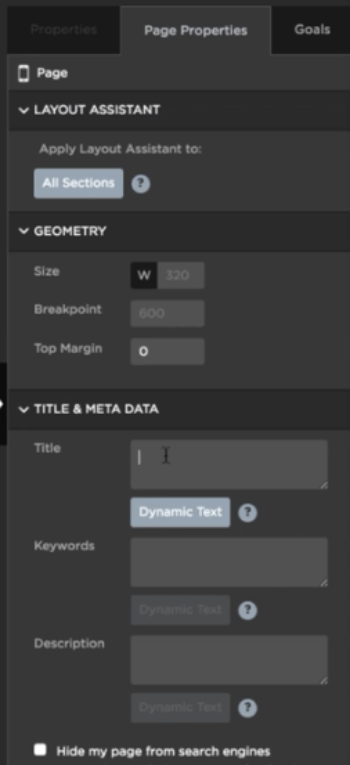
After you are satisfied with the mobile view, you can set page properties like layouts, geometry for sizes, title, and metadata for SEO. In the geometry part, you can set the size of the landing page with its breakpoints and top margin.
In the title & metadata part, you can add a title to your landing page with SEO keywords and descriptions. These are useful to get good search results from search engines.
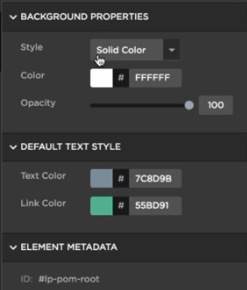
You can also set properties like background, default text style, and element metadata. In the background section, you can set the color with style and opacity. The default style text part is useful when you have to change the text and link color for your landing page.
In addition to this, you can also set a goal for your landing page to set and see the conversions. You can set conversions goals and an external conversion tracking system to your landing page.
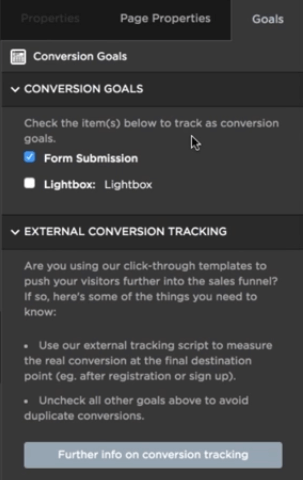
After you are satisfied with the preview of your landing page and other useful settings, you can click the ‘Save’ button to save your hard work. The below image indicated the location of the save button that you have to click to save the landing page.

Step 7: Make Page Settings
The page settings are useful to set the URL of the landing page, A/B testing, conversion rate charts, and integration with marketing platforms like Mailchimp, Constant Contact, and others.
To go to the landing page settings, click the page name as indicated in the image below.
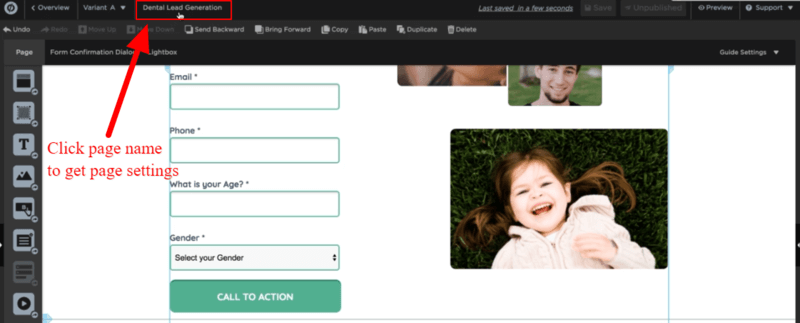
On the settings page, you can click the ‘Change URL’ button to change the current URL of the landing page before publishing.
When you are selling some products using the landing page, it’s better to add the product name to the URL of the landing page. By adding the product’s name, it makes it easier for users to easily get that the page is made for the individual product.
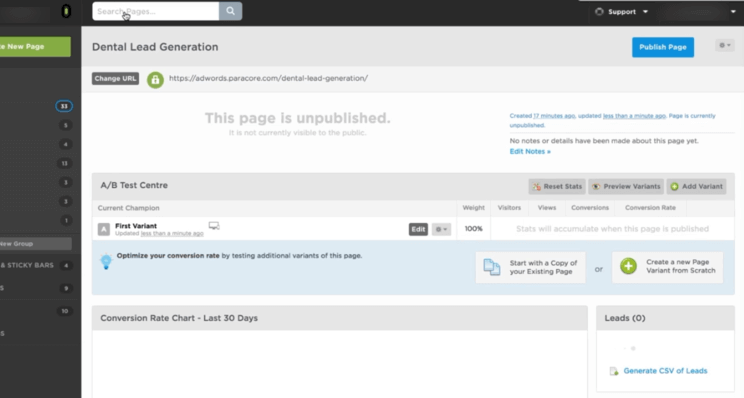
In the A/B testing section, you can set different variants for the landing page. To know which works and which is not working for you, A/B testing helps you see the results of different landings pages to decide the better option for your business.
You can also create a new landing page with the A/B testing to get better results and increase performance.

In the conversion rates section, you can check the conversions you are getting with your created landing page. You can also see the new leads you have generated with the landing page. If you want to download the leads, you can do so in CSV format.
If you want to get the leads when you generate from the landings, you can also set up the option to get emails of new leads.

In addition to the above settings of the landing page, you can also integrate your landing page with various applications like Mailchimp, Constant Contact, SalesForce, and others.
To integrate with the application, you have to click the application name to get the option to connect with it. After making the connection, you can easily collect leads from your landing page to your connected applications.

Step 8: Publish Your Landing Page
Once you have done with all the above setups, you are ready to publish your landing page to make it live. To publish your landing page, you have to click the ‘Publish Page’ button as indicated in the image below.

Congratulations! you have successfully created a landing page in Unbounce to get more conversions for your business.
FAQS on How to Create Landing Page in Unbounce That Converts
Q1. Can I Make My Own Landing Page?
Answer: Yes, you can make your own landing pages without the need for any website to create. You can use Unbounce to easily create professional landing pages without the need for any coding knowledge. Unbounce comes with an easy-to-use drag-n-drop editor to easily create any type of design you want.
Q2. What is Landing Page and How Does it Work?
Answer: A landing page is a web page to land your visitors and convert them into leads. It is useful to get more conversions and sales for your business. It works in two ways in which the first way is to generate leads and the second way is to generate sales.
Q3. Where Can I Create a Landing Page?
Answer: You can easily create a landing page with our #1 recommended tool called Unbounce. It comes with many useful tools that you can use to create any type of design of your choice. Unbounce also comes with 100+ pre-made templates for almost every type of category. You need to just select a template of your choice to quickly create a landing page for your business.
Q4. Can I Create Landing Page and Publish it on My WordPress Website with Unbounce?
Answer: Yes, Unbounce comes with WordPress plugins that you can install on your WordPress website. After that, you can easily create a landing page on your WordPress website and publish it for your customers.
Conclusion on How to Create Landing Page in Unbounce
Landing pages are the best choice for any business to easily generate leads and sales. You can Unbounce to start creating a landing page. It comes with every tool that is useful to easily create a landing page in minutes.
Unbounce comes with A/B testing, Drag-n-Drop Editor, 100+ Readymade Templates, Real-time Editing, Popups & Sticky Bars, and more to create any type of landing page and increase your performs.
You May Also Like to Read
- 9 Best Mailchimp Alternatives
- How to Automate Newsletters With RSS Feed Campaigns
- Boost eCommerce Sales with Sendinblue Email Plugin for Shopify
- Sendinblue Review: Is It Worth to Buy and Affordable?
- Omnisend Review: Is It Worth to Buy for Ecommerce
- 7 Best Aweber Alternatives (Top Competitors + Free)
- Sendinblue VS Mailchimp: Which One is Better?
- 11 Best Email List Cleaning Services (Free & Paid)
