jQuery Ajax contact form allows users to submit and get the result without page refresh. You can also use PHP to collect data via emails to your email address.
Page refresh on form submission takes time to give results. The Ajax contact form is an efficient and useful method to give results to users without page refresh.

Collecting users’ queries without page refresh can give you better results. Ajax request sends form data to the PHP page and executes the PHP code to send emails instantly. Users will get response results in the blink of an eye with no reloading of the page.
If you want to give instant responses to your customers when they fill out and submit the form, you can start using the jQuery Ajax contact form on your website.
So, let’s get started.
How to Create jQuery Ajax Contact Form with PHP (Step-by-step)
Here is the step-by-step process on how to create a jQuery Ajax contact form with PHP:-
Step 1: Create jQuery Ajax Contact Form Design
To make your jQuery Ajax code work for your contact form, you have to add the latest jQuery library whose CDN URL is given below. It also contains the CDN URL of the font awesome icon to show the rotated icon until users get the result.
You have to add the below URL to the <head> section of your web page.
|
1 2 |
<link rel="stylesheet" href="https://cdnjs.cloudflare.com/ajax/libs/font-awesome/4.7.0/css/font-awesome.min.css"> <script src="https://cdnjs.cloudflare.com/ajax/libs/jquery/3.6.3/jquery.js"></script> |
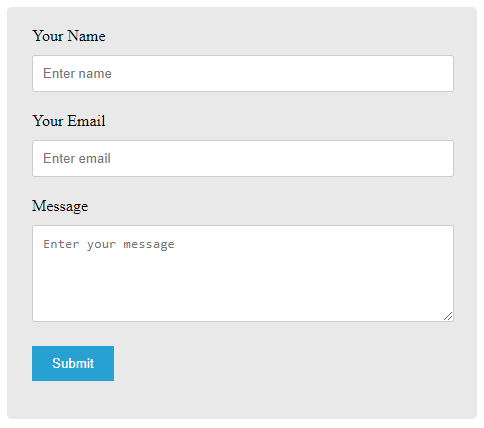
Now, let’s create the contact form structure with the essential form fields to collect users’ queries and make communication with them. The form fields Name, Email, and Message are enough for the contact form.
We are going to create the contact form design as shown in the image below.

We have added the required attribute to each field to make them compulsory for the user to fill. Without filling in all the fields, users are not allowed to submit the form.
The main structure of the contact form is given below.
|
1 2 3 4 5 6 7 8 9 10 11 12 13 14 15 16 17 18 |
<div class="main-contact-form"> <form action="#" method="POST" id="ajaxform"> <label for="Name">Your Name</label> <input type="text" name="name" class="name" placeholder="Enter name" required> <label for="Email">Your Email</label> <input type="email" name="email" class="email" placeholder="Enter email" required> <label for="message">Message</label> <textarea name="message" class="message" placeholder="Enter your message" rows="5" required></textarea> <input name="submit" type="submit" value="Submit"> </form><br> <div id="form_message"></div> <div class="loader_icon" style="display:none;"><i class="fa fa-spinner fa-spin"></i></div> </div> |
The above contact form code also contains the loader icon to display after form submission until users get results. However, it is a hidden state using the display:none; property of CSS.
Add CSS for Look & Feel
To make the above contact form beautiful, you have to add some CSS code as given below.
|
1 2 3 4 5 6 7 8 9 10 11 12 13 14 15 16 17 18 19 20 21 22 23 24 25 26 27 28 29 30 31 32 33 34 35 36 37 38 39 40 41 42 43 44 |
<style> input[type='text'],input[type='email'], textarea{ width: 100%; padding: 10px; border-radius: 3px; border: 1px solid #ccc; margin-top: 10px; margin-bottom: 20px; } input[type='text']:focus,input[type='email']:focus, textarea:focus{ border: 1px solid #5db6db; box-shadow: 0 0 10px #b9eaff; outline: none !important; } input[type='submit']{ background: rgb(39,160,210); color: #fff; border: none; padding: 10px 20px; cursor: pointer; } .main-contact-form{ max-width: 400px; margin: 0 auto; background: #e9e9e9; padding: 20px 45px 20px 25px; border-radius: 5px; } .loader_icon{ background: #0404046b; display: flex; justify-content: center; align-items: center; position: fixed; left: 0; top: 0; width: 100%; height: 100%; } .loader_icon i{ font-size: 24px; color: #fff; } </style> |
The above CSS code also contains code for the loader icon to display with the background and the middle position. The loader icon also does not allow users to do any other tasks until they get the result.
Step 2: Add jQuery Ajax Script to Submit Form Without Page Refresh
The jQuery code submits the form and gives results in data without page refresh. It sends the form data to the PHP file with the name ‘send-email.php’. You will get the PHP code of this file in the next step.
However, it requires a few seconds to execute the PHP code to send emails containing contact form data. After emails are sent to the recipient, you will get a success message that the form data via to the recipient.
|
1 2 3 4 5 6 7 8 9 10 11 12 13 14 15 16 17 18 |
<script> //script to submit for using ajax without page refresh $("#ajaxform").submit(function(e) { e.preventDefault(); // avoid executing the actual submission of the form var form = $(this); $(".loader_icon").show(); $.ajax({ url: "send-email.php", global: false, type: "POST", data: form.serialize(), // serializes the form's elements. success: function(data) { $('div#form_message').html(data); $(".loader_icon").hide(); } }); }); </script> |
During the execution time of the PHP code, you can display the loader icon to intimated users that the form is working in the backend.
![]()
It also does not allow users to click the form again until received the success message. I am using the show() and hide() to show/hide the loader icon during form submission.
Step 3: PHP Code to Email Contact Form Data with Validation
Finally, you need to add the PHP code in a separate file with the name ‘send-email.php’. The below code first collects the form data using a global variable $_POST. After that, it validates the email address to find out if it is valid or not.
It does not require to validate whether the fields are filled with data or left blank as we have already added the required attribute. The attribute is the built-in HTML attribute that makes sure that form fields should not leave blank. It will not allow users to submit without filling in each field.
The below code is commented enough to help you easily understand each link of code with comments. So, see the code to learn the use of them.
|
1 2 3 4 5 6 7 8 9 10 11 12 13 14 15 16 17 18 19 20 21 22 23 24 25 26 27 28 29 30 31 32 33 34 35 36 37 38 39 |
<?php //Get form data $name = $_POST['name']; $email = $_POST['email']; $message = $_POST['message']; //validation for the email address $email_exp = '/^[A-Za-z0-9._%-]+@[A-Za-z0-9.-]+\.[A-Za-z]{2,4}$/'; if (!preg_match($email_exp, $email)) { echo "<p style='color:red;'>The Email address you entered is not valid.</p>"; exit; } //If everything is ok then send an email $subject = "Contact Form"; //Subject of the email //Message content to send in an email $message = "Name: ".$name."<br>Email: ".$email."<br> Message: ".$message; // Set content type as HTML $headers = "MIME-Version: 1.0" . "\r\n"; $headers .= "Content-type:text/html;charset=UTF-8" . "\r\n"; //Email headers $headers .= "From:".$email."\r\n"; //$headers .= "CC: [email protected]"; $headers .= "Reply-To:".$email."\r\n"; //Send email $sendmail = mail($to, $subject, $message, $headers); if($sendmail == true){ echo "<p style='color:green;'>Message has been sent successfully.</p>"; }else { echo "<p style='color:red;'>Message could not be sent.</p>"; } ?> |
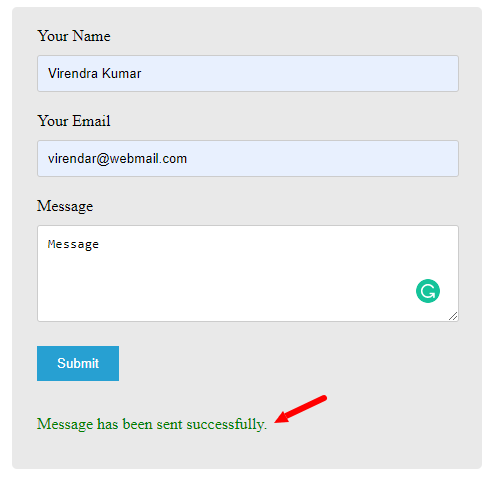
After submitting the contact form, you will get the success message as shown in the image below.

The above PHP code uses the mail() to send emails from the contact form. If you want to send emails via PHPMailer Gmail SMTP, you can read our post on contact form using PHPMailer Gmail SMTP to send emails
If you have any queries regarding this tutorial, please comment below. I will reply with solutions.
You May Also Like to Read

This is strange but it gives an error – Message could not be sent.
Please make error reporting on with the below codes:
After that, check the errors and try to resolve them. Also, check your server error logs related to sending emails.