Learn how to create a PHP login form with session and MySQL database. When users logged in, it will create a session that stores the unique ids of the user to identify them.
After storing the unique ids of users in the session variable, you can easily access their information from the MySQL database. The unique ids can be the email address or mobile numbers of users.

Access to the information is only allowed when there is a session created and session variables are available. After destroying the session and session variables, users are logged out of the server.
In this tutorial, you will learn the step-by-step process of creating a login form with Session and MySQL. So, let’s get started.
How to Create PHP Login Form with Session and MySQL (Step-by-step)
Here is the step-by-step process for creating a PHP login form with Session and MySQL:-
Step 1: Create a Login Form Structure and Design
A login form should contain important form fields that are username and password. The username input field should be of the type of email and the password input field should be of the type of password.
If you want to create a responsive login form structure and design, you can read our tutorial post:-
Read Guide: How to Create Responsive Login Form Structure and Design Using Bootstrap
To help you with it, you can use the full responsive login form structure and design code given below with the PHP session.
|
1 2 3 4 5 6 7 8 9 10 11 12 13 14 15 16 17 18 19 20 21 22 23 24 25 26 27 28 29 30 31 32 33 34 35 36 37 38 39 40 41 |
<?php ob_start(); ?> <?php include_once 'dbcon.php';?> <?php session_start(); // Starting Session if(isset($_SESSION['user_login'])){ header("location: dashboard.php"); } ?> <!doctype html> <html lang="en"> <head> <title>Responsive Bootstrap Login Form</title> <meta charset="utf-8"> <meta name="viewport" content="width=device-width, initial-scale=1"> <link href="https://cdn.jsdelivr.net/npm/[email protected]/dist/css/bootstrap.min.css" rel="stylesheet"> </head> <body> <div class="container"> <div class="row"> <div class="col-md-6 offset-md-3 mt-3 bg-light p-3 border border-secondary"> <!-- Bootstrap main form start --> <form method="POST"> <div class="mb-3"> <label for="Username" class="form-label">Your Username</label> <input type="email" class="form-control" name="username" placeholder="Enter username" required> </div> <div class="mb-3"> <label for="Password" class="form-label">Your Password</label> <input type="password" class="form-control" name="password" placeholder="Enter password" required> </div> <div class="mb-3"> <input type="submit" class="btn btn-primary" name="submit" value="Submit"> </div> </form> <!-- Bootstrap main form end --> </div> <?php include_once('login.php'); ?> </div> </div> </body> </html> |
After you complete creating a login form structure and design, you can move to the 2nd step given below to create a login/logout system with it using PHP and MySQL.
So, let’s move further and start creating a database to store users’ data using PHPMyAdmin in MySQL.
Step 2 Create a Database to Store Users Login Data in MySQL Database
Now, create a login user, you have to first insert users into your MySQL database using PHP. For this, you must have a user database where you can store your login users who can log in using the login form.
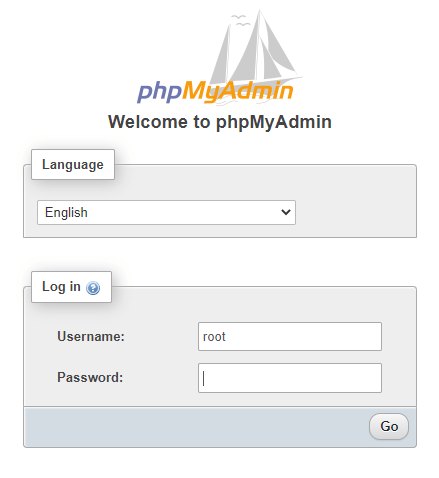
To create a user database, log in to your PHPMyAdmin with your username and password.

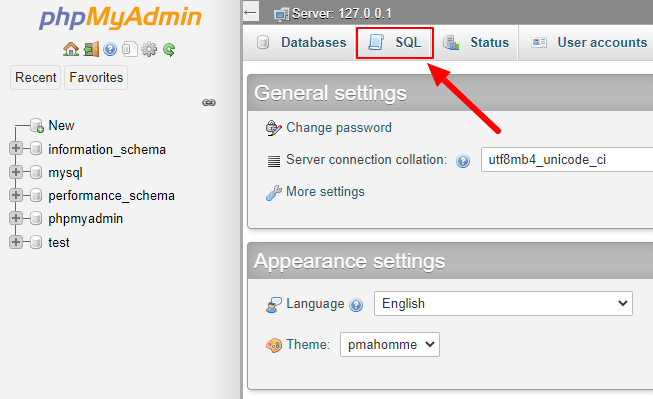
After logging in to PHPMyAdmin, click the ‘SQL’ tab as shown in the image below.

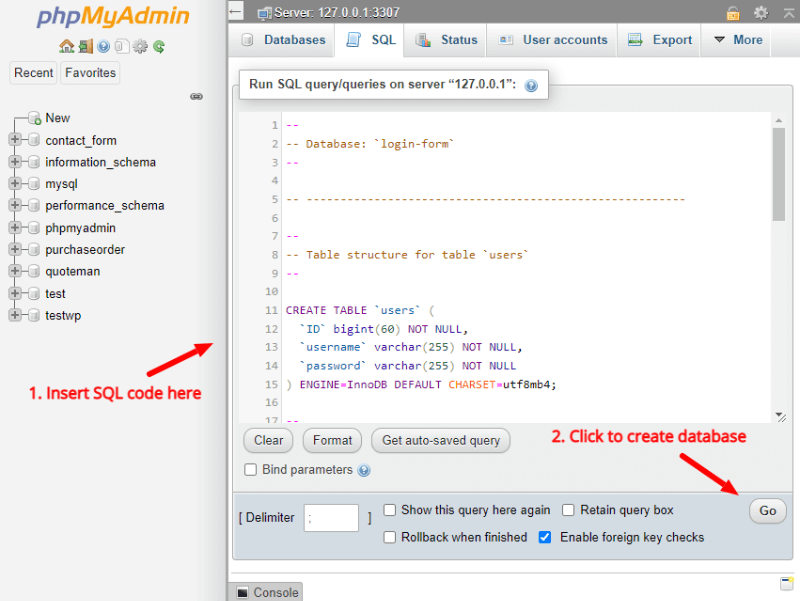
Now, enter the SQL queries given below to create a database for users to store login username and password records. It is the create query of MySQL that you can learn more about in our SQL tutorial post on SQL CREATE DATABASE

Copy and paste the below code under the ‘SQL’ tab textarea and click the ‘Go’ button as shown in the image above. It will execute the SQL queries to create a database.
|
1 2 3 4 5 6 7 8 9 10 11 12 13 14 15 16 17 18 19 20 21 22 23 24 25 26 27 28 29 30 31 32 33 34 35 36 37 38 39 40 41 42 43 |
-- -- Database: `login-form` -- -- -------------------------------------------------------- -- -- Table structure for table `users` -- CREATE TABLE `users` ( `ID` bigint(60) NOT NULL, `username` varchar(255) NOT NULL, `password` varchar(255) NOT NULL ) ENGINE=InnoDB DEFAULT CHARSET=utf8mb4; -- -- Dumping data for table `users` -- INSERT INTO `users` (`ID`, `username`, `password`) VALUES -- -- Indexes for dumped tables -- -- -- Indexes for table `users` -- ALTER TABLE `users` ADD PRIMARY KEY (`ID`); -- -- AUTO_INCREMENT for dumped tables -- -- -- AUTO_INCREMENT for table `users` -- ALTER TABLE `users` MODIFY `ID` bigint(60) NOT NULL AUTO_INCREMENT, AUTO_INCREMENT=2; COMMIT; |
The above SQL query also creates a record of the user with username ‘[email protected]’ and password ‘12345’ in MD5 encrypted format. You can change or add more user records in the database to allow them to log in using the login form.
Step 3 Make MySQL Database Connection Using MySQL and PHP
To insert users’ records and check them when the user login using the login form, you have to make a connection with the database. You can use the PHP code given below to make a connection with your created database in the 1st step.
|
1 2 3 4 5 6 7 8 9 10 11 12 13 14 15 16 17 |
<?php //Make database connection $servername = "localhost"; $username = "root"; $password = ""; $dbname = "login-form"; // Create a connection $conn = mysqli_connect($servername, $username, $password, $dbname); // Check the connection if (!$conn) { die("Connection failed: " . mysqli_connect_error()); }else{ //echo "connected successfully"; } ?> |
Let’s explain each part of the above code below:-
$servername: It is the name of the server$username: The username of the database. Here, ‘root’ is for the localhost of the locally installed server of your computer system. If you run the code on your hosting server, you can change it with your database user.$password: Enter the password of the user of the database with all privileges. If you are running code on your PHP server on your local computer system, you can use a blank password. But, if you run the code on your hosting server, you can change it with your database user password.$dbname: It is the name of your user’s database.
Now, you have to use mysqli_connect() with all these parameters included as given in the code above. After that, you can check if the connection is made successfully.
Next, create a login check and create a session for successful login using PHP.
Step 4 Check Users Login and Create a Session When Logged In Using PHP
Now, you can get the data of the login form that the user enters and submit. First, start a session using session_start(). After that, check whether there is already a present username session variable. If it is present, then redirect users to the dashboard. You will learn to create a dashboard in the next step.
If the session variable is not set, that means there are no users logged in using the login form. So, collect all the login form data using $_POST global variable. We can collect the password in md5 conversion as the data of the password is stored in the database in md5 encrypted format.
After that, select the user database and match the login form user-entered data. Check whether the data matches or not using the mysqli_num_rows() function that checks if the matching row is present or not.
If there is a matching record present in the database, it stores the data in the session variable using $_SESSION global variable. After the session variable is created, it redirects the user to the dashboard.
However, if the record is not present in the database, it displays an alert message that the user is not matching or not found.
|
1 2 3 4 5 6 7 8 9 10 11 12 13 14 15 16 17 18 19 20 21 22 23 24 25 26 27 28 29 30 31 32 33 34 35 |
<?php include_once 'dbcon.php'; ?> <?php session_start(); // Starting Session if(isset($_SESSION['username'])){ header("location: dashboard.php"); } ?> <?php if (isset($_POST['submit'])){ $username = $_POST['username']; $password = md5($_POST['password']); $sql = "SELECT * FROM users WHERE username = '$username' AND password = '$password'"; $result = mysqli_query($conn, $sql); $row = mysqli_fetch_assoc($result); //echo $row['user_role']; if(mysqli_num_rows($result) > 0){ $_SESSION['username'] = $username; if(isset($_SESSION['username'])){ header("location: dashboard.php"); } } else { ?> <br> <div class="alert alert-danger alert-dismissible fade show"> <strong>Record not found</strong> <button type="button" class="close" data-dismiss="alert">×</button> </div> <?php } mysqli_close($conn); } ?> |
Next, create a dashboard where you have to redirect users when they logged in successfully and the session of the user created.
Step 5 Create Dashboard to Redirect Users After Logged in Using PHP
The dashboard should first check whether the session variable is present or not. If the session is present, it allows users to be logged in user. If the user is not logged in successfully and the session is not created, the user will again redirect to the login page.
Every application redirects users to the dashboard when they complete logging in to the website. So, it is important to create a dashboard with a login and logout system in PHP.
To create a dashboard for users, you have to use the code given below.
|
1 2 3 4 5 6 7 8 9 10 11 12 13 14 15 16 17 18 19 20 21 22 23 24 |
<?php session_start(); // Starting Session if(!isset($_SESSION['username'])){ header("location: index.php"); } ?> <!doctype html> <html lang="en"> <head> <title>Dashboard</title> <meta charset="utf-8"> <meta name="viewport" content="width=device-width, initial-scale=1"> <link href="https://cdn.jsdelivr.net/npm/[email protected]/dist/css/bootstrap.min.css" rel="stylesheet"> </head> <body> <div class="container"> <div class="row"> <div class="col-md-12"> <?php echo "Welcome ".$_SESSION['username']; ?> <a href="logout.php" onclick="javascript:return confirm('Are you sure you want to logout?');">Logout</a> </div> </div> </div> </body> </html> |
The above dashboard code displays the name of the user who logged in from the login form. You can add more content of users to display in the dashboard. It can be the profile of the user, statistics, and graphical representation of data.
Step 6 Create Logout System to Destroy Session Using PHP
The previous step dashboard code contains the logout link. When the users want to log out of their present session, you have to unset the session and destroy all the session variables.
It also requires redirecting users to another page when they log out. The other page can be the login page or the homepage of the website.
To unset the session, you can use the session_destroy() function of PHP. To destroy all the session variables, you can use the session_destroy(). See the below code to create a logout system with ‘logout.php’ file.
|
1 2 3 4 5 6 7 8 9 10 11 12 13 14 15 |
<?php session_start(); ?> <?php if(isset($_SESSION['username'])){ //Remove all session variables session_unset(); // destroy the session session_destroy(); header("location: index.php"); }else{ header("location: index.php"); } ?> |
The logout system works when there is a session present. We have stored the username of the users in the session variable. That’s why we have to check whether the username session is present or not. If the session is present, the logout system destroys all the sessions.
That’s all about the PHP login form with session and MySQL.
You May Also Like to Read
