Learn how to create a login form with OTP verification in PHP and MySQL. You can make your login form more secure with the OTP verification system.
When you create premium content on your website, you may want to allow only registered users to access them. A secure login form can help you allow only authenticated users to access your content.

Looking to create working forms without coding for your website? Create beautiful-looking forms with JotForm.
Sometimes it can be possible that unauthenticated users can access your private content using a login form. They can enter a random username and password to gain access to your private content.
You can make your login form more secure with the OTP verification system. The verification system sends an OTP to the unique email ids of the registered users. After that, they need to enter their received OTP into the login form to get access to the private content.
This way, you can restrict unauthorized access and make your login form more secure for your audience.
In this tutorial, you will learn the step-by-step process of creating a login form with OTP verification using PHP and MySQL.
How to Create Login Form with OTP Verification in PHP and MySQL (Step-by-step)
Here is the step-by-step process on how to create a login form with OTP verification using PHP and MySQL:-
Step 1: Create Login Form Structure with Design Using Bootstrap
A login form requires two important fields that are username and password. The username input field should be of input type email and the password field should be of input type password.
If you want to create a responsive login form structure and design using Bootstrap, you can read our tutorial post whose link is given below:-
Read Guide: How to Create Responsive Login Form Structure and Design Using Bootstrap
If you don’t want to read the above link guide, you need not worry about it. To help you out more with it, let’s add the full responsive login form structure and design code given below with the PHP session.
|
1 2 3 4 5 6 7 8 9 10 11 12 13 14 15 16 17 18 19 20 21 22 23 24 25 26 27 28 29 30 31 32 33 34 35 36 37 38 39 40 41 42 |
<?php ob_start(); //include the database connection file in the login form include_once('dbcon.php'); session_start(); //Starting session ?> <!DOCTYPE html> <html lang="en"> <head> <title>PHP Login Form with OTP Verification</title> <meta charset="UTF-8"> <meta name="description" content=""> <link href="https://cdn.jsdelivr.net/npm/[email protected]/dist/css/bootstrap.min.css" rel="stylesheet" integrity="sha384-EVSTQN3/azprG1Anm3QDgpJLIm9Nao0Yz1ztcQTwFspd3yD65VohhpuuCOmLASjC" crossorigin="anonymous"> </head> <body> <div class="container"> <div class="row"> <div class="col-md-6 offset-md-3 mt-3 bg-light p-3 border border-secondary"> <!--Start main login form --> <form method="POST"> <div class="mb-3"> <label for="Username" class="form-label">Your Username</label> <input type="email" class="form-control" name="username" placeholder="Enter username" required> </div> <div class="mb-3"> <label for="Password" class="form-label">Your Password</label> <input type="password" class="form-control" name="password" placeholder="Enter password" required> </div> <div class="mb-3"> <input type="submit" class="btn btn-primary" name="submit" value="Submit"> </div> </form> <!--End main login form --> <?php include_once('login.php'); ?> </div> </div> </div> </body> </html> |
After you complete creating a login form structure and design using Bootstrap, you can move to the 2nd step given below to create a login form with an OTP verification system with it using PHP and MySQL.
So, let’s move to the next step to start creating a database to store users’ data and OTP for verification using PHPMyAdmin in MySQL.
Step 2 Create a Database to Store User’s Login Data and OTP in MySQL Database
Now, create a login user, you have to first insert users into your MySQL database using PHP. For this, you must have a user database where you can store your login users who can log in using the login form. It should also contain the field to store the latest OTP that updates regularly for verification each time users try to make a login.
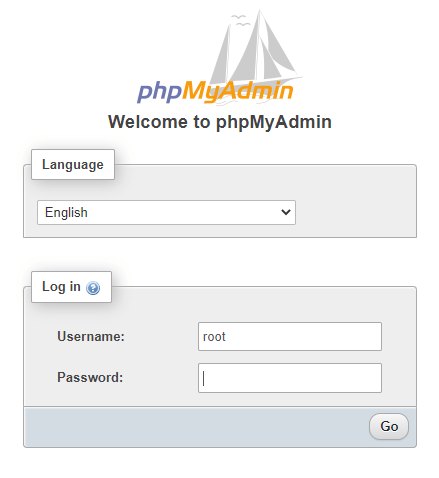
To create a login database with a user table, you have to first log in to your PHPMyAdmin with your username and password.

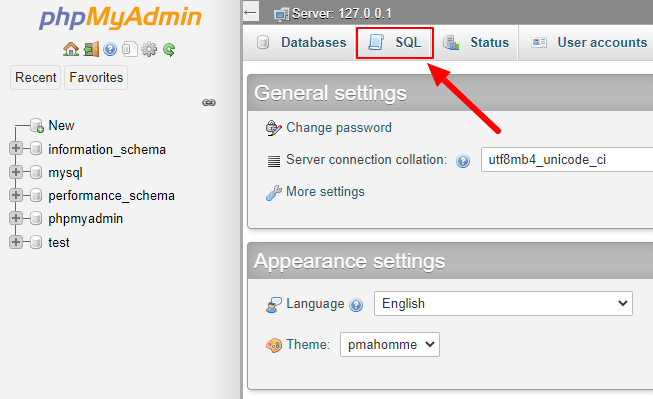
After that, click the ‘SQL’ tab as shown in the image below.

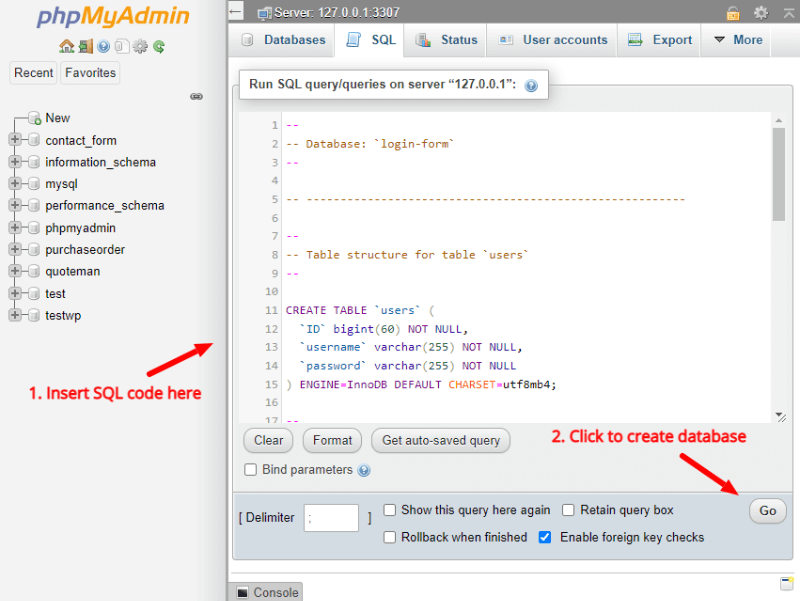
Now, you have to enter the SQL queries given below after the image to create a database to store the user’s login data. It is the create query of MySQL that you can learn more about in our SQL tutorial post on SQL CREATE DATABASE

Just copy and paste the below code under the ‘SQL’ tab within the text area as indicated above. After that, click the ‘Go’ button as shown in the image above to execute the SQL queries and create a login user database.
|
1 2 3 4 5 6 7 8 9 10 11 12 13 14 15 16 17 18 19 20 21 22 23 24 25 26 27 28 29 30 31 32 33 34 35 36 37 38 39 40 41 42 43 44 45 46 47 |
-- -- Database: `login-form-otp` -- CREATE DATABASE IF NOT EXISTS `login-form-otp` DEFAULT CHARACTER SET utf8mb4 COLLATE utf8mb4_general_ci; USE `login-form-otp`; -- -------------------------------------------------------- -- -- Table structure for table `users` -- CREATE TABLE `users` ( `ID` bigint(60) NOT NULL, `username` varchar(255) NOT NULL, `password` varchar(255) NOT NULL, `user_otp_verification` varchar(255) NOT NULL, `user_otp_verification_creation_time` varchar(255) NOT NULL ) ENGINE=InnoDB DEFAULT CHARSET=utf8mb4; -- -- Dumping data for table `users` -- INSERT INTO `users` (`ID`, `username`, `password`, `user_otp_verification`, `user_otp_verification_creation_time`) VALUES -- -- Indexes for dumped tables -- -- -- Indexes for table `users` -- ALTER TABLE `users` ADD PRIMARY KEY (`ID`); -- -- AUTO_INCREMENT for dumped tables -- -- -- AUTO_INCREMENT for table `users` -- ALTER TABLE `users` MODIFY `ID` bigint(60) NOT NULL AUTO_INCREMENT, AUTO_INCREMENT=2; COMMIT; |
The above SQL query also creates a record of the login user with username ‘[email protected]’ and password ‘12345’ in MD5 encrypted format. You can change or add more records in the database to allow them to log in using the login form with OTP verification.
Step 3 Make MySQL Database Connection Using MySQL and PHP
To insert records and check users’ login with OTP verification, you have to first make a connection with the database. You can use the below PHP code to make a connection with the database created in the 1st step.
|
1 2 3 4 5 6 7 8 9 10 11 12 13 14 15 16 17 |
<?php //Make database connection $servername = "localhost"; $username = "root"; //change with your database username $password = ""; //change with your database user password $dbname = "login-form"; // Create a connection $conn = mysqli_connect($servername, $username, $password, $dbname); // Check the connection if (!$conn) { die("Connection failed: " . mysqli_connect_error()); }else{ //echo "connected successfully"; } ?> |
Let’s explain each part of the above code below:-
$servername: It is the name of the server that should be ‘localhost’ by default.$username: The name of the user of the database with all the privileges. Here, ‘root’ is for the localhost of the locally installed server of your computer system. If you want to use the above code on your hosting server, you can change it with your database user.$password: Enter the password of the user of the database with all privileges. If you are running code on your PHP server on your local computer system, you have to leave it blank. But, if you are running the code on your hosting server, you can change it with the password of your database user.$dbname: The name of your user’s database.
Now, use the PHP built-in function mysqli_connect() with all the above parameters included as given in the code above to make the connection. After that, you can check if the connection is made successfully.
Next, make a login check, Send OTP, and create a session for login with OTP verification using PHP.
Step 4 Check Users Login and Send OTP for Verification Using PHP
Now, you can collect the data of the login form that the user enters and submit it to check login data if present in the database. Let’s name the file ‘login.php’.
First, include the 3rd step file ‘dbcon.php’ at the top file using include_once(). After that, start the session using session_start().
After that, check whether there is already a present username session variable. If it is present, then redirect users to the dashboard. If it is not present and the ID is set, then redirect users to the OTP verification form. You will learn to create a dashboard in the next step.
If the session variable is not set, that means there are no users logged in using the login form. To collect the login form data, use the $_POST global variable of PHP. The password field should be collected in md5 format as it is stored in the database in md5 encrypted format.
After that, select the user database using MySQL select query to match the login form user-entered data. Find out whether the data matches or the matching row is present or not using the mysqli_num_rows() function.
If there is a matching record present in the database, you have to store the required data in the session variable using $_SESSION global variable. After you create a session variable, redirect the user to the dashboard.
However, if the record is not present in the database, you have to display an alert message that the user is not present or matching.
|
1 2 3 4 5 6 7 8 9 10 11 12 13 14 15 16 17 18 19 20 21 22 23 24 25 26 27 28 29 30 31 32 33 34 35 36 37 38 39 40 41 42 43 44 45 46 47 48 49 50 51 52 53 54 55 56 57 58 59 60 61 62 63 64 65 66 67 68 69 70 71 72 73 74 75 76 77 78 79 80 81 82 83 84 85 86 87 88 89 90 91 92 93 94 95 96 97 98 |
<?php include_once('dbcon.php'); session_start(); //Starting session //Check user session is already present or not if(isset($_SESSION['username'])){ header("location: dashboard.php"); } if((isset($_SESSION['ID']))){ header("location: otp-verification.php"); } ?> <?php date_default_timezone_set("Asia/Calcutta"); ?> <?php //Check if the login form is submit if(isset($_POST['submit'])){ //Get form data using $_POST global variable $username = $_POST['username']; $password = md5($_POST['password']); //as we have stored password in the database in md5 format for security //Select and check user data if present and matching with the database $sql = "SELECT * FROM users WHERE username = '$username' AND password = '$password'"; $result = mysqli_query($conn, $sql); $row = mysqli_fetch_assoc($result); //Check if the matching row is present in the database if(mysqli_num_rows($result) > 0){ $_SESSION['ID'] = $row['ID']; // generate OTP $otp = rand(100000,999999); // Send OTP require "phpmailer/PHPMailerAutoload.php"; $mail = new PHPMailer; $message = "Your one time OTP verification for login is: ".$otp; //$mail->SMTPDebug = 4; $mail->isSMTP(); // Set mailer to use SMTP $mail->Host = 'smtp.gmail.com'; // Specify main and backup SMTP servers $mail->SMTPAuth = true; // Enable SMTP authentication $mail->Username = $sender; // SMTP username $mail->Password = 'your gmail app password'; // SMTP password $mail->SMTPSecure = 'tls'; // Enable TLS encryption, `ssl` also accepted $mail->Port = 587; // TCP port to connect to $mail->setFrom($sender, 'OTP'); //$mail->addAddress('[email protected]'); //$mail->addReplyTo('[email protected]', 'Information'); //$mail->addCC($project_director_emp_email); //$mail->addBCC('[email protected]'); $mail->isHTML(true); // Set email format to HTML $mail->Subject = 'OTP Verification'; $mail->Body = $message; //$mail->AltBody = 'This is the body in plain text for non-HTML mail clients'; if(!$mail->send()) { echo 'Message could not be sent.'; echo 'Mailer Error: ' . $mail->ErrorInfo; } else { //echo $otp; $currentdatetime = date('Y-m-d H:i:s'); $sql_otp_update = "UPDATE users SET user_otp_verification = '$otp', user_otp_verification_creation_time = '$currentdatetime' WHERE username = '$username'"; if (mysqli_query($conn, $sql_otp_update)) { echo "OTP updated"; header("location: otp-verification.php"); } else { echo "Error: " . $sql_otp_update . "<br>" . mysqli_error($conn); } } }else{ //echo "Error: " . $sql . "<br>" . mysqli_error($conn); ?> <br> <div class="alert alert-warning alert-dismissible fade show" role="alert"> <strong>Record not matching</strong> <button type="button" class="btn-close" data-bs-dismiss="alert" aria-label="Close"></button> </div> <?php //echo "Record not found"; } mysqli_close($conn); //close database connection } ?> |
Next, create a dashboard for the user who makes successful login and the session is created for the user.
Step 5 Create OTP Verification Form with OTP Re-generation Link and Verify OTP Using PHP
In the previous step, the user will get an OTP to verify their identity. Now, let’s create an OTP verification form where users have to enter the OTP which they received in their email address. If the user did not receive the OTP, they can use the ‘Generate OTP’ link to generate a new OTP for verification.
|
1 2 3 4 5 6 7 8 9 10 11 12 13 14 15 16 17 18 19 20 21 22 23 24 25 26 27 28 29 30 31 32 33 34 35 36 37 38 39 40 41 42 43 44 45 46 47 48 49 50 51 52 53 54 55 56 57 58 59 60 61 62 63 64 65 66 67 68 69 70 71 72 73 74 75 76 77 78 79 80 81 82 83 84 85 86 87 88 89 90 91 92 93 94 95 96 97 98 99 100 101 102 103 104 105 106 107 108 109 110 111 112 113 114 115 116 117 118 119 120 121 122 123 124 125 126 127 128 129 130 131 132 133 134 135 136 |
<?php ob_start(); ?> <?php include_once 'dbcon.php';?> <?php date_default_timezone_set("Asia/Calcutta"); ?> <?php session_start(); // Starting Session $error=''; // Variable To Store Error Message //print_r($_SESSION); if(isset($_SESSION['username'])){ header("location: dashboard.php"); } if(!isset($_SESSION['ID'])){ header("location: index.php"); } ?> <!DOCTYPE html> <html lang="en"> <head> <title>PHP Login Form with OTP Verification</title> <meta charset="UTF-8"> <meta name="description" content=""> <link href="https://cdn.jsdelivr.net/npm/[email protected]/dist/css/bootstrap.min.css" rel="stylesheet" integrity="sha384-EVSTQN3/azprG1Anm3QDgpJLIm9Nao0Yz1ztcQTwFspd3yD65VohhpuuCOmLASjC" crossorigin="anonymous"> </head> <body> <div class="container"> <div class="row"> <div class="col-md-6 offset-md-3 mt-3 bg-light p-3 border border-secondary"> <form method="post" id="myformloginotp"> <div class="mb-3"> <label for="exampleInputEmail1">Enter OTP (Check your email)</label> <input type="password" class="form-control" placeholder="Enter OTP" name="otpverification" id="otpverification" required> </div> <div class="mb-3"> <button type="submit" class="btn btn-primary" name="otpsubmit">Submit</button> </div> </form> <form method="post"> <button onclick="javascript:return confirm('Are you sure you want to generate OTP again?');" type="submit" class="btn btn-link" name="otpagaingeneratesubmit">Generate OTP Again</button> </form> <?php $user_id_login = $_SESSION['ID']; $sql = "SELECT * FROM users WHERE ID = '$user_id_login'"; $result = mysqli_query($conn, $sql); $row = mysqli_fetch_assoc($result); if (isset($_POST['otpsubmit'])){ $otpverification = $_POST['otpverification']; if($row['user_otp_verification'] == $otpverification){ $_SESSION['username'] = $row['username']; if(isset($_SESSION['username'])){ header("location: index.php"); } }else{ ?> <br> <div class="alert alert-warning alert-dismissible fade show" role="alert"> <strong>OTP not matching. Check your email again. and enter the correct OTP to log in. </strong> <button type="button" class="btn-close" data-bs-dismiss="alert" aria-label="Close"></button> </div> <?php } } if (isset($_POST['otpagaingeneratesubmit'])){ $my_session_user_id = $_SESSION['ID']; // generate OTP $otp = rand(100000,999999); // Send OTP require "phpmailer/PHPMailerAutoload.php"; $mail = new PHPMailer; $message = "Your one time OTP verification for login is: ".$otp; //$mail->SMTPDebug = 4; $mail->isSMTP(); // Set mailer to use SMTP $mail->Host = 'smtp.gmail.com'; // Specify main and backup SMTP servers $mail->SMTPAuth = true; // Enable SMTP authentication $mail->Username = $sender; // SMTP username $mail->Password = 'your gmail app password'; // SMTP password $mail->SMTPSecure = 'tls'; // Enable TLS encryption, `ssl` also accepted $mail->Port = 587; // TCP port to connect to $mail->setFrom($sender, 'OTP'); //$mail->addAddress('[email protected]'); //$mail->addReplyTo('[email protected]', 'Information'); //$mail->addCC($project_director_emp_email); //$mail->addBCC('[email protected]'); $mail->isHTML(true); // Set email format to HTML $mail->Subject = 'OTP Verification'; $mail->Body = $message; //$mail->AltBody = 'This is the body in plain text for non-HTML mail clients'; if(!$mail->send()) { echo 'Message could not be sent.'; echo 'Mailer Error: ' . $mail->ErrorInfo; } else { //echo $otp; $currentdatetime = date('Y-m-d H:i:s'); $sql_otp_update = "UPDATE users SET user_otp_verification = '$otp', user_otp_verification_creation_time = '$currentdatetime' WHERE ID = '$my_session_user_id'"; if (mysqli_query($conn, $sql_otp_update)) { ?> <br> <div class="alert alert-warning alert-dismissible fade show" role="alert"> <strong>Check your email for OTP again.</strong> <button type="button" class="btn-close" data-bs-dismiss="alert" aria-label="Close"></button> </div> <?php } else { echo "Error: " . $sql_otp_update . "<br>" . mysqli_error($conn); } } } mysqli_close($conn); ?> </div> </div> </div> </body> </html> <?php ob_end_flush(); ?> |
Step 6 Create Dashboard to Redirect Users After Succesful Logged in Using PHP
The dashboard should first check whether the session variable of the login user is present or not. If the session is present, it allows users to be logged in user and visit the dashboard. If the user is not logged in successfully, it means the session is not created and the user will remain on the login page.
Every application requires a dashboard to redirect users when they make a successful login into the website. So, it is important to create a dashboard for only logged-in users using PHP.
To create a dashboard for users, you have to use the PHP code given below.
|
1 2 3 4 5 6 7 8 9 10 11 12 13 14 15 16 17 18 19 20 21 22 23 24 |
<?php session_start(); // Starting Session if(!isset($_SESSION['username'])){ header("location: index.php"); } ?> <!doctype html> <html lang="en"> <head> <title>Dashboard</title> <meta charset="utf-8"> <meta name="viewport" content="width=device-width, initial-scale=1"> <link href="https://cdn.jsdelivr.net/npm/[email protected]/dist/css/bootstrap.min.css" rel="stylesheet"> </head> <body> <div class="container"> <div class="row"> <div class="col-md-12"> <?php echo "Welcome ".$_SESSION['username']; ?> <a href="logout.php" onclick="javascript:return confirm('Are you sure you want to logout?');">Logout</a> </div> </div> </div> </body> </html> |
The above dashboard code displays the name of the logged-in user.
You can fetch more records of the logged-in user to display in the dashboard. The details can be the profile of the user, statistics, graphical representation of the user’s data, etc.
Step 7 Create Logout System to Destroy Session Using PHP
The previous step dashboard code contains the logout link to log out the user from the present session. When the users want to log out of their present session, you have to unset the session variables and destroy all the sessions of the user.
It also requires a redirection of the users to the login or other page when they log out of the session. The other page can be the facts page, homepage, etc.
To unset or remove all the session variables of the login user, you can use the session_unset() function of PHP. To destroy the present session of the user, you can use the session_destroy(). See the below code to create a logout system in ‘logout.php’ file.
|
1 2 3 4 5 6 7 8 9 10 11 12 13 14 15 |
<?php session_start(); ?> <?php if(isset($_SESSION['username'])){ //Remove all session variables session_unset(); // destroy the session session_destroy(); header("location: index.php"); }else{ header("location: index.php"); } ?> |
The logout system works when there is a session present for the user. We have stored the username of the users in the session variable. That’s why we have to check the presence of the user’s session if present or not. If the session is present, the logout system destroys all the sessions and unsets all session variables.
That’s all about the login form with OTP verification in PHP and MySQL.
You May Also Like to Read
