PHP contact form with multiple attachments helps you collect more screenshots from users. You can easily understand users’ queries visually.
If you are running a business online, contact would be the better option to get connected with your audience. Sometimes, a single attachment in your contact form is not enough to understand audience queries.

Looking to create contact forms with multiple attachments without coding? Create beautiful-looking contact forms with JotForm. with no coding required
You can allow users to attach more files to collect more screenshots and documents from users. Collecting more information helps you easily analyze the requirements of your users.
After collecting more information from your users, you can contact them to stay connected with your business. This can help you increase the revenue of your business.
In this post, you will learn how to create a contact form with multiple attachments using PHP. So, let’s get started.
How to Create PHP Contact Form with Multiple Attachments (Step-by-step Process)
Here is the step-by-step process on how to create a PHP contact form with multiple attachments:-
Step 1: Create an HTML Structure Contact Form with Multiple Attachments
First of all, create an HTML structure of the contact form with multiple attachments. The contact form should contain fields that are complete enough to help you easily make communication after collecting emails.
The fields like Name, Email, and Message are complete fields to get the message and make personal communication. So, let’s add these fields to the contact form with an attachment field.
The main HTML structure of a webpage is as given below. You have to use it and place the form HTML code in the indicated place below. You will get the HTML form and CSS code below.
HTML Structure of a Webpage
|
1 2 3 4 5 6 7 8 9 10 11 12 |
<!DOCTYPE html> <html lang="en"> <head> <title>PHP Contact Form with Multiple Attachments</title> <meta charset="utf-8"> <meta name="viewport" content="width=device-width, initial-scale=1"> <!-- place CSS code here --> </head> <body> <!-- place Contact Form HTML code here --> </body> </html> |
Contact Form HTML Code
To make the contact form with multiple attachments structure, you have to add the Name field using <input type="text">, Email field using <input type="email">, message field using <textarea">, and attachment field using <input type="file">.
Also, make sure that the attachment field should contain multiple attributes to allow multiple file uploads. It also requires adding name=inputname[] attribute of the attachment field with [] as you can see below the HTML code.
|
1 2 3 4 5 6 7 8 9 10 11 12 13 14 15 16 17 18 19 20 |
<div class="main-contact-form"> <form method="POST" id="ajaxform" enctype="multipart/form-data"> <label for="Name">Your Name</label><br> <input type="text" name="name" placeholder="Enter name" required><br> <label for="Email">Your Email</label><br> <input type="email" name="email" placeholder="Enter email" required><br> <label for="message">Message</label><br> <textarea name="message" placeholder="Enter your message" rows="5" required></textarea><br> <label for="Attachment">Multiple Attachments</label><br> <input type="file" name="attachment[]" multiple><br><br> <input type="submit" class="btn btn-primary" name="submit" value="Submit"> </form> <br> <!-- place PHP code here --> </div> |
CSS Code to Make Contact Form Design Looks Better
The HTML structure requires some better design for look-n-feel. For this, you have to add some CSS as given below. The below CSS style forms field elements, attachments, and buttons. You can change the button and attachment color to match them with your brand color.
|
1 2 3 4 5 6 7 8 9 10 11 12 13 14 15 16 17 18 19 20 21 22 23 24 25 26 27 28 29 30 31 32 33 34 35 36 37 38 39 40 41 42 43 44 45 46 47 48 49 |
<style> input[type='text'],input[type='email'], textarea{ width: 100%; padding: 10px; border-radius: 3px; border: 1px solid #ccc; margin-top: 10px; margin-bottom: 20px; } input[type='text']:focus,input[type='email']:focus, textarea:focus{ border: 1px solid #5db6db; box-shadow: 0 0 10px #b9eaff; outline: none !important; } input[type='submit']{ background: rgb(39,160,210); color: #fff; border: none; padding: 10px 20px; cursor: pointer; } .main-contact-form{ max-width: 400px; margin: 0 auto; background: #e9e9e9; padding: 20px 45px 20px 25px; border-radius: 5px; } input[type=file] { width: 100%; padding: 5px; background: #fff; border-radius: 10px; border: 1px solid #ccc; } input[type=file]::file-selector-button { border: none; background: #084cdf; padding: 10px 20px; border-radius: 10px; color: #fff; cursor: pointer; transition: background .2s ease-in-out; } input[type=file]::file-selector-button:hover { background: #0d45a5; } </style> |
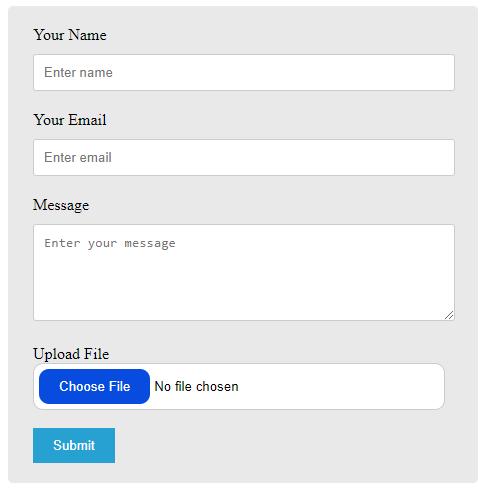
After you add the above CSS, your contact form will convert into a better design as shown in the image below.

Now, you have created the design of the contact form with multiple attachments. Let’s add PHP code to it to validate the email address and the multiple attachment files.
Step 2: Validate Email Addresses and Attachments Using PHP
To validate the contact form, you can use the PHP code given below. It first collects the contact form data using PHP global variable $_POST. The name and message fields are not required to validate. However, it is required to validate email addresses and attachments.
The below PHP code is well commented on enough to easily understand each line of code for validation. To validate the email address, you have to use the preg_match() with regular expression.
The attachment type and size are the main part to validate using PHP. We should validate that its size should be less than 2MB and type should be PDF, DOC, JPG, JPEG, and PNG. 2MB size helps you reduce the extra load of uploading larger files to your hosting server.
The multiple attachment fields require foreach loop to validate each attachment one by one. See the code below to validate the user’s entered information.
|
1 2 3 4 5 6 7 8 9 10 11 12 13 14 15 16 17 18 19 20 21 22 23 24 25 26 27 28 29 30 31 32 33 34 35 36 37 38 39 40 41 42 43 44 45 46 47 48 49 50 51 52 53 54 55 56 57 |
<?php if(isset($_POST['submit'])){ // Get the submitted form data $email = $_POST['email']; $name = $_POST['name']; $message = $_POST['message']; //validation for email $email_exp = '/^[A-Za-z0-9._%-]+@[A-Za-z0-9.-]+\.[A-Za-z]{2,4}$/'; if (!preg_match($email_exp, $email)) { echo "<p style='color:red;'>The Email address you entered is not valid.</p>"; exit; } // Upload attachment file if(!empty($_FILES["attachment"]["name"])){ foreach ($_FILES["attachment"]["name"] as $key => $val) { $fileerror = $_FILES['attachment']['error'][$key]; // get the error (if any) //validate form field for attaching the file if($fileerror > 0) { echo "<p style='color:red;'>Upload error or No files uploaded.</p>"; exit; } // Attachment path config $targetDir = "uploads/"; $fileName = basename($_FILES['attachment']['name'][$key]); $targetFilePath = $targetDir . $fileName; $fileType = pathinfo($targetFilePath,PATHINFO_EXTENSION); // Allow certain attachment formats $allowTypes = array('pdf', 'doc', 'docx', 'jpg', 'png', 'jpeg'); if(in_array($fileType, $allowTypes)){ // Check the attachment size if ($_FILES['attachment']['size'][$key] > 2000000) { echo "<p style='color:red;'>Attachment size should be less than 2MB</p>"; exit; }else{ // Upload attachment to the server if(move_uploaded_file($_FILES['attachment']['tmp_name'][$key], $targetFilePath)){ $uploadedFile = $targetFilePath; }else{ echo "<p style='color:red;'>Sorry, there was an error uploading your file.</p>"; exit; } } }else{ echo "<p style='color:red;'>Sorry, only PDF, DOC, JPG, JPEG, & PNG files are allowed to upload.</p>"; exit; } } } } ?> |
As you have validated your contact form and multiple attachments. You can now send the contact form data in the next step.
Step 4: Send Contact Form with Multiple Attachments Via Emails Using PHP
To send the contact form data with multiple attachments via emails, PHPMailer is the more convenient and easiest way.
You have to first download the PHP Mailer library and include it in the base location of your contact form. Click the below button and save the PHPMailer library in the base location of your main files. After that, extract the folder to get the required PHPMailer files and folders.
Now, copy the below code and paste it after the above PHP validation code. Also, don’t forget to change the below things in the code:-
- Change ‘[email protected]’ with your Gmail id
- Change ‘yourgmailpassword’ with the Gmail app password. If you don’t have a Gmail app password, you can create one using the guide Sign in with app password in Gmail.
- Change ‘[email protected]’ with the recipient’s email address. Also, change the ‘recipientname’ with your name to appear on the emails.
|
1 2 3 4 5 6 7 8 9 10 11 12 13 14 15 16 17 18 19 20 21 22 23 24 25 26 27 28 29 30 31 32 33 34 35 36 37 38 39 40 41 42 43 44 45 46 47 48 49 50 51 52 53 54 55 56 57 58 59 60 61 62 63 64 |
<?php if(isset($_POST['submit'])){ //If everything above is ok then move further //Use PHPmailer require "phpmailer/PHPMailerAutoload.php"; $mail = new PHPMailer; //Mailbody to send in an email $mailbody = '<p><b>Customer contact details:-</b></p> <p><b>Name:</b> '.$name.'</p> <p><b>Email:</b> '.$email.'</p> <p><b>Message:</b> '.$message.'</p>'; //Sender email address $mail->isSMTP(); // Set mailer to use SMTP $mail->SMTPDebug = 0; //See errors, change it to 4 $mail->Host = 'smtp.gmail.com'; // Specify main and backup SMTP servers $mail->SMTPAuth = true; // Enable SMTP authentication $mail->Username = $sender; // SMTP username $mail->Password = 'yourgmailpassword';// Gmail SMTP password $mail->SMTPSecure = 'tls'; // Enable TLS encryption, `SSL` also accepted $mail->Port = 587; // TCP port to connect to $mail->setFrom($email, $name); //$mail->addAddress('[email protected]'); //add more recipient (optional) $mail->addReplyTo($email, $name); //$mail->addCC('[email protected]'); //$mail->addBCC('[email protected]'); //Add attachment if(is_array($_FILES)) { foreach ($_FILES["attachment"]["name"] as $key => $val) { $fileName = basename($_FILES['attachment']['name'][$key]); $targetFilePath = $targetDir . $fileName; $uploadedFile = $targetFilePath; $mail->AddAttachment($uploadedFile, $_FILES["attachment"]["name"][$key], 'base64', 'mime/type'); } } $mail->isHTML(true); // Set email format to HTML $mail->Subject = 'Contact Form Submitted by '.$name; $mail->Body = $mailbody; //$mail->AltBody = 'This is the body in plain text for non-HTML mail clients'; //Email your contact form data with an attachment using Gmail SMTP with PHPMailer if(!$mail->send()){ echo "<p style='color:red;'>Message could not be sent. Please try again.</p>"; echo 'Mailer Error: ' . $mail->ErrorInfo; }else{ echo "<p style='color:green;'>Message has been sent successfully.</p>"; //To delete all sent files from the uploaded folder; foreach ($_FILES["attachment"]["name"] as $key => $val) { $fileName = basename($_FILES['attachment']['name'][$key]); $targetFilePath = $targetDir . $fileName; $uploadedFile = $targetFilePath; @unlink($uploadedFile); } } } ?> |
After you complete the above step-by-step process, your contact form with multiple attachments is ready to use. Now, open your contact form in your favorite browser and enter your information. After that, submit the form to test its working.
If you have any problem with the contact form with multiple attachments, please comment below. I will be very happy to help you.
You May Also Like to Read
