
Ever opened VS Code, written a beautiful piece of Python code, and then just… stared at it, unsure how to actually run the thing? You’re not alone. Thousands of developers search “how to run Python in VS Code” every single day – and the good news is, once you know the trick, it takes less than 10 seconds.
This guide covers every method to run Python in Visual Studio Code, from beginner-friendly clicks to power-user shortcuts, debugging techniques, and the exact errors that trip people up (with fixes). By the end, you’ll never be stuck staring at a blinking cursor again.
In this guide:
- Why VS Code is the top choice for Python development
- Installing Python and the VS Code Python extension
- 5 ways to run Python code in VS Code
- How to debug Python step-by-step
- Fixing the most common VS Code + Python errors
- Selecting the correct Python interpreter
- FAQs (the questions people ask most)
*[Suggested screenshot: VS Code interface with a Python file open and the Run button highlighted — alt text: “Running a Python file in VS Code using the Run button”]*
Why VS Code Is the Go-To Editor for Python
Before diving into setup, here’s why so many developers choose VS Code for Python specifically:
- Free and lightweight, yet powerful enough for professional-grade development.
- The official Python extension from Microsoft adds IntelliSense, linting, testing, and Jupyter Notebook support in one place.
- Massive community support — nearly every error has already been solved somewhere online.
- Cross-platform consistency across Windows, macOS, and Linux.
- Built-in Git integration, so version control lives right next to your code.
Now let’s get your Python code actually running.
Step 1: Install Python
VS Code doesn’t come with Python pre-installed – your system needs Python first.
- 1. Go to [python.org/downloads](https://python.org/downloads) and download the latest stable release.
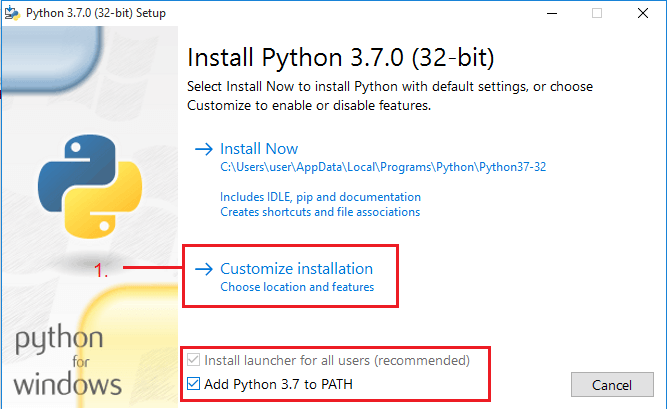
- 2. On Windows, check the box that says “Add Python to PATH” during installation. This single checkbox prevents 90% of beginner setup errors.
- 3. Confirm the install by opening a terminal and running:
|
1 |
python --version |
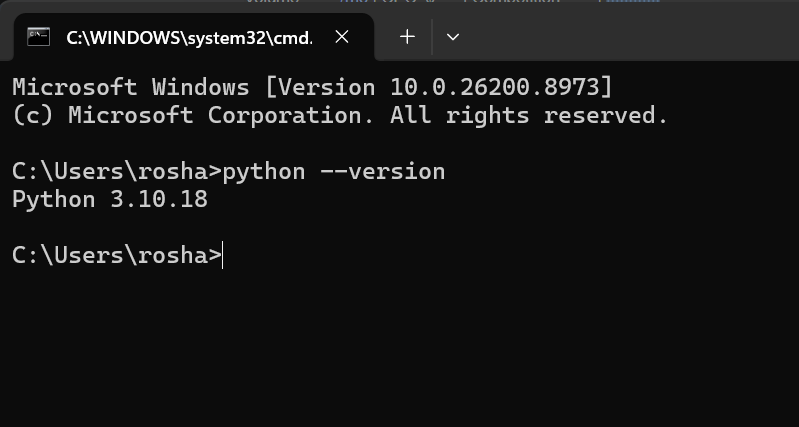
When I am creating this tutorial, the latest version of Python is Python 3.14.x. When you run the above comman, you should see output like Python 3.14.x. The below image shows the version I have installed on my computer system.
If you want full guide on installing Python, you can check my step-by-step tutorial on how to install Python on Windows
Step 2: Install VS Code and the Python and Code Runner Extension
- 1. Download VS Code from [code.visualstudio.com](https://code.visualstudio.com).
- 2. Open VS Code and click the Extensions icon in the sidebar (or press
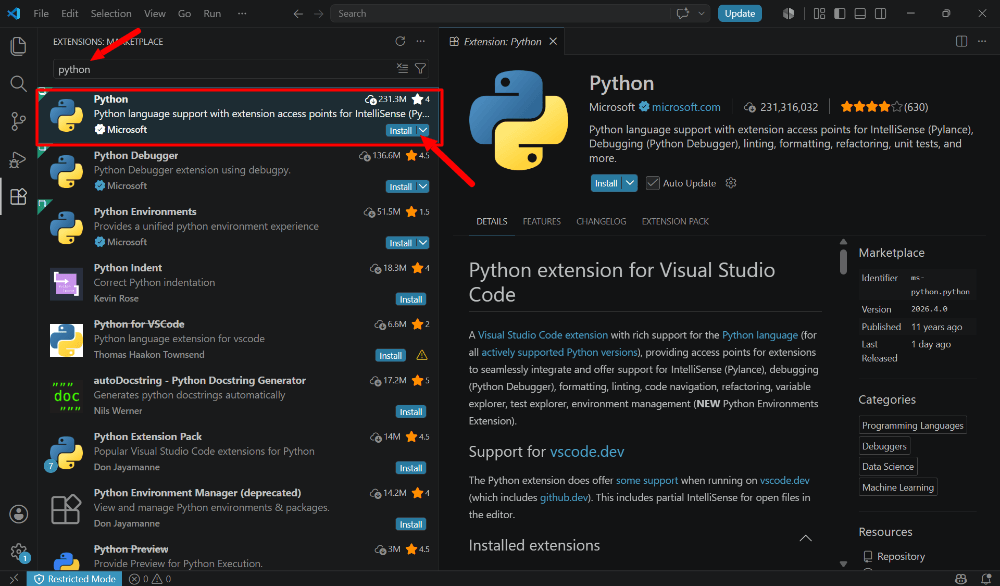
Ctrl+Shift+Xon Windows/Linux,Cmd+Shift+Xon macOS). - 3. Search “Python” and install the official extension published by Microsoft.
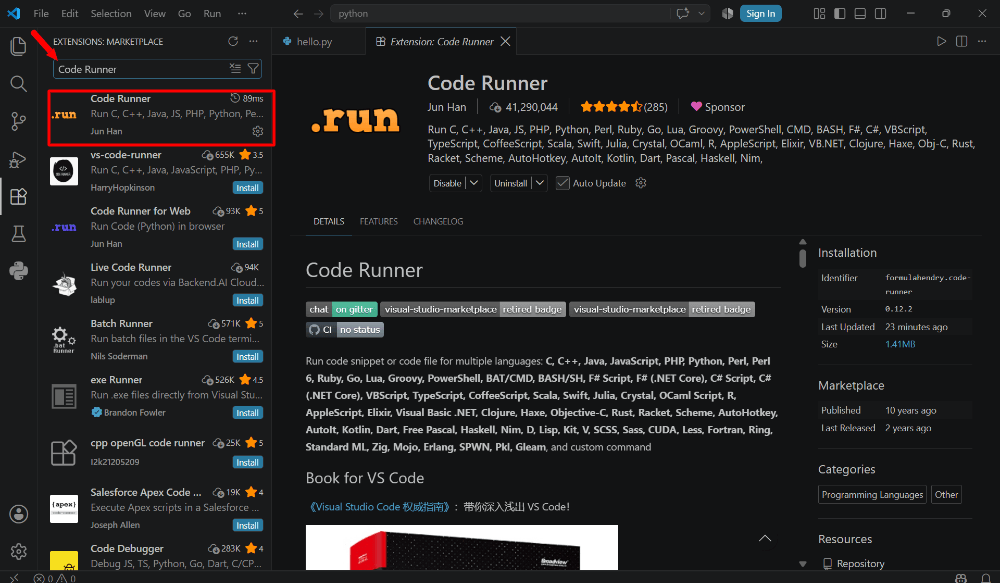
- 4. Search “Code Runner” and install the official extension published by Jun Han.
This extension turns VS Code into a complete Python environment – adding syntax highlighting, autocomplete, linting, and the ability to run and debug code with one click.
Step 3: Create and Open Your Python File
- 1. Open a project folder in VS Code (
File > Open Folder) to keep things organized. - 2. Create a new file and save it with a
.pyextension – for example,hello.py. - 3. Add a simple test script:
|
1 |
print("Hello, VS Code!") |
Step 4: Run Your Python Code (5 Easy Ways)
This is the part most people are actually searching for. VS Code offers several ways to run a Python script — pick whichever fits your workflow.
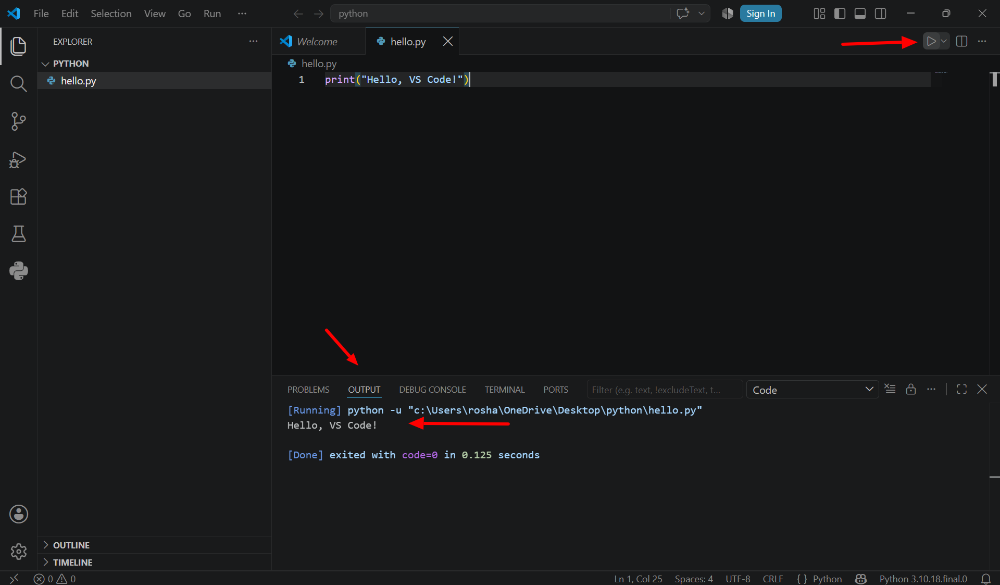
Method 1: The Run Button (Easiest)
Click the triangular Run button in the top-right corner of the editor. VS Code opens an integrated terminal and executes your file instantly.
Method 2: Right-Click Menu
Right-click anywhere inside your .py file and select “Run Python File in Terminal.”
Method 3: Keyboard Shortcut
With the Python extension installed and your file active, you can run it without touching the mouse at all – hover over the Run button to see the exact shortcut assigned on your system.
|
1 |
Ctrl+Alt+N |
Method 4: Integrated Terminal (Manual Method)
Open the terminal with
|
1 |
Ctrl+` |
(backtick) and type:
|
1 |
python hello.py |
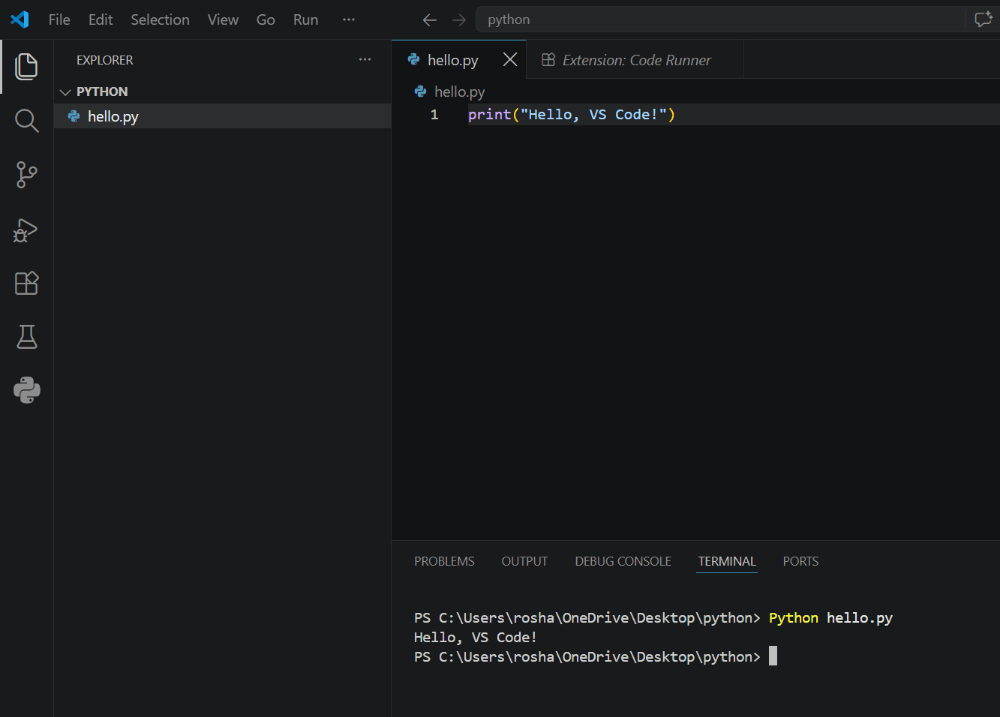
This is the classic method – useful for understanding exactly what’s happening behind the scenes, and it works identically whether you’re using VS Code or any other editor.
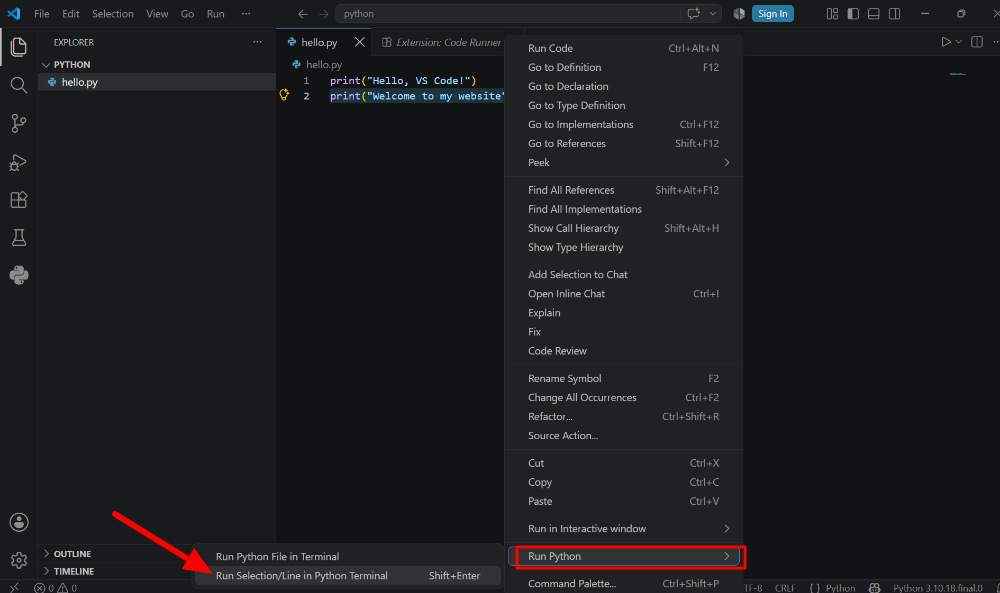
Method 5: Run Selected Code Only
Highlight a specific block of code, right-click, and choose “Run Selection/Line in Python Terminal.” This is perfect for testing a small snippet without executing the entire file.
Step 5: Debugging Python in VS Code
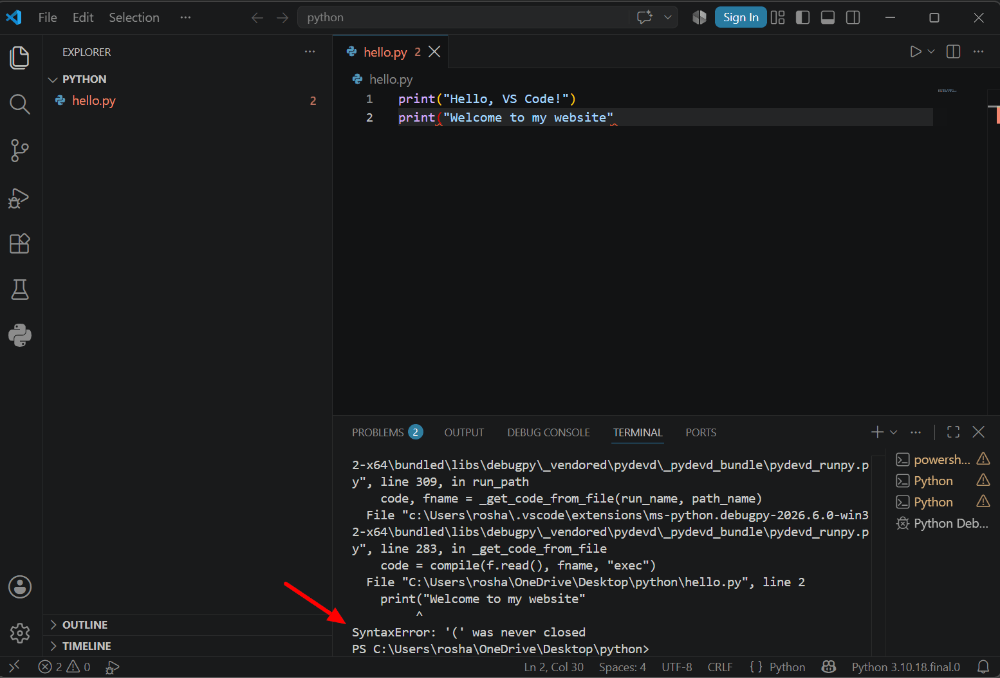
Running code is great, but debugging is where VS Code really earns its reputation.
- 1. Click just to the left of a line number to set a breakpoint (a red dot appears).
- 2. Press
F5or go to Run > Start Debugging. - 3. VS Code pauses execution at your breakpoint, letting you inspect variables, step through code line-by-line, and watch values update in real time using the Variables, Watch, and Call Stack panels.
This feature is a major reason developers move from basic text editors to VS Code – instead of guessing what your code is doing, you can watch it happen.
Common Errors (and Quick Fixes)
| Error | Likely Cause | Fix |
|---|---|---|
'python' is not recognized |
Python not added to PATH | Reinstall Python and check “Add to PATH” during installation. |
No Run button appears |
Python extension not installed | Install the official Microsoft Python extension. |
| Wrong Python version runs | Multiple Python interpreters installed | Click the interpreter version in the bottom-right status bar and select the correct one. |
ModuleNotFoundError |
Package not installed in the active environment | Run pip install <package-name> in the terminal. |
| Code runs but terminal shows nothing | Output buffering or wrong file saved | Save the file (Ctrl + S) before running, and confirm you’re running the correct file. |
| Debugger won’t stop at breakpoint | Debugging the wrong file or interpreter mismatch | Confirm the correct interpreter is selected and the breakpoint is on an executable line. |
Selecting the Right Python Interpreter
If your code runs but behaves unexpectedly, check your interpreter. Click the Python version shown in the bottom status bar of VS Code, then choose the correct virtual environment or global installation. This single setting resolves a huge share of “it works on my machine but not here” problems – especially in projects using venv or conda.
Frequently Asked Questions
Q1: Why won’t VS Code run my Python file?
A: This usually means either the Python extension isn’t installed, or Python itself isn’t in your system PATH. Reinstall Python with “Add to PATH” checked, then restart VS Code.
Q2: How do I run Python in the VS Code terminal manually?
A: Open the terminal with Ctrl+` and type python filename.py (or python3 filename.py on macOS/Linux).
Q3: Can I run Python code without saving the file first?
A: No – VS Code executes the saved version of a file. Always save (Ctrl+S) before running, or enable “Auto Save” in settings.
Q4: What’s the shortcut to run Python code in VS Code?
A: There’s no single universal shortcut across all installs, but the Run button in the top-right corner always works, and its tooltip shows the exact keybinding configured on your machine.
Q5: How do I switch Python interpreters in VS Code?
A: Click the Python version number in the bottom status bar, then select the interpreter or virtual environment you want to use.
Q6: Do I need to install Python separately, or does VS Code include it?
A: VS Code is just an editor – it doesn’t include Python. You must install Python separately from python.org before VS Code can run any Python code.
Final Thoughts
Running Python in VS Code isn’t complicated once you know where to look – it’s one click, one shortcut, or one terminal command away.
Whether you’re a student writing your first print("Hello World") or a professional debugging a complex data pipeline, VS Code adapts to your skill level and grows with you.
Now open that editor, hit Run, and watch your code come to life.
Found this guide helpful? Bookmark it – because trust us, you’ll need it again the next time you set up a new machine.