A responsive job application form in Bootstrap can resize itself to any screen size. It can help your applicants to apply a job for your business online.
If you want to collect more applicants, you cannot depend only on the desktop. More and more users are using mobiles today to open websites. Users also remain more active every time on their mobile phones with notifications.
If you want to create beautiful looking responsive job application forms without coding required? Signup JotForm and Start Creating beautiful-looking job applications forms.
You must consider using responsive job applications forms on your websites to make it mobile-friendly. A mobile-friendly job application form can bring more applications to your business online. This can help you gain more employees.
So, how you can easily create a responsive job application form with less coding required?
You can use Bootstrap that comes with pre-defined CSS classes to easily use and create a responsive job application forms. It just require to add a Bootstrap CSS file to include on your code to quickstart using its CSS classes.
In this post, you learn a step-by-step process for creating a responsive Bootstrap job application form. You will also learn PHP code to collect applicants’ data via emails. So, let’s get started.
How to Create a Responsive Job Application Form in Bootstrap 5
Here is the step-by-step process to create a responsive job application form using Bootstrap:-
Step 1: Create Responsive Job Application Form Design Using Bootstrap 5
To create a responsive job application form design, you can use Bootstrap. I am going to use Bootstrap version 5 with its CDN URL as given below. You just have to include the CDN URL inside the HTML code’s <head> tag to start using its responsive classes.
Bootstrap 5 CDN
|
1 |
<link href="https://cdn.jsdelivr.net/npm/[email protected]/dist/css/bootstrap.min.css" rel="stylesheet"> |
After you add the CDN, you can start using the Bootstrap classes to create a job application form structure as shown in the below code. It contains the form field Name, Email, Job Position, Experience, Cover Letter, and Resume in PDF format. These fields are enough to collect applicants’ data to easily communicate with them.
Responsive Job Application Form Design Using Bootstrap 5
|
1 2 3 4 5 6 7 8 9 10 11 12 13 14 15 16 17 18 19 20 21 22 23 24 25 26 27 28 29 30 31 32 33 34 35 36 37 38 39 40 41 42 43 44 45 46 47 48 49 50 51 52 53 54 55 56 57 58 59 60 61 62 63 64 65 66 67 68 69 70 71 72 73 74 75 76 77 78 |
<!doctype html> <html lang="en"> <head> <title>Responsive Job Application Form Design in Bootstrap 5</title> <meta charset="utf-8"> <meta name="viewport" content="width=device-width, initial-scale=1"> <link href="https://cdn.jsdelivr.net/npm/[email protected]/dist/css/bootstrap.min.css" rel="stylesheet"> </head> <body> <div class="container"> <div class="row"> <div class="col-md-6 offset-md-3 mt-3 bg-light p-3 border border-secondary"> <!-- Bootstrap main form start --> <form class="row g-3" method="POST" enctype="multipart/form-data"> <div class="col-md-6"> <label for="Name" class="form-label">Your Name</label> <input type="text" class="form-control" name="name" placeholder="Enter name" required> </div> <div class="col-md-6"> <label for="Email" class="form-label">Your Email</label> <input type="email" class="form-control" name="email" placeholder="Enter email" required> </div> <div class="col-md-12"> <label for="position">Position</label> <select name="position" class="form-select" id="position" placeholder="" required> <option value="">Select a position your are applying for</option> <option value="Software Developer">Software Developer</option> <option value="UX Designer">UX Designer</option> <option value="SEO Expert">SEO Expert</option> <option value="Testing Expert">Testing Expert</option> </select> </div> <div class="col-md-12"> <label for="Email">How many years of experience do you have?</label> <div class="form-check"> <input type="radio" class="form-check-input" id="exp1" name="experience" value="1"> <label for="exp1" class="form-check-label">1</label> </div> <div class="form-check"> <input type="radio" id="exp2" class="form-check-input" name="experience" value="2"> <label for="exp2" class="form-check-label">2</label> </div> <div class="form-check"> <input type="radio" id="exp3" class="form-check-input" name="experience" value="3"> <label for="exp3" class="form-check-label">3</label> </div> <div class="form-check"> <input type="radio" id="exp4" class="form-check-input" name="experience" value="4"> <label for="exp4" class="form-check-label">4</label> </div> <div class="form-check"> <input type="radio" id="expmore4" class="form-check-input" name="experience" value="More than 4"> <label for="expmore4" class="form-check-label">More than 4</label> </div> </div> <div class="col-md-12"> <label for="cover">Cover Letter</label> <textarea name="cover" class="form-control" id="cover" placeholder="Please tell us why you're a good fit for this position and why you want to work with us" rows="5" required></textarea> </div> <div class="col-md-12"> <label for="file" class="form-label">Resume</label> <input type="file" name="file" class="form-control" required> <div class="form-text">Please upload your resume in PDF format</div> </div> <div class="col-md-12"> <input type="submit" class="btn btn-primary" name="submit" value="Submit"> </div> </form> <!-- Bootstrap main form end --> <!-- Place PHP Code Here Start--> <!-- Place PHP Code Here End--> </div> </div> </div> </body> </html> |
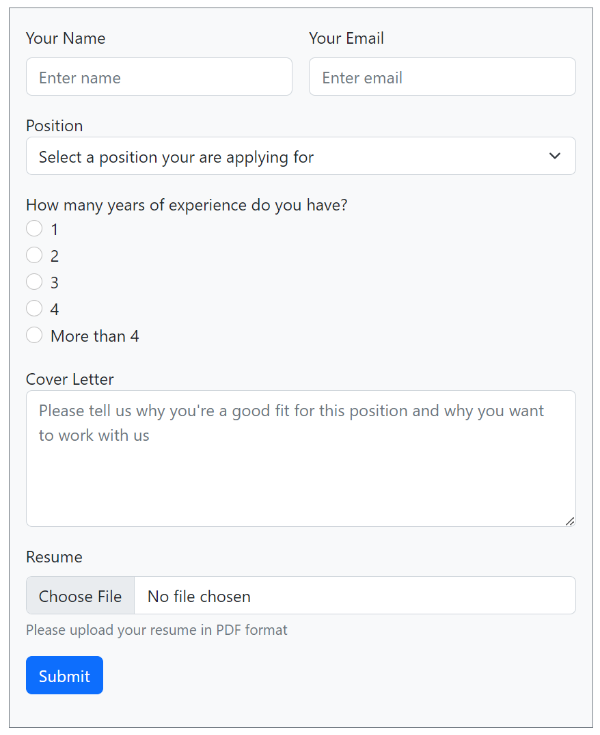
When you execute the above code on your browser, you will get a responsive design as shown in the image below. It will give you a different view on desktop and mobile.
Desktop View of Job Application Form
On the desktop, you will get your Name and Email input field in the same row. However, the other fields is added in the next single row to help applicants enter their data.
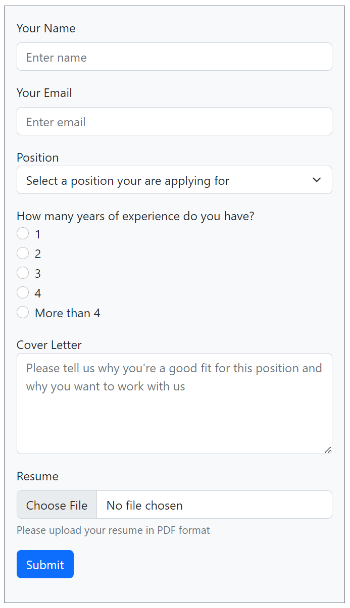
Mobile Responsive View of Job Application Form
Now, open the above HTML code on your mobile phone browsers. You will get the mobile view as shown in the image below. The email field automatically get moved to the next row to get full width view on mobile for responsiveness.
You can also check the design on other devices like tablets and iPhones to get the real responsive design view on them.
Explanations of Bootstrap 5 Classes in the above Code
Let’s find out some uses of Bootstrap 5 classes using in the above code whose explanations as given below:-
container: It is the main box where the main content of the form code will come.row: Create a 12-column row to define 12 grid columns in Bootstrap.col-md-6: covers half of the total 12 column grid in Bootstrap.offset-md-3: Move your div 3 columns ahead in 12 column grid using Bootstrap offset class.mt-3: Give margin-top CSS with this pre-defined Bootstrap margin CSS class. It means margin-top with 3em as its value.bg-light: If you want to give light background color to the div element, you can use this predefined background class.p-3: Add padding to the element using the Bootstrap padding class. It means 3em padding to the specified element.border: To give borders to the element using Bootstrap prefined border class.border-secondary: It is the contextual predefined class to give secondary color to the border of the element.g-3: If you want to give column padding or gaps among columns, you can use this gutter class of Bootstrap. It gives 3em padding to the columns.form-label: If you want to define the label for an input field, you can add this class to the label tag.form-control: To create a beautiful form element, you can use form Bootstrap class.col-md-12: Covers the full of the total 12 grid columns in Bootstrap.form-select: Add this class to the select field to change its appearance using Bootstrap.form-check: To creae a radio button using Bootstrap class.form-check-input: Add radio button input field using Bootstrap.form-check-label: Use this class to add a label for the radio input field using Bootstrap.btn: It defines the button element using Bootstrap.btn-primary: It is the contextual class for button in Bootstrap to give color to the button.
Now, you know all the Bootstrap classes uses with explanations. Let’s find out how to send form data via email.
Step 2: Get Data with Email and File Validation and Send Emails Using PHP
You cannot say a job application form is complete without sending emails of submissions. To send emails from your form, you will have to add some PHP code as given below.
The below code restricts users to upload only PDF file format. It also allows users to upload files with a size maximum of up to 2 MB. Also, create a folder with the name uploads/ in the base location to make the below code work.
The code first collects the form data using $_POST a global variable on submission. After that, it validates the email address and file in the specified format and size.
|
1 2 3 4 5 6 7 8 9 10 11 12 13 14 15 16 17 18 19 20 21 22 23 24 25 26 27 28 29 30 31 32 33 34 35 36 37 38 39 40 41 42 43 44 45 46 47 48 49 50 51 52 53 54 55 56 57 58 59 60 61 62 63 64 65 66 67 68 69 70 71 72 73 74 75 76 77 78 79 80 81 82 83 84 85 86 87 88 |
<?php if(isset($_POST['submit'])){ //Get form data $name = $_POST['name']; $email = $_POST['email']; $position = $_POST['position']; $experience = $_POST['experience']; $cover = $_POST['cover']; //validation for email $email_exp = '/^[A-Za-z0-9._%-]+@[A-Za-z0-9.-]+\.[A-Za-z]{2,4}$/'; if (!preg_match($email_exp, $email)) { ?> <div class="alert alert-danger alert-dismissible fade show"> <strong>The Email address you entered is not valid.</strong> <button type="button" class="btn-close" data-bs-dismiss="alert" aria-label="Close"></button> </div> <?php exit; } //Get uploaded file data using $_FILES array $tmp_name = $_FILES['file']['tmp_name']; // get the temporary file name of the file on the server $filename = $_FILES['file']['name']; // get the name of the file $filesize = $_FILES['file']['size']; // get size of the file for size validation $filetype = $_FILES['file']['type']; // get type of the file $fileerror = $_FILES['file']['error']; // get the error (if any) //validate form field for attaching the file if($fileerror > 0) { ?> <div class="alert alert-danger alert-dismissible fade show"> <strong>Upload error or No files uploaded.</strong> <button type="button" class="btn-close" data-bs-dismiss="alert" aria-label="Close"></button> </div> <?php exit; } // Upload attachment file if(!empty($_FILES["file"]["name"])){ // File path config $targetDir = "uploads/"; $fileName = basename($filename); $targetFilePath = $targetDir . $fileName; $fileType = pathinfo($targetFilePath,PATHINFO_EXTENSION); // Allow certain file formats $allowTypes = array('pdf'); if(in_array($fileType, $allowTypes)){ // Check file size if ($filesize > 2000000) { ?> <div class="alert alert-danger alert-dismissible fade show"> <strong>File size should be less than 2MB.</strong> <button type="button" class="btn-close" data-bs-dismiss="alert" aria-label="Close"></button> </div> <?php exit; }else{ // Upload file to the server if(move_uploaded_file($tmp_name, $targetFilePath)){ $uploadedFile = $targetFilePath; }else{ ?> <div class="alert alert-danger alert-dismissible fade show"> <strong>Sorry, there was an error uploading your file.</strong> <button type="button" class="btn-close" data-bs-dismiss="alert" aria-label="Close"></button> </div> <?php exit; } } }else{ ?> <div class="alert alert-danger alert-dismissible fade show"> <strong>Sorry, only PDF files are allowed to upload.</strong> <button type="button" class="btn-close" data-bs-dismiss="alert" aria-label="Close"></button> </div> <?php exit; } } ?> |
You can send the collected job application form data using PHPMailer Gmail SMTP. It is a simple way that require less code to send form data via email in PHP. The codes given below are self-explained using the comments in them. So, you can easily understand every line of code given below.
It requires you to use the PHPMailer library of PHP which you can download with the button given below. You have to download and extract it in the base location where you have placed your main PHP index.php file.
You just have to change the Gmail email addres with app password in the below code. Also, change the [email protected] with the email address of the recipient with name. When everything goes ok, it triggers and email to the recipient will get an email containing the applicant’s submitted form data.
|
1 2 3 4 5 6 7 8 9 10 11 12 13 14 15 16 17 18 19 20 21 22 23 24 25 26 27 28 29 30 31 32 33 34 35 36 37 38 39 40 41 42 43 44 45 46 47 48 49 50 51 52 53 54 55 56 57 58 59 60 61 62 63 64 65 66 |
<?php //If everything above is ok then move further //Use PHPmailer require "phpmailer/PHPMailerAutoload.php"; $mail = new PHPMailer; //Mailbody to send in email $mailbody = '<p><b>Applicant details:-</b></p> <p><b>Name:</b> '.$name.'</p> <p><b>Email:</b> '.$email.'</p> <p><b>Position Applying For:</b> '.$position.'</p> <p><b>Years of Experience:</b> '.$experience.'</p> <p><b>Cover Letter:</b> '.$cover.'</p>'; //Sender email address $mail->isSMTP(); // Set mailer to use SMTP $mail->SMTPDebug = 0; //See errors, change it to 4 $mail->Host = 'smtp.gmail.com'; // Specify main and backup SMTP servers $mail->SMTPAuth = true; // Enable SMTP authentication $mail->Username = $sender; // SMTP username $mail->Password = 'yourgmailapppassword';// Gmail SMTP password $mail->SMTPSecure = 'tls'; // Enable TLS encryption, `SSL` also accepted $mail->Port = 587; // TCP port to connect to $mail->setFrom($email, $name); //$mail->addAddress('[email protected]'); //add more recipient (optional) $mail->addReplyTo($email, $name); //$mail->addCC('[email protected]'); //$mail->addBCC('[email protected]'); //Add attachment if(is_array($_FILES)) { $mail->AddAttachment($uploadedFile, $fileName, 'base64', 'mime/type'); } $mail->isHTML(true); // Set email format to HTML $mail->Subject = 'Job Application Form Submitted by '.$name; $mail->Body = $mailbody; //$mail->AltBody = 'This is the body in plain text for non-HTML mail clients'; //Email your job form data with an attachment using Gmail SMTP with PHPMailer if(!$mail->send()){ ?> <div class="alert alert-danger alert-dismissible fade show"> <strong>Message could not be sent. Please try again.</strong> <button type="button" class="btn-close" data-bs-dismiss="alert" aria-label="Close"></button> </div> <?php echo 'Mailer Error: ' . $mail->ErrorInfo; }else{ ?> <div class="alert alert-success alert-dismissible fade show"> <strong>You job application has been sent successfully.</strong> <button type="button" class="btn-close" data-bs-dismiss="alert" aria-label="Close"></button> </div> <?php //@unlink($uploadedFile); } mysqli_close($conn); } ?> |
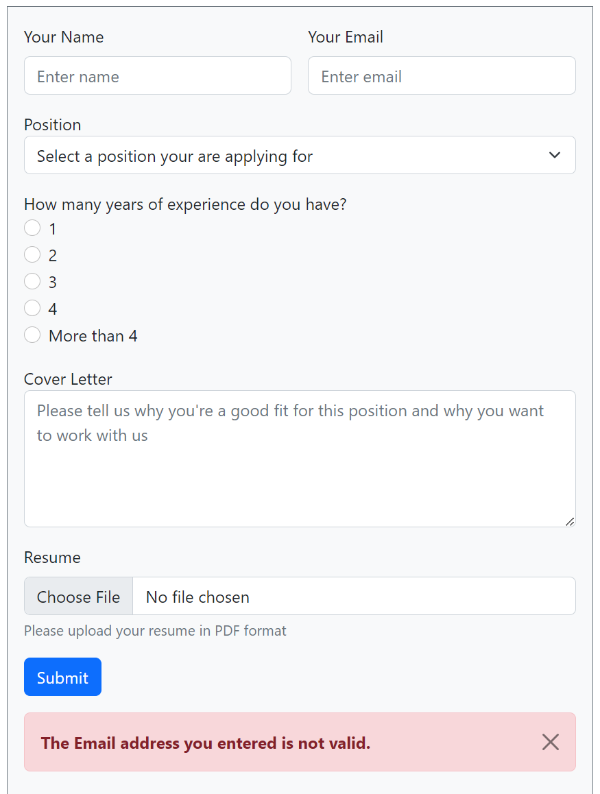
I have added some error and success validation messages to display using Bootstrap design. Below are the screenshots of the error and success messages I have added to the code.
Email Validation Bootstrap Error Message
When there is some error present in the applicants input data, it display an error message in the format shown below.
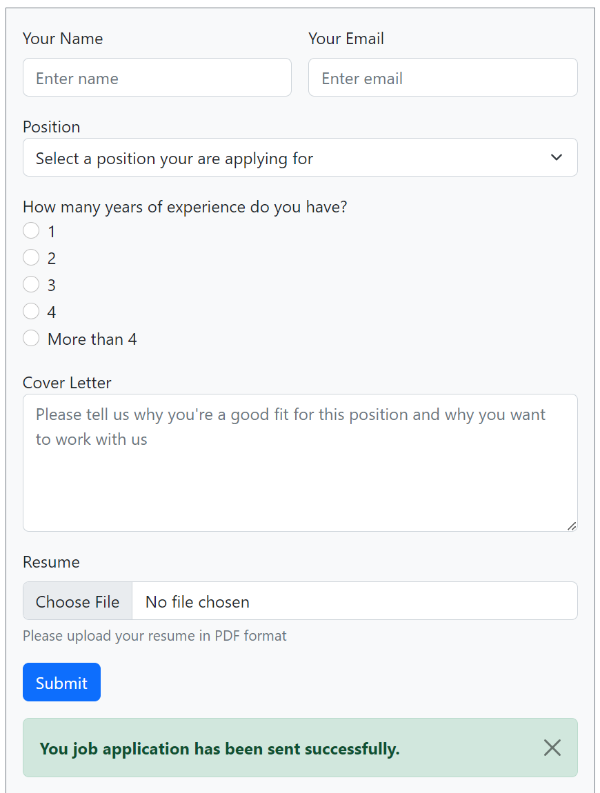
Email Sent Bootstrap Success Message
When everything is correct in the form, it successfully send an email and displays success message as shown below.
The above PHP code is self-explanatory as it is well-commented to explain each line of code. However, if you want to learn the code with more explanations of sending emails code, I am going to add some more explanations below.
So, now you know how to create a responsive job application form in Bootstrap. You also know how to send emails from your form using PHP.
You May Also Like to Read
- Simple Job Application Form HTML Code with CSS
- How to Create Online Job Application Form with Jotform
- PHP Job Application Form
If you have any queries regarding this post, you can comment below.
